HTML and CSS Basics, part 4: controlling document flow via display property
We can control the document flow via CSS display property
By: Ajdin Imsirovic 13 September 2019
This series of posts is titled HTML and CSS Basics. If you’re just starting out with web development, it is crucial to read and understand this series of posts.
This is the fourth post in this series.
To see all the articles in this series, click here.
In this article, we’ll look at how to use the CSS display property to convert block-level elements into inline elements, and vice-versa. By controlling the way that elements are displayed, we’re effectively controlling the document flow.
Video tutorial on controlling document flow via display property
Here’s a video of this tutorial.
Do you like how I’ve covered this topic in the above video? If so, please like 👍 it. Be a great person and also subscribe 🥰 to the CodingExercises Youtube channel.
Controlling document flow using CSS display property
This article’s first codepen example has the following HTML code:
1
2
3
4
5
6
<h1 class="border1 display-inline">We can control document flow via css display property</h1>
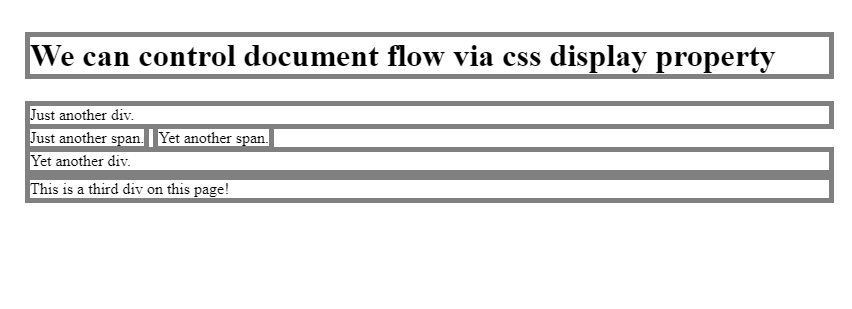
<div class="border1 display-inline">Just another div.</div>
<span class="border1 display-inline">Just another span.</span>
<span class="border1 display-inline">Yet another span.</span>
<div class="border1 display-inline">Yet another div.</div>
<div class="border1 display-inline">This is a third div on this page!</div>
As we can see, we start our HTML structure with two block-level elements, an <h1> and a <div> tag. Their default behavior is to be displayed as block-level elements. Put differently, their CSS display property is set by the browser to the value of block. In other words, modern browsers honor web standards by displaying the <h1> and the <div> elements as block-level elements.
However, as we’ve seen before, we can override this default browser behavior - using CSS (preferrably CSS classes).
With CSS, we can reset the display property from the default behavior to something else.
Let’s see how we do it in our first codepen example.
Switching block-level elements to inline, and vice-versa
Here’s our example’s CSS code:
1
2
.border1 { border: 5px solid gray }
.display-inline { display: inline }
The purpose of the first CSS class, border1, is to give a 5-pixel gray border around any HTML element it is applied to. We’re applying this class to all the HTML elements in our first example, so that we can clearly see what’s happening to all our elements.
The second CSS class in the above code is the display-inline class, with a single property: value pair: display: inline. We could have given this CSS class any name we wanted, such as whatever, or asdf, or querty - literally anything we wanted. But if we were to determine what this class does just from looking at the HTML code where it’s applied as a value of the class attribute, we’d have a hard time figuring it out. Even if we know the meaning behind the weird name we give our CSS classes, our co-workers or anyone else reading our code would have difficulties understanding what’s going on. That’s why the CSS class name of display-inline is probably the best in this scenario.
That’s it for our CSS code. Now we understand what’s happenning in our HTML. We’re overriding the default display property of all the elements in our example, and setting all the elements to display: inline.
Here’s the result of this override in the browser:

To see the original, default, normal document flow, we can simply uncomment the line that sets the display-inline CSS class in our CSS. The updated code now looks like this:
1
2
.border1 { border: 5px solid gray }
/* .display-inline { display: inline } */
Next, let’s wrap this article up by looking at the conclusions.
Conclusions
HTML conclusions:
- We added the
display-inlineclass name to all the elements on this page.
CSS conclusions:
- The HTML class attribute’s value of
display-inlineis targeted by simply adding a dot in front of the class name. - Next, we use the CSS property of
display, and we give it the value ofinline. - This makes all our elements behave like inline elements!
Use the below links to navigate through other tutorials in this guide.
< Back to part 3: CSS element selectors VS class selectors
You are here: Part 4, Controlling document flow via display property

