Rebuild a Todo app using create-react-app
Let's rebuild a todo app so that we better grasp what we've learned so far
By: Ajdin Imsirovic 25 January 2022
Let’s reinforce our learning by rebuilding the Todo app, only this time, we’ll be doing it locally.
Additionally, now that we’ve already gone through the process of building the todo app in React on Codepen, we’ll be able to have an overview of things that we need to do before we do them - it’s a road we’ve already travelled.
Analyzing how we built the app the first time around will help us gain additional valuable insights - thus, when we build another app in one of the next chapters, it’s going to be easier to plan it out and have an idea of how it should work from a high-level perspective.
Table of contents
- Planning our local todo app
- Planning the App component
- Planning the form component
- Planning the todo component
- Generate the boilerplate React app
- Building the structure for all the components
- Adding the static content for all the components
- Adding state using useState
- Inspecting the app in React Devtools
- Adding state to the TodoInput component
- Improving the Todo component with methods from the App component
- Updating the TodoInput component so that it adds todos
- Conclusion
- What to do next?
Planning our local todo app
Before we even start scaffolding our app, let’s look back at what we’ve already built and learn from the experience, so that we can build this second version of our todo app even better.
First, let’s reiterate what we’ve achieved in the previous chapter.
We’ve built the following separate components:
- The parent component (
App) - The form component (
TodoInput) - The single todo component (
Todo)
Let’s discuss and plan each component based on what we already know about them.
Planning the App component
The App component holds the initial data array for the starting todos. Each object in the data array comes with two properties:
textisDone
The App component’s state is controled with useState: [todos, setTodos].
The App component comes with its own two methods:
markTodoDonedeleteTodo
Both of these methods work with the todos useState variable to update or manipulate it in some way. Both of these methods achieve this goal with the use of setTodos() method.
In the App component’s return statement, we’re effectively doing two crucial things:
- We’re looping over the
todosstate, and for each member of thetodosarray, we’re rendering a singleTodoelement. - We’re also using a single
TodoInput(form component), whose sole purpose is to allow for adding a todo.
Whew, this explanation of what the App component does is a bit long-winded. Let’s try being more succint.
App component:
- accepts props: none
- state set and manipulated with:
[todos, setTodos] - initial state set with:
useState(data)(wheredatais an array of objects, each holding two properties:text,isDone) - own methods:
markTodoDone,deleteTodo, using[todos, setTodos]useStatevariables for state updates - returns:
- maps over
todos, rendering aTodocomponent on eachtodosmember - displays
TodoInput, passing itsetTodosandtodosprops (state props)
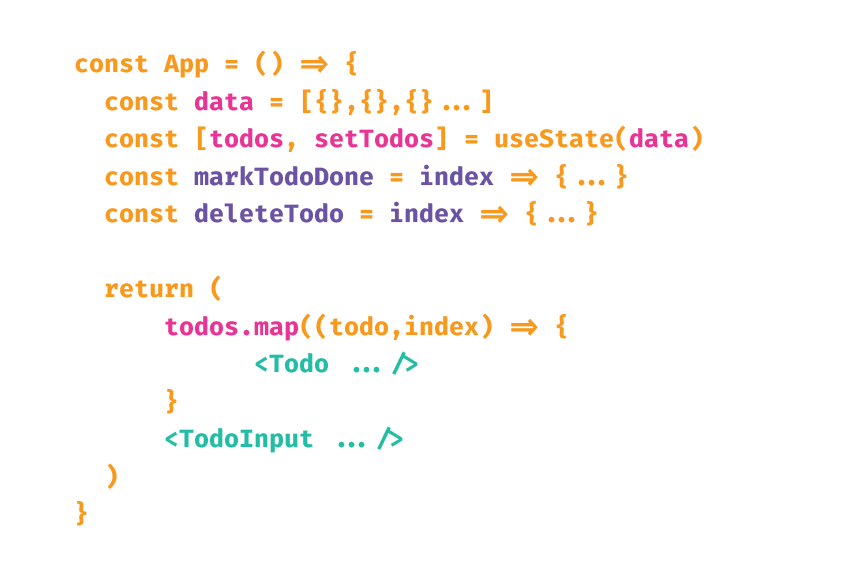
- maps over
Here’s a simplified diagram of the App component’s code:
Planning the form component
The TodoInput component:
- accepts
props:setTodos,todos(App component’suseStatevariables) - state:
- internal:
userInput,setUserInput - external:
todos,setTodos
- internal:
- initial state set with:
useState("")(that’s why the input is initially empty) - own methods:
handleSubmit, using[userInput, setUserInput]useStatevariables for state updates - returns:
- a
formelement listening to theonSubmitsynthetic event and runninghandleSubmitown method- an
inputelement whosevalueis set touserInputand that listens to theonChangesynthetic event and runs thesetUserInputstate-updating method
- an
- a
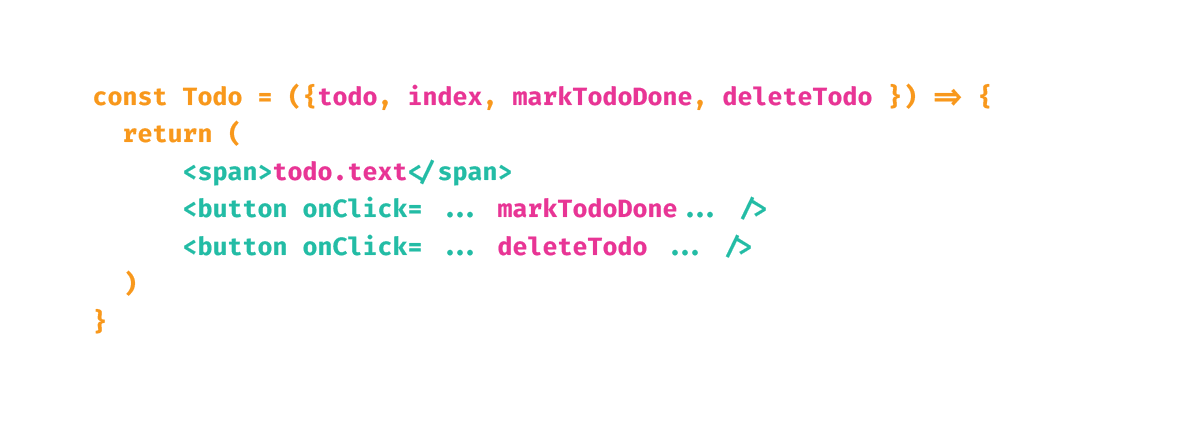
Here’s a simplified diagram of TodoInput’s code:

Planning the todo component
The Todo component:
- accepts
props:index,todooftodos,markTodoDone(a method inApp),deleteTodo(a method inApp)- effectively, this means we’re using the following props in
TodoInput:props.todo.isDoneprops.todo.textprops.markTodoDoneprops.index(comes from the built-in second argument to themapJS array method)props.deleteTodo
- effectively, this means we’re using the following props in
- state:
- internal: none
- external: updates its parent’s (
Appcomponent’s) state through the invocation ofmarkTodoDone()anddeleteTodo()methods (which use thesetTodos()method to control state)
- own methods: none
- returns:
- An
liholding thetodo.textstring value (and styled based on the boolean value stored intodo.isDone) - A
buttonwith theonClicksynthetic event running themarkTodoDone()parent’s method - Another
buttonwith theonClicksynthetic event running thedeleteTodo()parent’s method
- An
Now that we have a detailed description of what each component needs to have and how each component needs to behave and interact with the app as a whole, let’s review it as a diagram, before building a brand new boilerplate React app.
Generate the boilerplate React app
We’ve already done this in the Build create-react-app chapter so to begin, just follow the instructions in that chapter. Obviously, we’re changing our app’s name from simplest2 to something else, like todo-chapter-11.
Once our app is running, it’s time for some house-keeping, namely, to remove everything we don’t need.
We’ll start by updating the App.js file to this:
1
2
3
4
5
6
7
8
9
function App() {
  return (
    <div className="App">
      <h1>Todo app in construction...</h1>
    </div>
  );
}

export default App;
We’ll erase all the contents from index.css, and App.css, leaving just empty files.
We’ll slim down index.js too:
1
2
3
4
5
6
7
8
9
10
import React from 'react';
import ReactDOM from 'react-dom';
import App from './App';

ReactDOM.render(
  <React.StrictMode>
    <App />
  </React.StrictMode>,
  document.getElementById('root')
);
The outcome of the above changes is that we only get a single h1 element on the screen that reads: Todo app in construction..., styled only with the default browser styles.
Just like in the previous chapter, we’ll keep the CSS in the app to the bare necessary minimum.
Alright, now’s the time to build our app.
Different from the first time we built the todo app in the previous chapter, this time we’ll take a high-level approach, and code everything in “batches”.
In the first “batch”, we’ll build all the components, but they will all be static. Let’s start.
Building the structure for all the components
First off, in our app’s ./src folder, let’s add another folder and name it components.
Inside the components folder, let’s add the two components our todo app needs:
TodoInput.jsTodo.js
Let’s just render the bare minimum for now.
In TodoInput.js:
1
2
3
4
5
6
7
import React from "react"

export default function TodoInput() {
    return (
        <h2>This is the TodoInput component</h2>
    )
}
In Todo.js:
1
2
3
4
5
6
7
import React from "react"

export default function Todo() {
    return (
        <h2>This is the Todo component</h2>
    )
}
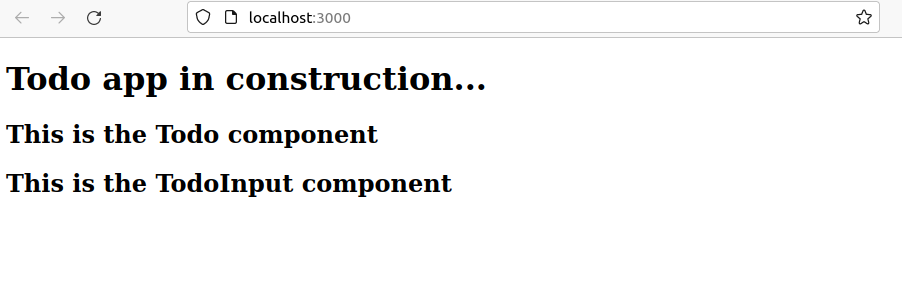
Back in App.js, we’ll import and use our new components:
1
2
3
4
5
6
7
8
9
10
11
12
13
14
15
import React from "react"
import TodoInput from "./components/TodoInput"
import Todo from "./components/Todo"

function App() {
  return (
    <div className="App">
      <h1>Todo app in construction...</h1>
      <Todo />
      <TodoInput />
    </div>
  );
}

export default App;
The update in the browser now looks like this:
Adding the static content for all the components
Now that we know our nested components are being properly served, we can add all the static content to them, as follows.
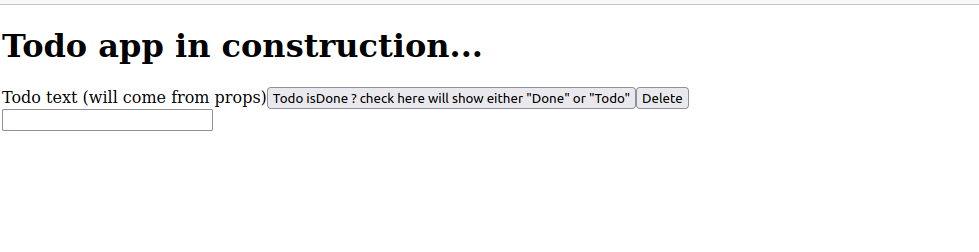
First, let’s update Todo.js to this:
1
2
3
4
5
6
7
8
9
10
11
12
13
14
15
16
17
import React from "react"

export default function Todo() {
  return (
    <li>
      <span>
        Todo text (will come from props)
      </span>
      <button onClick={() => alert("Add the markTodoDone method call here")} >
        Todo isDone ? check here will show either "Done" or "Todo"
      </button>
      <button onClick={() => alert("Add the deleteTodo method call here")} >
        Delete
      </button>
    </li>
  )
}
Next, let’s update TodoInput.js to this:
1
2
3
4
5
6
7
8
9
10
11
12
13
14
15
16
17
18
import React from "react"

export default function TodoInput() {

    const handleSubmit = () => {
        alert("Update the props.todos with new text from user")
    }
    return (
        <form onSubmit={handleSubmit} >
          <input
            className="add-todo"
            type="text"
            value=""
            onChange={ () => alert("Update the local state here") }
          />
        </form>
    )
}
The updated app now looks like this:
Clicking the Todo isDone... button will update the screen to this:
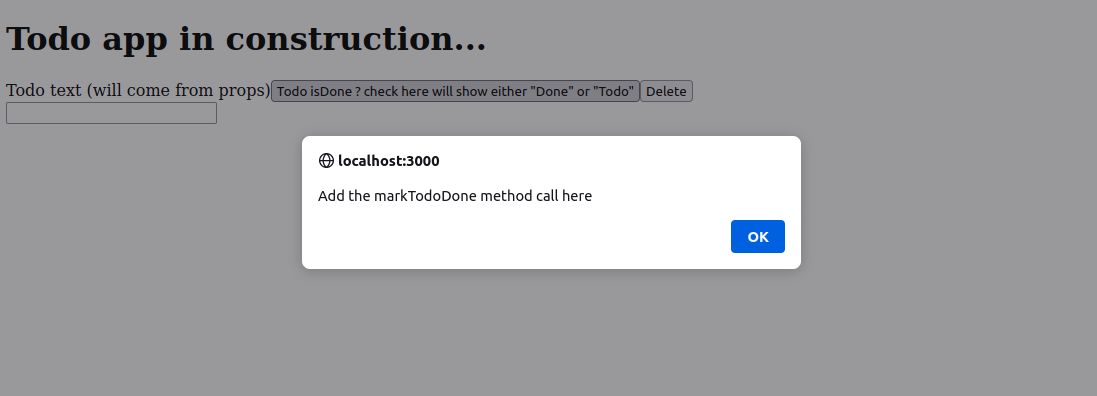
Clicking the Delete button shows another alert:

Finally, typing into the input field shows yet another alert:
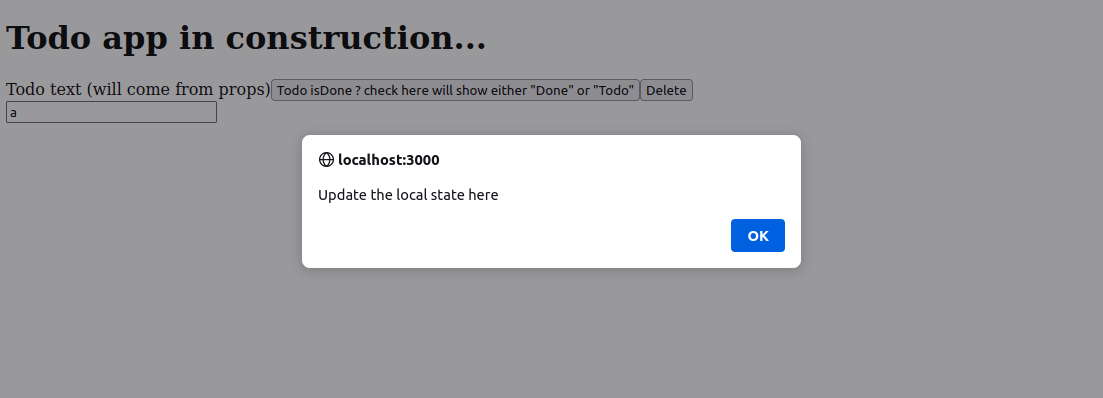
Obviously, the todo text currently is just a hard-coded value.
This is as far as we could take our app with static HTML content and a few alert() calls inside synthetic events’ anonymous callback event-handling functions.
Next, we’ll add the state to all our components, with the help of the useState hook.
Adding state using useState
There are several places where we need to add state:
- In
App.js, we will track thetodosstate, which will come from the initialdataarray of objects - In
TodoInput.js, we will use the above-mentioned global state, but it will also have its ownuserInputstate. - In
Todo.js, we’ll use the globaltodosstate fromApp.js
Let’s start by adding the data array to App.js, and follow it up by defining the state using the useState hook. To avoid getting the 'useState' is not defined error, we need to extend our imports in App.js with:
import React, { useState } from "react";
Still in App.js, we’ll continue with updates:
1
2
3
4
5
6
7
8
9
10
11
12
13
14
15
16
function App() {

  const data = [
    { text: "Go shopping", isDone: false },
    { text: "Wash dishes", isDone: false },
    { text: "Study for the exam", isDone: false }
  ]

  const [todos, setTodos] = useState(data);

  return (
    // ... unchanged code here ...
  );
}

export default App;
Now that we have the initial array of data, we can use the map() method to loop over it:
1
2
3
4
5
6
7
8
9
10
11
12
13
14
15
16
17
18
19
20
function App() {

  // ... unchanged code here ...

  return (
    <div className="App">
      <h1>Todo app in construction...</h1>
       {
          todos.map(
            (todo, index) => (
              <Todo todo={todo} key={index} />
            )
          )
       }
      <TodoInput todos={todos} setTodos={setTodos} />
    </div>
  );
}

export default App;
Note the funny formatting on the todos.map line; it’s due to the specific way that the JSX syntax works - “spelling it out” like this makes for easier-to-understand code, which is important at this level, as we’re still in the early learning stages and it helps to take things one step at a time.
Now that we’re passing props to the nested components inside App.js, we need to “catch” the props object in each of the two actual nested components’ files, as follows.
We’ll update the Todo.js to accept the props object coming in from App.js, and for now, we’ll use the props object’s todo object’s text property in a single place, the span element:
1
2
3
4
5
6
7
8
9
10
11
12
13
14
15
16
17
18
import React from "react"

export default function Todo(props) {
  console.table(props);
  return (
    <li>
      <span>
        { props.todo.text }
      </span>
      <button onClick={() => alert("Add the markTodoDone method call here")} >
        Todo isDone ? check here will show either "Done" or "Todo"
      </button>
      <button onClick={() => alert("Add the deleteTodo method call here")} >
        Delete
      </button>
    </li>
  )
}
Wonderful! We’re getting our data to appear. By mapping over it, we’re repeating the Todo component three times.
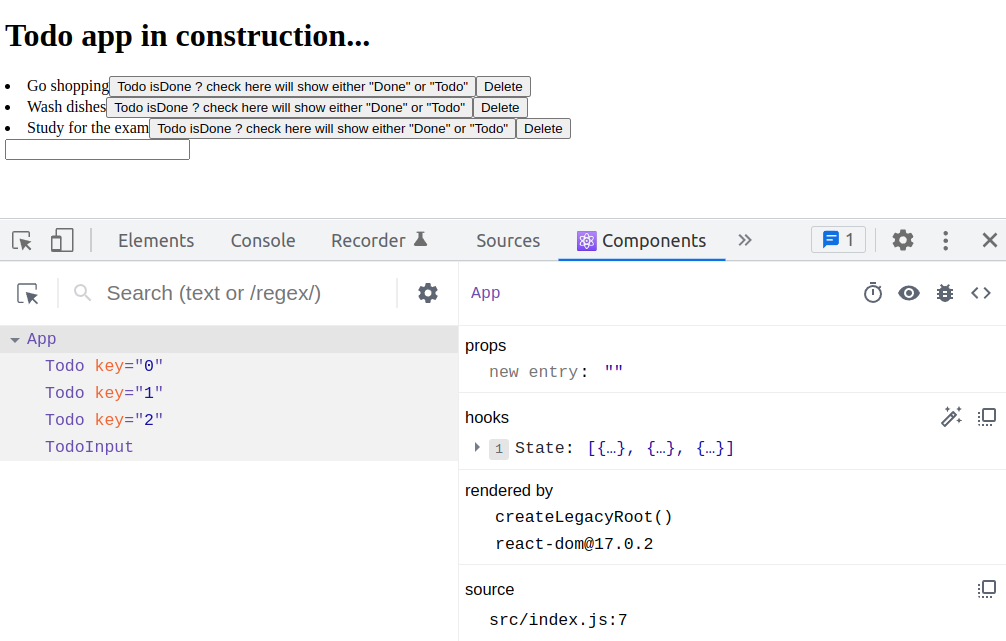
Let’s inspect the current state of things in React Devtools.
Inspecting the app in React Devtools
Here’s a screenshot of the initial Components tab once we open the app in the browser after the recent updates.
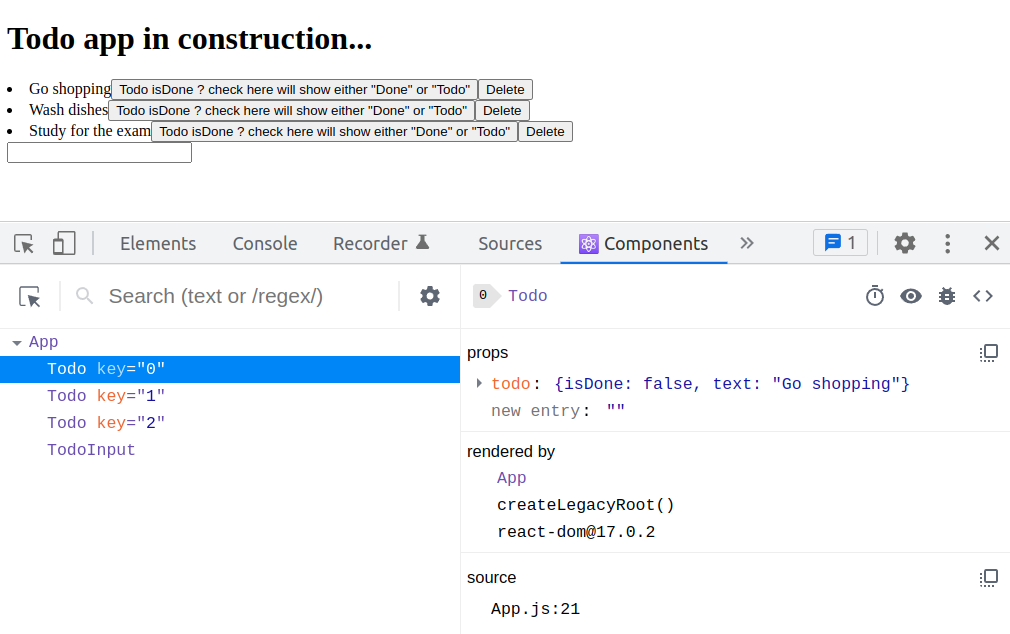
Clicking on the first Todo component inside the App component in React devtools updates the data to this:
Adding state to the TodoInput component
Next, we can continue adding state by updating TodoInput.js. We’re already sending the todos and setTodos state from App.js to the TodoInput component, so let’s update the TodoInput.js to this:
1
2
3
4
5
6
7
8
9
10
11
12
13
14
15
16
17
18
19
import React, { useState } from "react"

export default function TodoInput(props) {

    const handleSubmit = (evt) => {
        evt.preventDefault();
        console.log('Ran handleSubmit', props)
    }
    return (
        <form onSubmit={handleSubmit} >
          <input
            className="add-todo"
            type="text"
            value=""
            onChange={ evt => console.log(evt.target.value) }
          />
        </form>
    )
}
We’re barely scratching the surface here. But at least our TodoInput component is accepting the props object from the parent and it throws errors.
Let’s bring our focus back to completing the Todo component, by passing it additional props to handle the marking a todo as complete and deleting a todo.
Improving the Todo component with methods from the App component
We need to have the ability to mark todos as complete and to delete them.
To begin, we’ll update the App.js file to this:
1
2
3
4
5
6
7
8
9
10
11
12
13
14
15
16
17
18
19
20
21
22
23
24
25
26
27
28
29
30
31
32
33
34
35
36
37
38
39
40
41
42
// ... unchanged code ...

function App() {

  // ... unchanged code ...

  const markTodoDone = (index) => {
    // console.log(index); <--- no need to use this, we can inspect it in devtools
    const updatedTodos = [...todos];
    updatedTodos[index].isDone = !updatedTodos[index].isDone;
    setTodos(updatedTodos);
  }

  const deleteTodo = (index) => {
    // console.log(index); <--- no need to use this, we can inspect it in devtools
    const updatedTodos = [...todos];
    updatedTodos.splice(index, 1);
    setTodos(updatedTodos);
  }

  return (
    <div className="App">
      <h1>Todo app in construction...</h1>
       {
          todos.map(
            (todo, index) => (
              <Todo
                todo={todo}
                key={index}
                index={index}
                markTodoDone={markTodoDone}
                deleteTodo={deleteTodo}
              />
            )
          )
       }
      <TodoInput todos={todos} setTodos={setTodos} />
    </div>
  );
}

export default App;
Back in Todo.js, here’s the updated code:
1
2
3
4
5
6
7
8
9
10
11
12
13
14
15
16
17
18
import React from "react"

export default function Todo(props) {
  // console.table(props); <--- no need to use this, we can inspect it in devtools
  return (
    <li>
      <span style={{ opacity: props.todo.isDone ? "0.4" : "1" }}>
        {props.todo.text}
      </span>
      <button onClick={() => props.markTodoDone(props.index)} >
        { props.todo.isDone ? "Done" : "Todo"}
      </button>
      <button onClick={() => props.deleteTodo(props.index)} >
        Delete
      </button>
    </li>
  )
}
This update allows us to delete and/or toggle the isDone boolean on each individual todo.
All we have left to do is to make the input element work, and this is probably the most “difficult” part of the entire app.
Updating the TodoInput component so that it adds todos
Now’s the time to update the TodoInput component.
First, let’s add destructure the props object and set the component’s internal state:
1
2
3
4
5
6
7
import React, { useState } from "react"

export default function TodoInput({todos, setTodos}) {

  const [userInput, setUserInput] = useState("");

  // ...
Next, let’s update the handleSubmit() method:
1
2
3
4
5
6
7
8
const handleSubmit = evt => {
    evt.preventDefault();
    if (!userInput) return;

    let text = userInput;
    setTodos([...todos, { text }]);
    setUserInput("");
}
Finally, let’s improve the return statement:
1
2
3
4
5
6
7
8
9
10
return (
    <form onSubmit={handleSubmit}>
        <input
            className="add-todo"
            type="text"
            value={userInput}
            onChange={(evt) => setUserInput(evt.target.value)}
        />
    </form>
);
With this, we have successfully rebuilt our todo app in a local environment.
Conclusion
In this chapter, we’ve once again built a todo app in React.
We’ve taken a birds-eye view of the process, which can be summed up in the following steps:
- Build a brand new app using
create-react-appand remove redundant code - Add the
./src/components/folder and the nested components needed for the app; include the nested components inside theAppcomponent. - Add as much of the static JSX content as is possible (to all the components).
- Add state to
AppandTodoInput, “borrow” external state inTodo. - Pass the relevant props from
ApptoTodoInputandTodo. - Manipulate state in
TodoInputandTodousing the passed-in props. - Optional: Refactor the app to use ES6 arrow functions everywhere (we haven’t done this step in this tutorial).
Great, our app is finished.
What to do next?
There are plenty of ways to improve our todo app:
- Adding the possibility to add multiple todo apps
- Add multiple “owners” and users to the multiple todo apps functionality, including RBAC (role-based access control)
- Add tags to individual todos
- Add the drag and drop functionality to each of the todo lists
There’s always plenty more that we can do and learn, but for now, this brings us to the end of the React from Scratch book.

