An In-Depth Introduction To Start Coding in PHP Today
Read this article to learn enough PHP to start programming in it
By: Ajdin Imsirovic 31 January 2019
PHP is a must-know language, if you want do any significant work on the web.
In this post, we’ll be learning PHP from the very beginning.
By the end of this post, you should have a solid understanding of PHP basics, so you can take your skills to the next level and build an actual project in PHP.

Introduction: Installing PHP?
Rather than going into PHP’s history, let’s dive right in.
When you first start our with PHP, it might be a bit of a difficulty to install it on your machine.
Luckily, with the rise of online IDE’s, we don’t have to install it on our computer.
A service that provides a full container for a PHP environment to execude code in is called PaizaCloud.
One great benefit of PaizaCloud is that it provides a fully working container that is available to users for 4 straight hours - which makes it great for learning.
So, sign up and let’s get started!
Alternatively, you can use a Korean-based IDE, Goorm. Some of the text is in Korean too, but with Chrome’s translate option, you should be able to get by easily.
One nice thing about Goorm is that the interface reminds of Cloud9, a popular IDE that was acquired by Amazon a few years ago.
Since Goorm’s interface seems to be more user-friendly, in the rest of this tutorial, we’ll be using Goorm.
Understanding the Basics that Most Tutorials Gloss Over
Before we even begin working with PHP, we need to define a few things. In most tutorials, even beginner ones, these foundational concepts are usually glossed over, and that means lack of understanding.
If you don’t understand the very basics, it’s gonna be more difficult to understand more advanced concepts.
So let’s cover the basics first:
- What is a variable in PHP?
- How does a variable get updated (variables and operators in PHP)
- Introduction to PHP functions
- URLs, GET parameters, and HTTP requests
- Object-Oriented Programming in PHP
- What is an Object in PHP?
- Attributes and Methods, and why they’re class-specific
- Accessing Public, Private, and Protected Attributes and Methods
- Modularity, Encapsulation, Inheritance, and Polymorphism
- MVC pattern in PHP: the Model, the View, and the Controller
The first thing we need to understand is the concept of a variable.
What Is A Variable?
A variable is just a label that points to a place in memory. This place in memory stores a certain piece of data. Each piece of data has a data type.
Here are the data types in PHP:
- integer
- double
- string
- NULL
- boolean
- array
- object
- resource (not really a data type, but close)
A variable name begins with a $ sign. Very often, it is followed by an assignment operator.
For example:
$someString = "qwertyasdf";The above variable is named $someString. It holds the value of "qwertyasdf". The data type of this value is string.
Another example:
$anInteger = 100;The above variable, $anInteger, holds the value of 100. The data type of this value is integer.
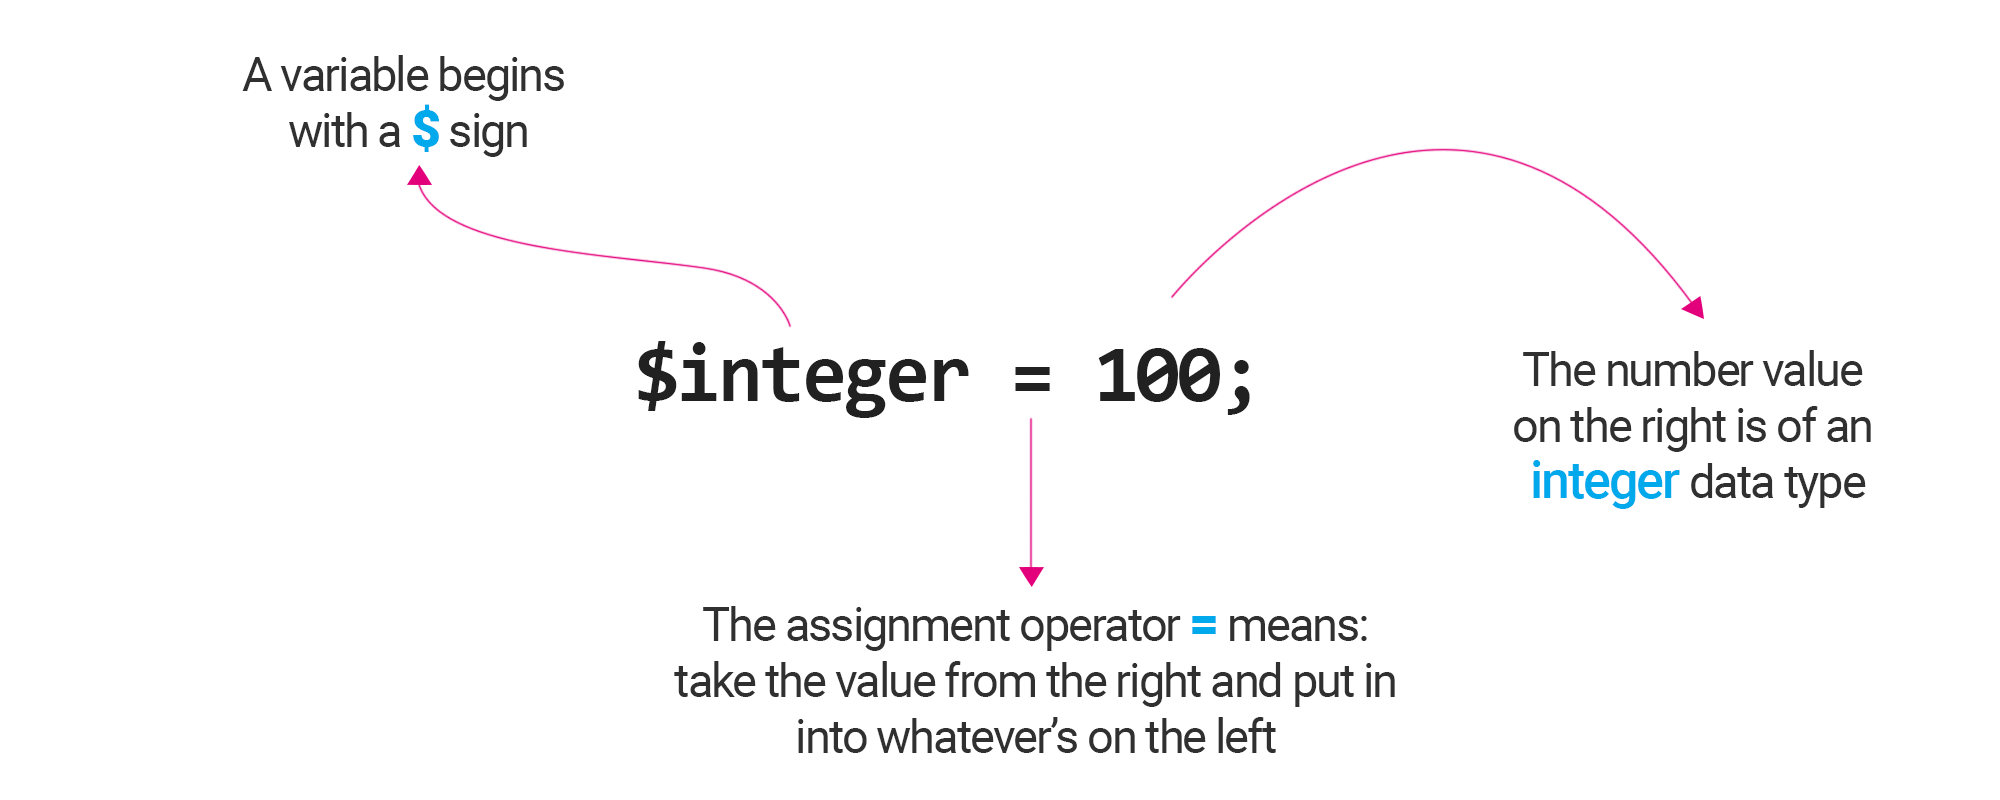
Image: Variable assignment in PHP
Introduction to PHP functions
A function is like a machine.
I have written an in-depth tutorial that explains this concept perfectly. If you are at all unsure how functions work, I strongly recommend you read the article here. Even though the tutorial is aimed at functions in JavaScript, the first half of the article translates very well to the use of functions in PHP, and I cannot emphasize enough the importance of you reading the mentioned article.
To define a function in PHP, we use the function keyword, followed by a function name, followed by a pair of round brackets. The function body is then added inside a pair of curly brackets, {}:
function nameOfTheFunction() {
    // here is the code of the function
}
To call a function in PHP (i.e to “run” the function), we use the following syntax:
nameOfTheFunction();Here is a practical example in which we both define and call a function in PHP:
function sayHello() {
    echo "<h1>Hello</h1>";
}
sayHello();
To define “inputs” that a function should expect, we use the following syntax in a function definition:
function itTakesOneInput($oneInput) {
    // code for function
}
To actually give “inputs” to a function when we call it, we use this syntax:
itTakesOneInput("just a string of characters");A practical example could be code that looks like this:
function printMyFavoriteColor($color) {
    echo "<h1>My favorite color is $color</h1>";
}
printMyFavoriteColor("blue");
In a function definition, the “inputs” that it is defined to be working with, are called “parameters”.
In a function call, the “inputs” that it actually receives, are called “arguments”.
We can also pass more than one argument to a function, like this:
function myFavoriteLanguageAndColor($language, $color) {
    echo "My favorite language is $language and my favorite color is $color";
}
myFavoriteLanguageAndColor("PHP", "blue");
Sometimes, functions need to return values instead of just printing them to the screen.
You need to use the return keyword to “explain” to a function that it should return a value.
Here’s an example:
function returnMyFavoriteLanguage($language) {
    return $language;
}
returnMyFavoriteLanguage("PHP");
How does a variable get updated (variables and operators in PHP)
Look at this example:
$anInteger = $anInteger + 1;How would you read the above code?
Let’s imagine we’re talking to the computer with our code. More specifically, we’re “talking” to the PHP parser. What we are telling PHP with the above code is:
“Hey PHP, take the current value that is held inside the $anInteger variable, and add 1 to it.”
The way that the parser executes the above code is as follows:
- It evaluates the expression:
$anInteger + 1. The result of this evaluation is100 + 1, thus the result is101. - It then takes the value of
101, and assigns it as the new, updated value of the$anIntegervariable.
Here is another, more technical way to explain the above code:
$anIntegeris a variable that holds a value- The equals sign,
=, is an operator. Operators are special functions that take two inputs. The first input is the one on the right of the=operator. It can be an expression or a value. Once the expression is evaluated to a certain value, the=operator takes that value and sets it as the new value of the variable that is placed on the left side of the=operator. The=operator is also called the assignment operator, because it assigns the value from its right side, to the variable on its left side. That’s why we say that the=operator is “right-associative” - because it works from right to left.
Image: The assignment operator is right associative
Another example of an operator is the + operator, used for addition. Thus, we might say:
$firstNum = 1;
$secondNum = 2;
$firstNum + $secondNum;
The plus operator takes two inputs, $firstNum and $secondNum, and returns a value of adding them together.
Next, we’ll discuss some more abstract terms, related to object-oriented programming in PHP.
How to assign default values to a function
Sometimes you need to define a function with a default parameter. That way, it the function doesn’t get passed a certain argument when it gets called, it still works because we gave it a default parameter when we defined it:
function alwaysPrintAName($name = "John Doe") {
    echo "This person's name is $name."
}
alwaysPrintName(); // will return: "This person's name is John Doe."
If a function actually does get passed an argument when it’s called, than that argument will override the default parameter that was specified in the function definition, like this:
function alwaysPrintAName($name = "John Doe") {
    echo "This person's name is $name."
}
alwaysPrintName("Jane Doe"); // will return: "This person's name is Jane Doe."
We are now ready to build our first little app, and learn about how HTML forms work with PHP.
URLs, GET parameters, and HTTP requests
Let’s log into Goorm online IDE and create a new PHP file. We’ll call it index.php.
Inside index.php, we’ll add this HTML code:
<html>
	<head>
		<title>My first PHP app</title>
	</head>
	<body>
		<div>
			<h1>My first PHP app</h1>
			<form>
				<input name="firstName">
				<select name="action">
					<option value="is">is</option>
					<option value="isn't">isn't</option>
					<option value="likes">likes</option>
				</select>
				<select name="quality">
					<option value="beer">having beer</option>
					<option value="sleeping">sleeping</option>
					<option value="walking">walking</option>
				</select>
				<input type="submit" name="submit" value="submit">
			</form>
		</div>
	</body>
</html>
Next, highlight over the Run dropdown in the second navigation bar inside Goorm IDE, and press the new run php command. This will start our container’s server.
Next, click the Project menu item on the main menu, and click the Running URL and Port command.
In the modal that opens, you’ll see a table with a For run entry. To it’s right, there’s a URL entry. Copy the URL and open a new tab in Chrome, then paste in the copied URL.
This is the screen that will appear:
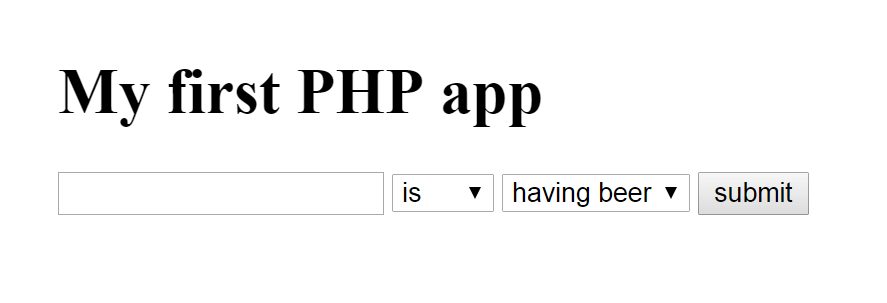
Image: HTML-only app output
What happens when we click the submit button?
When we click the submit button, the browser is taking the values we entered in the input fields, and it makes an HTTP request to the server.
The form data is going into the URL itself. This is what’s called a GET request, because you’re trying to GET some information from the server.
At this point, let’s try simply clicking the submit button without actually updating any fields in our form.
Once we’ve clicked submit, there will be new information added inside the browser address.
Before the submit, the address was:
` https://asdf-gugie.run.goorm.io `
After the submit, the address will be:
` https://asdf-gugie.run.goorm.io/?firstName=&action=is&quality=beer&submit=submit `
As we can see, clicking the submit button appended the following string to the end of our URL:
` firstName=&action=is&quality=beer&submit=submit `
The question mark, ?, is used to separate the rest of the URL from the Query string, but it is not a part of the query string itself.
The appended code is what’s known as the Query string.
As the linked wikipedia page reads:
A query string is a part of the uniform resource locator (URL) which assigns values to specified parameters.
Each parameter in a query string has a name and a value. They are listed in the following way:
` name=value `
The ampersand character, &, is used as a delimiter when passing multiple parameters inside a query string.
So, in our example above, we made a GET request to the server with the following query string:
` firstName=&action=is&quality=beer&submit=submit `
Let’s break down the query string. First off, our query string has 4 parameters:
firstNameactionqualitysubmit
Each parameter can have a value, or it can be submitted without a value, like we can see in the firstName parameter, where we simply have:
` firstName=& `
This means that the firstName parameter wasn’t assigned a value, as we can see the ampersand symbol following immediately after the equals symbol (the parameter assignment).
How HTML forms get mapped into the URL’s query parameter on submit
There are 2 parts to this process:
- Setting up names for keys of the URL’s query parameter that will be passed in when clicking “submit”
- Choosing the values of the URL’s query parameter’s keys
1. Setting up the keys of the URL’s query parameters
The first part of the process is determined inside the HTML form.
Let’s at our HTML form code again:
<form>
  <input name="firstName">
  <select name="action">
    <option value="is">is</option>
    <option value="isn't">isn't</option>
    <option value="likes">likes</option>
  </select>
  <select name="quality">
    <option value="beer">having beer</option>
    <option value="sleeping">sleeping</option>
    <option value="walking">walking</option>
  </select>
  <input type="submit" name="submit" value="submit">
</form>
Pay attention to the inside of the form element. We can see that each direct child of the form element also comes with the name attribute.
When we click the submit button, each of the form elements’ name attributes’ values will be sent in the GET request as the keys (“names”) of the query string parameters.
Thus, <input name="firstName">, after the submit button is clicked, will become firstName= inside the URL’s query string parameter.
Likewise, <select name="action">, after the submit button is clicked, will become action= inside the URL’s query string parameter.
Moving on, the <select name="quality">, after the submit button is clicked, will become quality= inside URL’s the query string parameter.
Finally, <input type="submit" name="submit" value="submit">, after the submit button is click, will become submit=submit inside the URL’s query string parameter.
2. Adding values to the keys of the URL’s query parameters
What kinds of values will be passed to the keys of the URL’s query parameters depends on the kind of the HTML element that we have inside our HTML form.
In our example HTML form, this is the first form element:
` `
What this means is we’ll have a plain text input that a user can type into. This also means that we are leaving it up to the user to determine the value of the firstName query parameter’s key. If the user decides to type the word whatever, that word will become a part of the query parameter, like this:
` https://asdf-gugie.run.goorm.io/?firstName=whatever&action=is&quality=beer&submit=submit `
The values in the other keys will be a bit more deterministic because the form elements that provide these values have some pre-populated entries.
For example, the first <select> element looks like this:
<select name="action">
  <option value="is">is</option>
  <option value="isn't">isn't</option>
  <option value="likes">likes</option>
</select>
What the above code means is that, as far as the action key in the URL query parameter goes, it can only have the following values: action=is, or action=isn't, or action=likes.
URL strings are fussy. They make fuss over the kind of characters that will be accepted as a valid URL address. For example, the single quote character, which is the second possible value in the above list (action=isn't), will be converted into an acceptable URL string: action=isn%27t. This is what’s known as URL encoding, and a string like action=isn%27t is reffered to as an URL-encoded string.
Inspecting GET requests in Chrome Developer Tools
We can inspect the page in Chrome Developer Tools. Press the F12 key, then go to the Network tab, and click the Headers tab to see all the information that pertains to the GET request we just made by clicking submit.
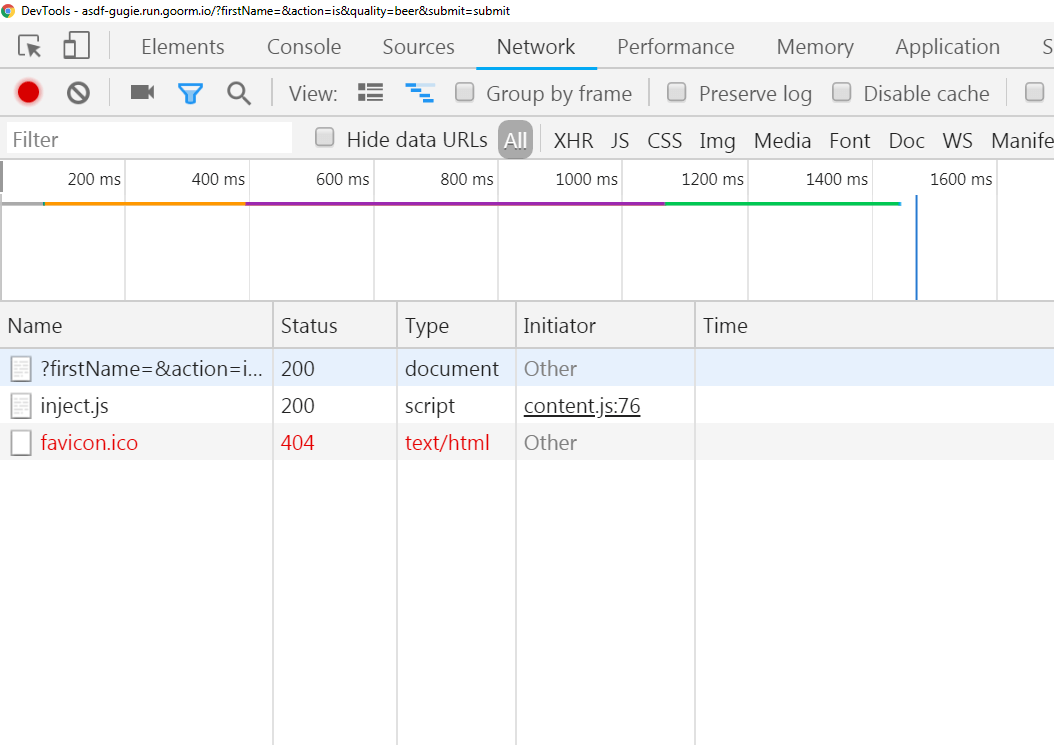
Image: Inspecting the network tab after we clicked the submit button
Feel free to right-click the gray bar that reads the names of the columns (“Name, Status, Type…”). Then simply click the top-most checkbox (“Method”). This will reveal the kind of request we are making. Since it is a GET request, this is how the update will look:
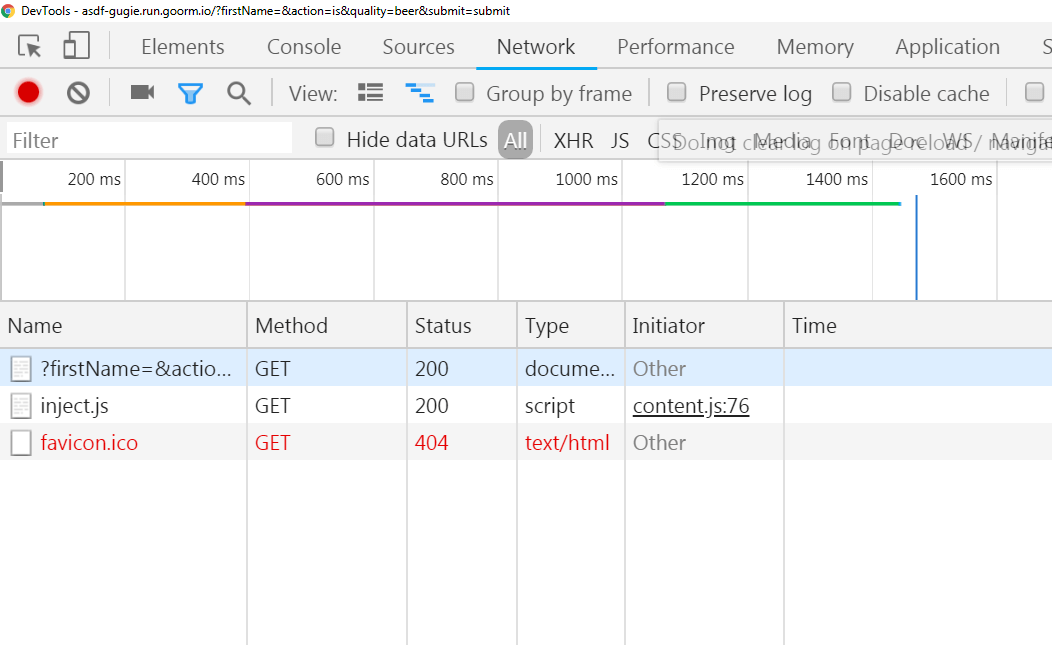
Image: Inspecting the network tab with the Method column active
Click on the first GET request to view more information about it. A screen similar to this will be shown:
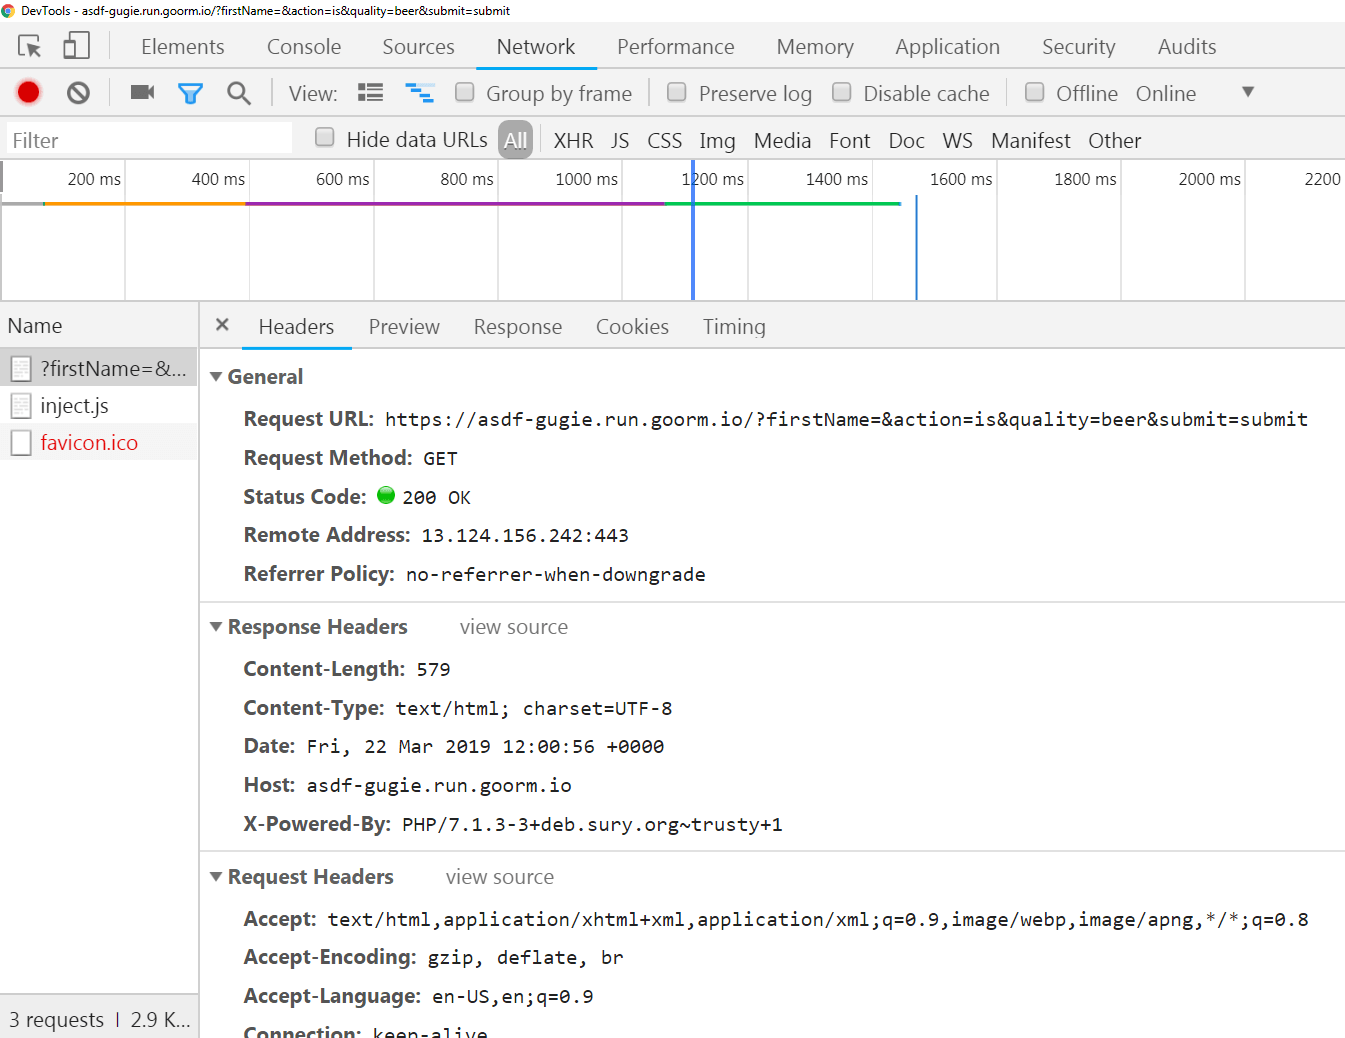
Image: Inspecting a single GET request in the network tab
At the very bottom you can find the query string’s parameters. This is another indicator that we’re looking at a GET request.
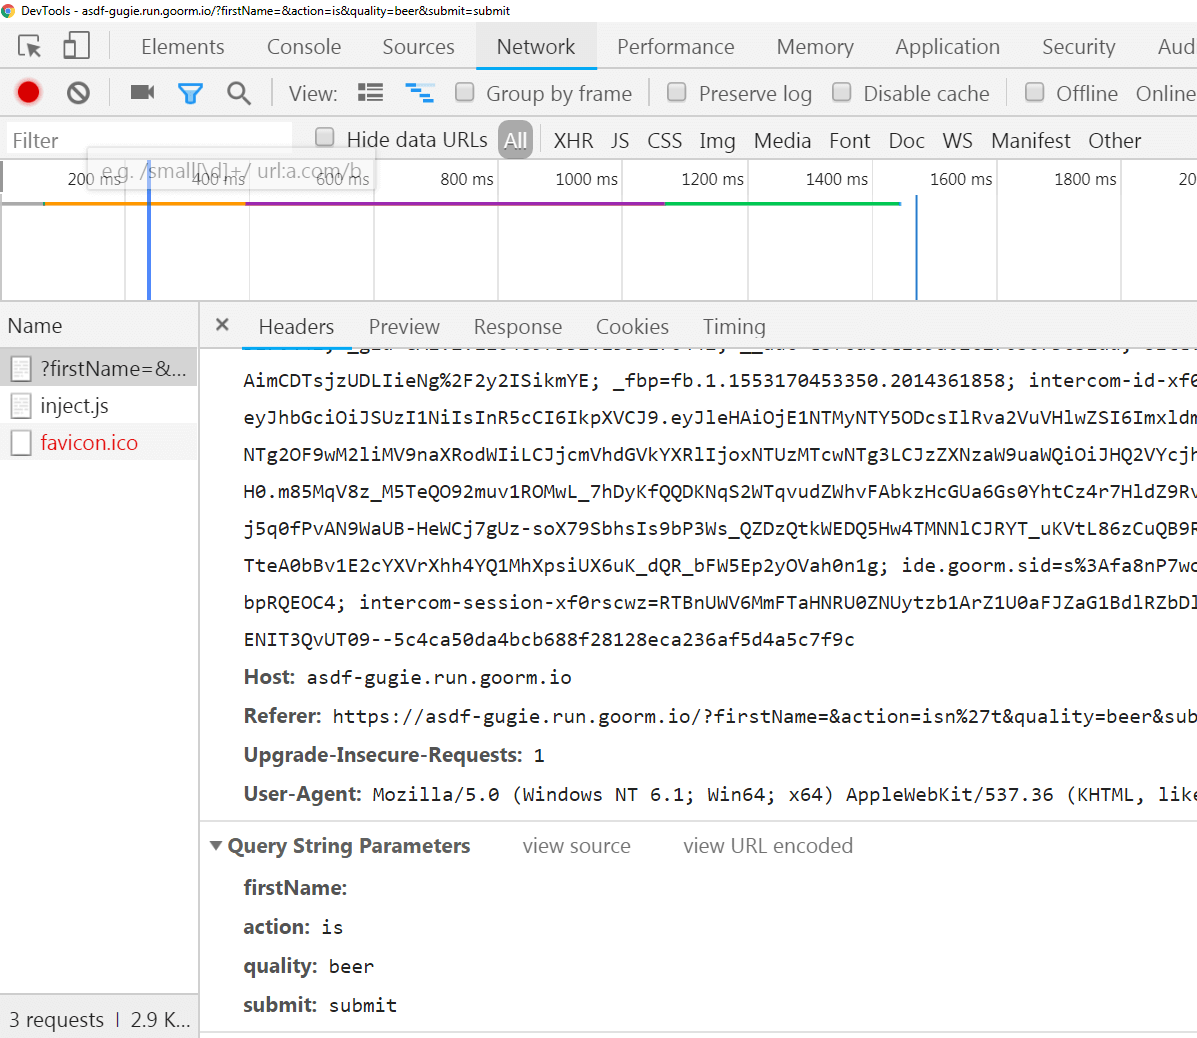
Image: Inspecting a single GET request’s query string
If we changed our form’s method attribute’s value from GET to POST, a click on the submit button would send the data to the server. You can think of the server as the “post office”, where you send messages. Once the “post office” receives these messages, they figure out what to do with them.
The GET method is different. It is an attempt to “GET” something from the server, from the “post office”. We are only sending a request to the post office to get some information back.
Since a PHP file is actually saved on the server, our example index.php can act as both the form that we’re using to fill out a query with parameters, and as the response that the post office will give back to this query.
In other words, we are submitting a query and processing a query on the same page: with the help of PHP.
So now, we need to update our index.php file, so that it looks like this:
<html>
	<head>
		<title>My first PHP app</title>
	</head>
	<body>
		<div>
			<h1>My first PHP app</h1>
			<form method="get" action="index.php">
				<input name="firstName">
				<select name="action">
					<option value="is">is</option>
					<option value="isn't">isn't</option>
					<option value="likes">likes</option>
				</select>
				<select name="quality">
					<option value="beer">having beer</option>
					<option value="sleeping">sleeping</option>
					<option value="walking">walking</option>
				</select>
				<input type="submit" name="submit" value="submit">
			</form>
		</div>
	</body>
</html>

<?php
    // We'll be adding our form processing code here
?>
Ok, so now that we have added the opening (<?php) and closing (?>) PHP tags, we can actually add some code to process the form:
<?php
    if(isset($_GET["submit"])) {
        echo $_GET["firstName"] .
             " " .
             $_GET['action'] .
             " "  .
             $_GET['quality'] .
             " "  .
             $_GET['submit'];
    }
?>
Save the updates, and in the web page preview, refresh the page, and notice that noting has changed visually. Now just click on the submit button.
Right upon submit, another piece of text will appear on the page: “is beer submit”.
What just happened here? We just got a reply from the post office! A reply that we wrote ourselves :)
Verifying if submit has been clicked and echoing out the values of query parameter names (keys)
We begin our PHP code with an if statement.
An if statement looks like this:
<?php
    if() {
        // the entire code that will execute when IF condition is true
    }
?>
The round brackets, () receive a condition to be checked. If the condition is true, the code inside the curly brackets will execute. The condition that we added inside the round brackets looks like this:
isset($_GET["submit"])The isset function checks if a variable is set or not. Thus, the code above is checking the $_GET array of query parameters.
Before we continue, we need to discuss arrays briefly.
Arrays in PHP
Let’s make an array in PHP.
$anArrayOfFruits = array("Mango", "Orange", "Apple", "Cherry");An array is basically like a single label for a group of variables. Each “variable” inside an array is called an array member.
A member of an array can be accessed using numbers, starting from 0.
To access the first member of the array, the Mango, we need to use this syntax:
$anArrayOfFruits[0];To access the fourth member of the array, the Cherry, we need to use this syntax:
$anArrayOfFruits[3];Notice that arrays are zero-based, meaning that we count them from zero, not from one (like we usually think about when we count groups of things - which arrays, in essence, are).
We can also access an array member by its value. To access the third member of the array, Apple, we can use this syntax:
$anArrayOfFruits["Apple"];To update an array member, we use this syntax:
$anArrayOfFruits[0] = "Pineapple";So now we have updated the first member of our $anArrayOfFruits, from Mango to Pineapple.
Now we can go back to discussing the isset() function that we passed to our if statement:
isset($_GET["submit"])The isset() function above will evaluate the $_GET["submit"] argument that we passed it. It will return either true or false. If it returns true, then the condition is satisfied, and the code inside the if statement’s curly brackets will be evaluated.
Next we’ll be looking at what’s inside the if statement.
echo $_GET["firstName"] .
     " " .
     $_GET['action'] .
     " "  .
     $_GET['quality'] .
     " "  .
     $_GET['submit'];
Let’s break this code down. The echo will print to the screen what we pass it an an argument.
However, echo is not a function. Echo is a langauge construct. But for all intents and purposes, it behaves like a function, so we’ll leave it at that. You can get more info about language constructs in PHP here.
So, what is the parameter that are we passing to the echo “function”?
It’s this:
$_GET["firstName"] . " " . $_GET['action'] . " " . $_GET['quality'] . " " . $_GET['submit'];So, what are we doing in the code above?
We are passing several query string parameters to the echo language construct. Since we sent the request as a $_GET, these query string parameters are actually part of the $_GET array.
Thus, we could have written the above code like this:
$_GET[0] . " " . $_GET[1] . " " . $_GET[2] . " " . $_GET[3];What about this code . " " . then?
The dots in the code above are just string concatenation operators. A string concatenation operator, the ., simply takes a string to its left and a string to its right, and combines them. The string concatenation operator in PHP is obviously left-associative.
The " " is simply a string of one single space character.
So what are we doing in this code:
$_GET[0] . " " . $_GET[1] . " " . $_GET[2] . " " . $_GET[3];Translated to English, we are saying to our PHP engine: Take the first, second, third, and fourth member of the $_GET array of query string parameters, and concatenate them together, but keep in mind to also concatenate a space character in between each array member.
That’s all that we’re doing here!
Now’s the time to improve our code.
First, we’ll assign the members of the $_GET array to variables, so that our code is easier to type and to reason about.
Assigning members of $_GET array to variables
If you followed everything from the beginning of this article, the code below should be easy to understand:
<?php

    $submit = $_GET["submit"];
    $firstName = $_GET["firstName"];
    $action = $_GET["action"];
    $quality = $_GET["quality"];

    if(isset($submit)) {
        echo $firstName . " " . $action . " "  . $quality . " ";
    }
?>
However, we still have an issue. A user is allowed to submit a form even without typing his name inside the first input field. Let’s make sure that we check user input before they can submit the form.
We’ll do it by adding nested if statements.
Nesting if statements inside if statements
We’re going to be nesting an if statement inside an if statement to make our code more robust.
Instead of checking for one condition being true or not, we’ll check two.
Here’s our improved code:
<?php
    $submit = $_GET["submit"];
    $firstName = $_GET["firstName"];
    $action = $_GET["action"];
    $quality = $_GET["quality"];

    if(isset($submit)) {
        if(!$firstName=="")) {
            echo $firstName . " " . $action . " "  . $quality . " ";
        } else {
            echo "<h1>Warning: Please enter your name!</h1>";
        }
    }
?>
Now, if we don’t provide an input into the first input field, we’ll get back the following message:
` Warning: Please enter your name! `
However, if we do enter a value, for example John Doe, we’ll get back the following information:
` John Doe is beer `
Obviously, the logic of our app works, but the output that gets processed by PHP could be a bit better. We’ll get back to fixing it. At this point, let’s discuss this piece of code:
` if(!$firstName==””) `
In the above if statement, we are checking if the $firstName variable is not equal to an empty string. The exclamation mark, the ! operator, is used for negation. It’s also called the not operator. Thus, the code if(!$firstName=="") checks if the value of the $firstName variable is NOT equal to an empty string, coded as "".
The double equals operator, the ==, is the equality operator. It is a question.
Contrast the double equals, the equality operator, with the single equals, the assignment operator.
The equality operator is a question. We are asking the PHP engine about the state of its “world”.
The assignment operator is a command. We are commanding to the PHP engine to set a variable to a certain value, to update the state of its “world”.
Improving the output of our PHP code with additional if statements
As we saw, our app works, but the returned code is slightly grammatically incorrect. If there was only a way to make this prettier…
Of course there is! We’ll just echo out nicely formatted responses based on conditions being satisfied.
So let’s update our code with a few more if statements:
<?php
    $submit = $_GET["submit"];
    $firstName = $_GET["firstName"];
    $action = $_GET["action"];
    $quality = $_GET["quality"];

    if(isset($submit)) {
        if(!$firstName=="") {

            if($action=="is" && $quality=="beer") {
                echo $firstName . " is having a beer.";
            } elseif ($action=="is" && $quality=="sleeping") {
                echo $firstName . " was so tired that sleeping was the only way to get rested.";
            } elseif ($action=="is" && $quality=="walking") {
                echo $firstName . " has a lot of energy, so it was a time for a walk!";
            } elseif ($action=="isn%27t" && $quality=="beer") {
                echo $firstName . " isn't having a beer.";
            } elseif ($action=="isn%27t" && $quality=="sleeping") {
                echo $firstName . " isn't tired, and thus isn't having a nap.";
            } elseif ($action=="isn%27t" && $quality=="walking") {
                echo $firstName . " is not walking, because it isn't the right time for it.";
            } elseif ($action=="likes" && $quality=="beer") {
                echo $firstName . " " . $action  . " " . $quality ;
            } elseif ($action=="likes" && $quality=="sleeping") {
                echo $firstName . " " . $action  . " " . $quality ;
            } elseif ($action=="likes" && $quality=="walking") {
                echo $firstName . " " . $action  . " " . $quality ;
            } else {
                echo "I'm not sure what to make of this";
            }

        } else {
            echo "<h1>Warning: Please enter your name!</h1>";
        }
    }
?>
Now our app works a lot better, and it’s responses are wonderful.
Let’s briefly discuss the POST request.
Understanding the POST request
The value of the action attribute on the form element determines the location to which we want to submit our request.
A post request doesn’t add a query string to the URL, so there’s no information appended to the end of the URL in the address bar.
To make a POST request, you just need to add another value to the method attribute inside the <form> HTML element. Instead of the value being get, it needs to be updated to post.
Save everything in your online IDE, then refresh the web page serving your app.
Next, open the Chrome developer tools again with the F12 key, and navigate to the Network tab. Finally, open the top-most POST method.
Scroll down to the very bottom of the screen that appears. You’ll notice that there are no longer query parameters listed at the bottom. Instread, the listing reads “form data”. This is another indicator that confirms that we are inspecting the contents of a POST request.
The difference between GET and POST HTTP requests
When you use a get request, the data you send is visible in your URL, in the form of a query parameter string. If you submit a form using the post method, all the data you pass gets sent with that request to the server.
Both get and post requests are useful and have their place. Since this is an entry-level tutorial, we’ll leave it at that. However, it is crucial to have an in-depth understanding of what each of these requests does and how it works (which is a subject for another blog post).
Is there PHP code in the browser?
In the browser, we can’t see any PHP code. The PHP code that’s at the bottom of the above code snippet that we worked with, can only be found on the server. The browser will receive the result of the server running the index.php file, and the browser will only receive the result of this file being processed into HTML.
With this, we conclude our coverage of get and post HTTP requests at this time.
Next, we’ll be discussing a slightly more technical, but very important concept in PHP, and that is the concept of object-oriented programming.
Object-oriented programming in PHP
OOP in PHP can be described in terms of classes and objects.
A class is like a floor plan, while an object is the actual floor built according to the floor plan.
Put differently, a class is like a cookie cutter, and an object is the actual cookie made using the cookie cutter.
Another useful analogy is: a class is a recipe, and an object is the actual meal.
It is important to note that we only need one class(i.e one floor plan, one cookie cutter, or one recipe), to make limitless number of objects (i.e as many floors, cookies, or meals as we need).
In more technical terms, we can say that:
An instance of a class is an object variable.
Since the object is actually a variable, it practically means that while the variable name remains the same, the actual object is mutable, meaning, it can be changed, either in part, or completely.
What Is An Object In PHP?
So what is this object variable, this “actual cookie”, built from?
Well, it has attributes (materials that go into building it, such as sugar, flour, water, etc..). It also has methods (actions to be taken, things to be done with the attributes).
Attributes are nothing more than class-specific variables.
Methods are nothing more than class-specific functions.
So why not just say “variables and functions”?
The answer is: because of this “class-specific” business. Because class-specific refers to the concept of visibility.
What Does It Mean To Say That Attributes And Methods Are Class-specific?
When we say that attributes and methods are class-specific, it means that they are accessible through the class only, or more precisely, accessible in one of these three ways:
- public,
- protected, and
- private.
Accessing Public Attributes And Methods
Public attributes and methods can be accessed:
- anywhere within the class,
- anywhere within the children classes,
- but not through object instances.
Accessing Private Attributes and Methods
Private means that attributes and methods can be accessed:
- anywhere within the class,
- not accessible in children classes,
- not accessible in object instances.
More on Attributes and Methods in Objects in PHP
Let’s go back to the blueprint analogy a bit. The first thing to know is that the class is like a blueprint for a house. We can have one blueprint, and a whole neighborhood of houses built according to that one blueprint.
Or we could say that a class is like a mold for, say, a pair of dice.
We can use this one mold to make as many pairs of dice as we want.
All of these actual objects, be it houses or pairs of dice, are individual, separate from each other.
Each of these houses can have the same attribute names, but different values in them.
They will all still share the same methods.
Modularity, Encapsulation, Inheritance, and Polymorphism
In order to keep things as simple as possible, OOP is based on modularity, i.e on separating code into different, easily manageable pieces.
The concept of keeping different parts of code separated, leads to something very interesting, called encapsulation.
Encapsulation is another way of looking at modularity, and it basically means that we don’t have to know how something works in order to use it.
Let’s say we want to drive a car. We know that in order to use (drive) the car, we don’t have to know how it works. Maybe we never even saw what’s under the hood. that still doesn’t keep us from being a good driver. Because of modularity, these two things: knowing what’s under the hood (the core, base, or grandparent classes) is separated from actually driving the car (the implementation).
So, modularity and encapsulation are really two sides of the same coin, and they are both connected to inheritance, which is the possibility to set attributes and methods as public, protected, and private, and the possibility to extend parent classes into child classes.
Inheritance allows for *abstraction, which means that parent (base) classes are unspecific, general. And child classes are more specific.
How is this achieved?
This is achieved in a very simple, but effective way: We are allowed to add more attributes and methods to children classes, therefore not only extending base (core or parent) classes, but also making children classes more specific.
In PHP, inheritance can go on through many generations, but it is important to remember that each child class can directly extend only 1 parent.
Another important aspect of OOP in PHP is polymorphism, which is a fancy way of saying that methods can be overriden in children (also in grandchildren, great-grandchildren, etc…). This is the essent of polymorphism.
A fancy definition would be something like “polymorphism allows methods to have different functionality based on where in the code they are declared”. But I still like to say that it simply means that core methods can be overridden (i.e re-declared) in children methods.
Practical examples
Defining and Extending Classes
We define classes using the keyword class:
class Model
{
    // model definition goes here
}
We make children classes using the keyword extends:
class LoginForm extends Model
{
    // children class defined here
}
With the class defined, you can create its instance (the object varibale), using the new keyword. Of course, before we can craete an instance of a class, we need to define the class itself.
For example, we define a simplest possible class (that has one attribute and one method), like this:
<?php
class SimplestClass
{
    // defining a SimplestClass-specific variable (usually referred to as "attribute")
    public $justAnAttr = 'Hello World';

    // defining a SimplestClass-specific function (usually referred to as "method")
    public function printToScreen() {
        echo $this->justAnAttr;
    }
}
?>
As describe earlier, we need a way to access class-specific variables and class-specific functions (i.e the object attributes and methods).
We do that using the object access operator: ->, as can be seen in the code above:
echo $this->justAnAttr;To access attributes and methods in the same class in which they are declared, we use the special object $this. Sometimes, $this is also called a pseudo-variable.
The Model-View-Controller Concept
The MVC is a programming pattern that basically allows us to separate our PHP web applications into 3 distinct parts:
- Model,
- View, and
- Controller
The model is the data. The view is the output on the user’s device. The controller is the glue that holds the model and the view together. Or we can say it’s a two-way “bridge”: in one direction, the model data goes over the controller (the “bridge”) onto the user’s screen. In the other direction, the results of the user interacting with the page are submitted to the controller (the “bridge”), and it decides if these submitted results should be kept in the model or if something else should be done with them.
Conclusion
This was a fast introduction to the PHP programming language. In this in-depth guide, we looked at a lot of important concepts that are usually not discussed. We took a step-by-step, no-stone-unturned approach.
Now you have a solid grasp of the very basics of how PHP language works, and you can go on and make simple apps.
You’ve learned the following foundational concepts:
- How to start coding in PHP right now, without any installations
- Using a cloud-based IDE for PHP
- What are variables in PHP, and their proper syntax
- Data types in PHP
- Variable assignment in PHP
- Introduction to PHP functions
- Assignment operator in PHP
- Updating variables in PHP
- What does it mean to say an operator is “right-associative” in PHP?
- The addition operator in PHP
- How to assign default values to PHP functions
- URL query strings
- GET and POST parameters in PHP
- HTTP requests
- What happens when we click the submit button on a PHP form?
- How HTML forms map to URL query params
- Query params keys and values
- Chrome Developer Tools
- Chrome’s Network Tab
- Inspecting GET requests in Chrome Developer Tools
- Working with if statements in PHP
- Using PHP to check if the submit button has been clicked
- Understanding PHP arrays
- Working with $_GET
- The echo language construct in PHP
- Nested if statements in PHP
- The difference between the GET request and the POST request
- The basics of OOP in PHP
- Understanding objects in PHP
- Public, protected, and private variables
- Accessing attributes and methods in PHP object instances
- Understanding classes in PHP
- Modularity in PHP
- Encapsulation and inheritance in PHP
- Polymorphism is a difficult word for a simple concept
- Practical examples of defining and extending classes in PHP
- What is the MVC pattern in PHP

