Quickstart Elm 0.19, part 16
Making todos editable in a todo app in Elm 0.19
By: Ajdin Imsirovic 31 October 2019
In this article, we’ll make it possible to edit todo items.

Note: Examples in this article use Elm 0.19.
Viewing this article’s complete app
Here’s this article’s minimalistic code:
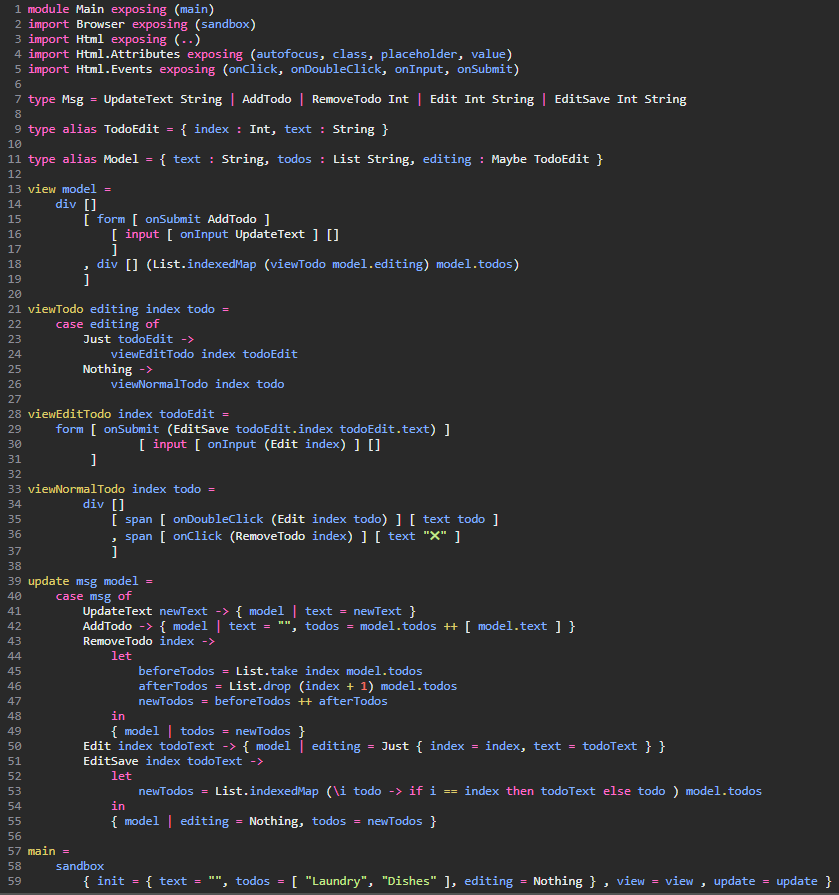
And here’s the embedded app:
This app’s code includes only the most essential code without which the app would not work. That’s why you won’t see any redundant attributes, such as class attributes, in the above code.
The code is also written to take up as little space as possible, in the hope that this will make it easier to comprehend.
Finally, to see how each part of the app is inter-related, let’s see a simplified version of the app, written in a combination of Elm and pseudo-Elm code, as a diagram.
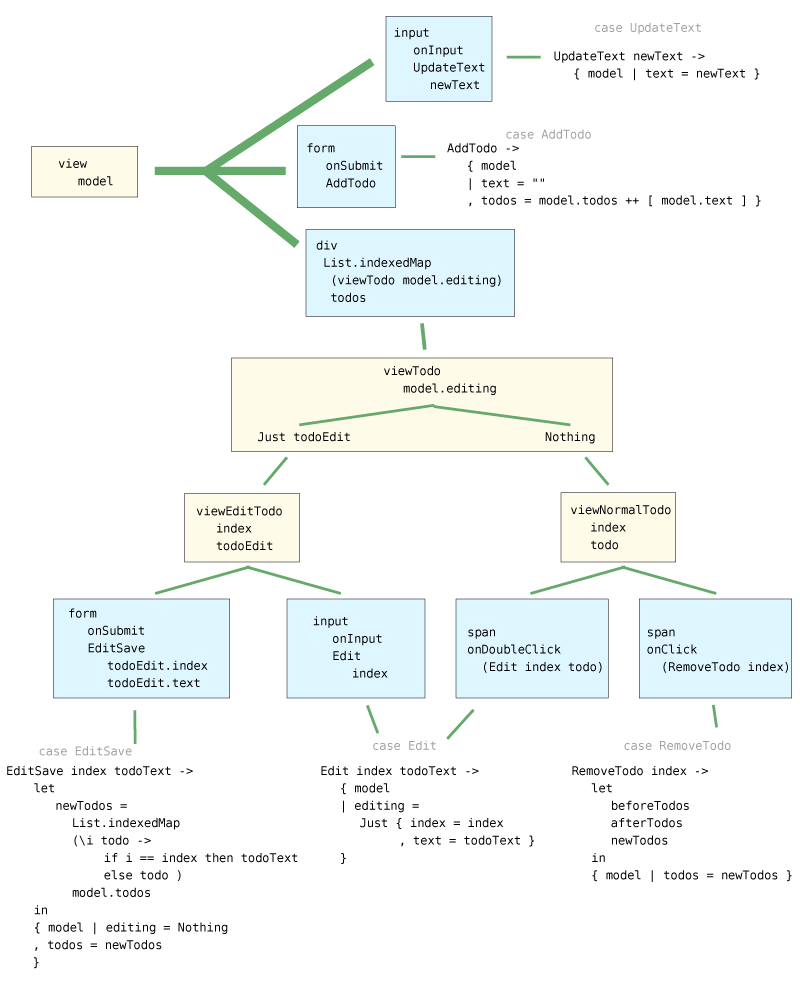
Note that the blue boxes in the above diagram represent actual HTML elements.
It might be helpful to annotate each branch in the diagram, like this:
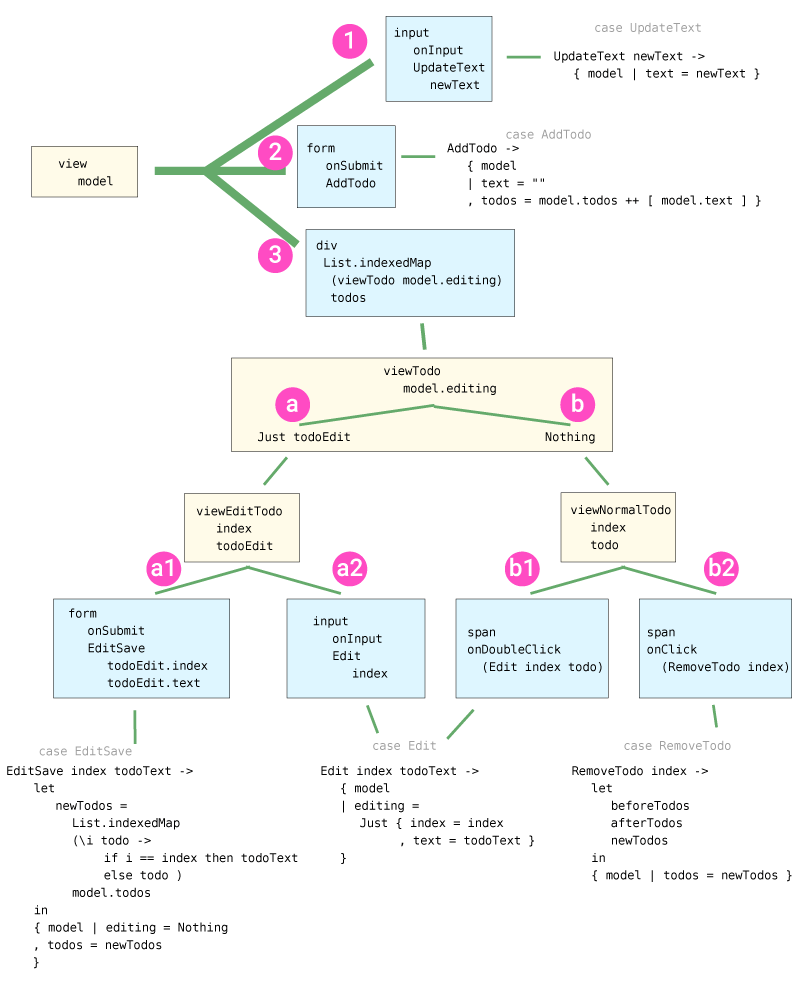
Looking at the diagram, we can see that it all starts with the view that takes a model and renders 1, 2, and 3:
- the HTML
inputthat sends theUpdateTextmessage onInput (when a user types into the input field) - the HTML
formthat sends theAddTodomessage onSubmit (when a user submits the form by pressing the ENTER key) - the HTML
divthat lists out all the todos under the form (i.e filters them usingList.indexedMap)
Then, based on user activity, the app branches into some additional HTML elements: a1, a2, b1, and b2. Which HTML elements will be rendered depends on actions a user makes when the initial view is rendered.
Let’s look into each of these HTML elements, one by one.
#1. How does the HTML input send the UpdateText message when onInput event fires?
Here’s the relevant part of our app’s code:
1
2
3
4
5
view model =
    div []
        [ form [ onSubmit AddTodo ]
            [ input [ onInput UpdateText ] []
-- etc
On line 4 of the above code snippet, we see the [ onInput UpdateText ] piece of code. This code listens for the event of user typing into the input.
If such an event fires, the UpdateText message will be sent:
update msg model =
    case msg of
        UpdateText newText -> { model | text = newText }
This UpdateText message will take the newText String and assign it as the value of the text variable in our model.
Where does the newText argument come from in the UpdateText pattern matching?
In the view function, there’s this code:
view model =
    div []
        [ form [ onSubmit AddTodo ]
            [ input [ onInput UpdateText ] []
            ]
        , div [] (List.indexedMap (viewTodo model.editing) model.todos)
        ]
A reasonable question would be: Where’s the String in this line:
[ input [ onInput UpdateText ] []
We know that it’s in the Msg type constructor:
type Msg = UpdateText String | AddTodo | RemoveTodo Int ...
… so how come we didn’t add it to this line:
[ input [ onInput UpdateText ] []
The explanation goes something like this:
Variants of a custom type are actually constructors for that type; they’re functions!
So UpdateText is actually a function String -> Msg.
The onInput event is expecting a function with the signature String -> Msg, and UpdateText is that function.
If you don’t believe it, check it in the REPL:
> type Msg = UpdateText String | ...

> UpdateText
<function> : String -> Msg
In the above example, newText is the String that UpdateText wraps around.
An example with a Maybe
Here’s an example with a Maybe.
Maybe produces a Just something or Nothing.
When we want to get that something, we can do pattern matching:
case maybeInt of
    Just n ->
        n
    Nothing ->
        0
So pattern matching is powerful because we can create bindings from some construct. Let’s say maybeInt was Just 5; when we pattern match Just n, we bind n to the value 5, and than we can do something with n. It’s sort of like destructuring in JS, but you can do it for any sort of type. In JS you can only destructure arrays and objects, but in Elm you can pattern match on anything that we know the constructor for. For example, the constructors for Set and Dict are hidden from us as consumers so we can’t pattern match on those types, but we can on others whose constructors are not hidden from us.
So:
type Msg
    = UpdateText String
    | AddTodo
    | RemoveTodo Int
    | Edit Int String
    | EditSave Int String
.
.
case msg of
    UpdateText text ->

    AddTodo ->

    RemoveTodo id ->

    Edit id text ->

    EditSave id text ->
In the case above, notice how when we pattern match, we’re creating bindings for the things each of those variants “wrap” around. So Edit “wraps” around Int String, so when we pattern match on the Edit constructor we bind that int and string to id text.
#2. How does the HTML form send the AddTodo message when onSubmit event fires?
Here’s the relevant part of our initial view’s code:
1
2
3
4
5
view model =
    div []
        [ form [ onSubmit AddTodo ]
            [ input [ onInput UpdateText ] []
-- etc
On line 3 of the above code snippet, we see the [ onSubmit AddTodo ] piece of code. This code listens for the event of user pressing the ENTER key - i.e an onSubmit event firing.
If such an event fires, the AddTodo message will be sent:
update msg model =
.
.
    AddTodo -> { model | text = "", todos = model.todos ++ [ model.text ] }
This AddTodo message will return an updated model, setting text to an empty String, and the todos List to exising model.todos with the addition of the existing model.text. In other words, whatever’s in the model.text will be added as the new member of the model.todos List.
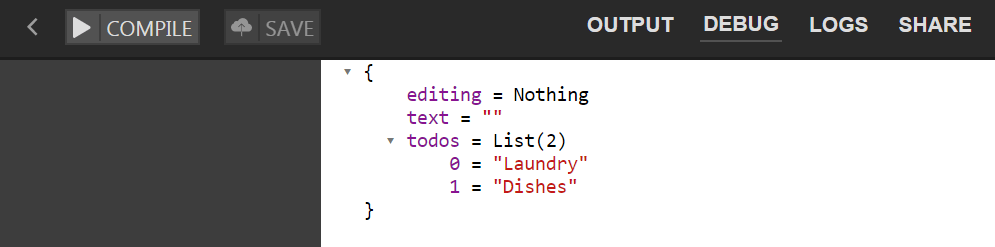
We can verify this by clicking the DEBUG link on Ellie and observing the actions happening on our site as a user interacts with it.
Inspecting the changes to our data model through user interactions
What we’re really observing on the DEBUG link is the changes to our app’s model - i.e, the state of our app as the user interacts with it.
Initially, before a user starts interacting with our app, it looks like this:
Then, each character that the user types into the input, triggers the entire model-view-message-update cycle.
In the below example, there are 8 times that the UpdateText message is pattern-matched based on the onInput event firing in the input field of our app.
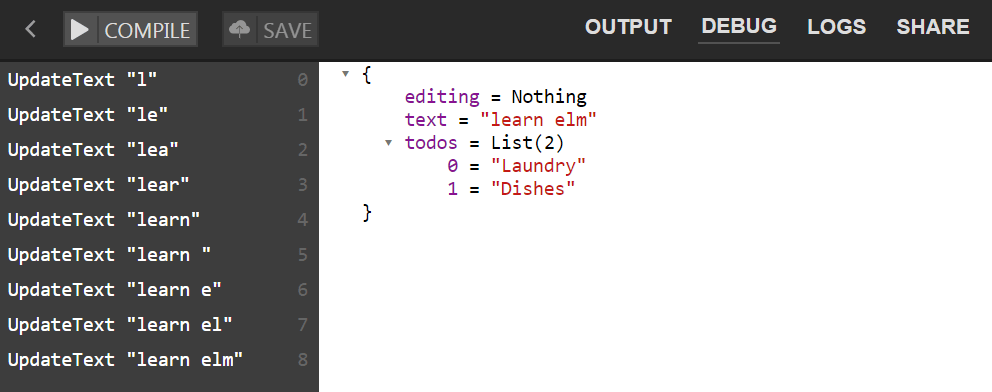
And this is what happens when we press the ENTER key after the above model updates have taken place:
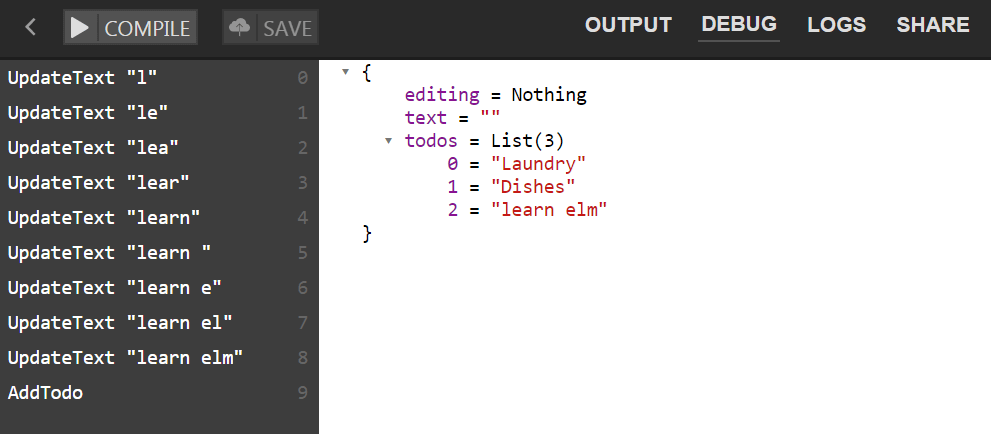
Here’s the above change as reflected in the view of our app:
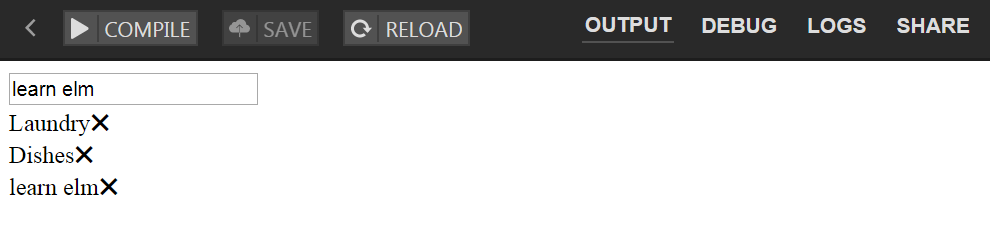
So we first type “learn elm” into the input, and that gets stored as newText in our data model.
Next we press Enter and AddTodo is fired, which updates the model.todo List with a new member, a String with value "learn elm".
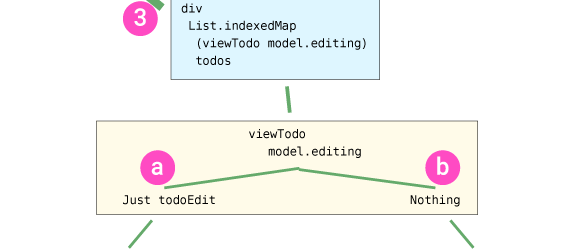
#3. How does the HTML div list out all the todos under the form
Let’s see the code for our initial view’s div:
1
2
3
4
5
6
7
view model =
    div []
        [ form [ onSubmit AddTodo ]
            [ input [ onInput UpdateText ] []
            ]
        , div [] (List.indexedMap (viewTodo model.editing) model.todos)
        ]
On line 6, we have:
, div [] (List.indexedMap (viewTodo model.editing) model.todos)
Like we already saw earlier, the List.indexedMap takes two arguments:
- The first argument is the mapping function
- The second argument is the List to be mapped over
On the diagram, this is shown in the “a b” box, with the “a” being Just todoEdit, and “b” being Nothing.
What does this practically mean?
It means that the div part of the view will render based on the map function (the List.indexedMap function, to be precise).
The result of this mapping operation can be Just todoEdit or Nothing.
Important reminder: this mapping operation is performed on each single member of the model.todos List!
Thus, initially, our data model looks like this (as seen in the DEBUG tab):
{
editing = Nothing
text = ""
▾todos = List(2)
    0 = "Laundry"
    1 = "Dishes"
}
Here’s the code of viewTodo function (the “mapper” function):
viewTodo editing index todo =
    case editing of
        Just todoEdit ->
            viewEditTodo index todoEdit
        Nothing ->
            viewNormalTodo index todo
To understand what’s happening above, let’s remember the bit of code from the previous article:
1
2
3
4
5
6
7
main =
    text <|
    case tom.age of
        Nothing ->
            "No age for this person"
        Just val ->
            val
The above code printed 42, because our data model looked like this:
1
2
3
4
5
6
7
-- A person, but maybe we do not know their age.
type alias Person =
    { name : String
    , age : Maybe String
    }
tom = { name = "Tom", age = Just "42" }
sue = { name = "Sue", age = Nothing }
However, then we replaced tom.age with sue.age:
1
2
3
4
5
6
7
main =
    text <|
    case sue.age of
        Nothing ->
            "No age for this person"
        Just val ->
            val
And the result of the above code was “No age for this person”.
Now let’s look again at the todo app’s data model, and the todo app’s viewTodo mapper function:
-- data model
{
editing = Nothing
text = ""
▾todos = List(2)
    0 = "Laundry"
    1 = "Dishes"
}

-- mapper function
viewTodo editing index todo =
    case editing of
        Just todoEdit ->
            viewEditTodo index todoEdit
        Nothing ->
            viewNormalTodo index todo
As we can see, initially, the value of editing is Nothing.
That’s why we know for a fact that only the Nothing pattern will be matched, and that will return the value from evaluation of viewNormalTodo index todo.
Here’s the call to viewNormalTodo function returning the Nothing branch:
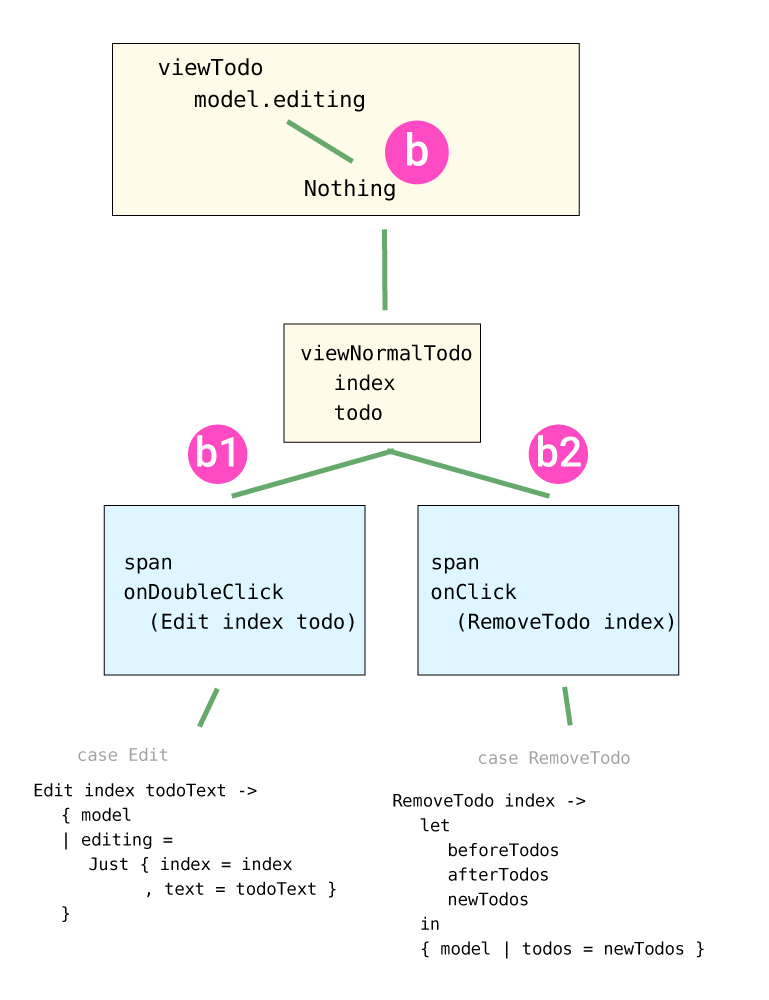
Now that we know that Nothing must be returned, we also know that this pattern match will trigger the viewNormalTodo function to be ran. It will have two arguments: index and todo, and that is enough to render two HTML elements:
- a
spanthat listens foronDoubleClick - a
spanthat listens foronClick
The first span listens for an onDoubleClick event, and when it receives it, it passes an Edit message, which gets pattern-matched in the update function’s Edit case:
Edit index todoText ->
    { model
    | editing = Just { index = index , text = todoText }
    }
The second span listens for an onClick event, in which case it triggers a RemoveTodo message which gets pattern-matched in update function’s RemoveTodo case:
RemoveTodo index ->
    let
        beforeTodos
        afterTodos
        newTodos
    in
    { model | todos = newTodos }
However, currently, if we double-click on a todo to edit it, all the todos will become editable. To avoid this, we’ll need to add an if expression to the Just todoEdit pattern match inside the viewTodo function definition.
Improving the editing branch
Here’s the improved code:
viewTodo : Maybe TodoEdit -> Int -> String -> Html Msg
viewTodo editing index todo =
    case editing of
        Just todoEdit ->
            if todoEdit.index == index then
                viewEditTodo index todoEdit

            else
                viewNormalTodo index todo

        Nothing ->
            viewNormalTodo index todo
The code above will make sure that only a todo with a specific index (the one we double-clicked) becomes editable. Others will be shown using the viewNormalTodo function.
Now we can see the full improved app:
Also, we can now play with adding and removing items and view the changes to our model through user interactions.
Here’s an example of model updates, from 0 to 11.
In the zero data model, we double-click on the “Laundry” todo to make it editable.
In the data model number 1-4, we add the letters: “asdf”, consecutively.
In the fifth data model, we run the EditSave function.
In the data model updates 6-8 we input a new string, “asf”.
Then, the nineth update runs AddTodo, the tenth runs RemoveTodo 2, and finally we clear the input field in the eleventh update to the data model.
Here’s a recording of the above change:
In the next article, we’ll look at Commands and Subscriptions, and we’ll update the app to include the use of those.

