Understanding Node, npm, JavaScript modules, and webpack
An in-depth beginners guide to using npm, Node, and module bundlers
By: Ajdin Imsirovic 25 September 2019
Why Node and npm? What’s up with Grunt, Gulp, and Webpack? Why choose one over the other? How to reliably share third-party libraries with your team? Why was it so hard - even impossible - to use modules in JavaScript in the past?
If you’ve ever thought about things like that, this article is a comprehensive answer to these questions, starting from the script tag in JavaScript, all the way to Webpack.
Note: This article is an excerpt from my book: Vue CLI 3 Quick Start Guide.
 Photo by
Paul Esch-Laurent, @pinjasaur on Unsplash
Photo by
Paul Esch-Laurent, @pinjasaur on Unsplash
Table of Contents
Here’s what you’ll read in this article:
- The script tag
- Immediately invoked function expressions
- The problem with IIFEs
- Sharing third-party libraries in a team environment with NPM
- JavaScript task runners and NPM scripts
- Modules in JavaScript
- Working with modules in Node.js
- Module bundlers, a way to use modules in the browser
- What is Webpack
- How webpack works
- Building a new project and running webpack on it
- Running webpack on a project
As you can see above, our end goal is to understand just what webpack is and how it works.
Looking from the vantage point of webpack, what you see above is the chronological list of approaches, techniques, best practices, and patterns that were added to the JS ecosystem, which led to the current state of things.
Let’s look at each one of these solutions in more detail.
The script tag
Initially, adding JS to your web page meant that you would need to add some script tags directly in your HTML. For quick prototypes, this is still a valid way of doing things even to this day. Very often, third-party libraries get added via the src attribute inside a script tag (which usually gets placed right above the closing body tag in our HTML).
Unfortunately, you usually need more than one script tag inside your HTML. And regardless of whether you add your JS code directly to your page, you add it from another file in your project, or you add it from a remote location (such as from a content delivery network (CDN) using the src attribute), ultimately, all these scripts are added to the global JS scope. This means one thing, collision.
To avoid collisions, a clever approach was taken, the use of IIFEs.
Immediately invoked function expressions
What are IIFEs all about? IIFEs simply exploit the fact that in JS, parentheses can’t contain statements. This fact alone allowed JS developers to put in anonymous functions that they could immediately invoke, without getting any errors from the parser, by simply wrapping them in parentheses.
An IIFE is essentially a quirk of the JS language, but a very useful one; with an IIFE, all the code is scoped to the function, and thus your code is safe from anything else that is outside of it. In other words, using IIFEs is a simple way to avoid collisions, that is, the accidental overwriting of variables or functions. Thus, at one point, many popular libraries started wrapping their own code into IIFEs. For example, if you open the code for the jQuery library, or for the Chart.js library, or for many other popular JS libraries, you’d find that they use the IIFE pattern.
Thus, with IIFEs, we could add different scripts to our pages, without the worry that code collisions might happen.
The problem with IIFEs
Unfortunately, simply using IIFEs does not fix all our problems. To illustrate the issue at hand, let’s quote Joe Armstrong, creator of Erlang:
“You wanted a banana, but what you got is the gorilla holding the banana, and the entire jungle.”
Bear in mind that in this quote, Mr. Armstrong was discussing a problem with object-oriented languages, but the underlying issue is applicable in JS code modularization.
Basically, our problem with IIFEs is that we can’t cherry-pick specific functionality that we’d like to use from a JS library. With the IIFE pattern, we must use everything that is wrapped up in an IIFE, even if we are only using just a small piece of a specific library’s codebase. Of course, to be honest, IIFEs are not the ones to blame for this. JS, the language, for a long time simply did not have the ability to cherry-pick any kind of code functionality, because in JS, it was simply impossible to split your code into modules.
Another major pain point of JS was the issue of reusing third-party code across teams.
Sharing third-party libraries in a team environment with NPM
IIFEs solved the problem of code collisions, but they didn’t solve the problem of code reuse. What if a developer on my team has a different, updated version of a library, with breaking changes? What if I decide to update the dependencies on my computer? How will my other team members deal with that? Besides using source version control, are there any other options for faster collaboration?
Node Package Manager (NPM) was the answer to these problems. Node is just a Google V8 JS engine that can run on a server. NPM simply allows a developer to install new libraries into a project, regardless of whether it is to be used on the frontend or the backend of an app. So, effectively, NPM is the JS package manager, similar to what we have in Ruby (gems), C# (NuGet), or in Linux (apt-get, yum).
For example, let’s say we wanted to install Vue via NPM. If we have Node installed on our machine, we’ll have NPM too, since NPM comes bundled with a Node installation.
Next, we need to create a new directory. Let’s change this directory’s name to vue-from-npm, and point our command-line console to it. We can then follow it up with this command:
npm init -y
Running the preceding command will create a package.json file. The -y flag accepts all the default answers that you’d be prompted with in the console.
If we looked at the newly created package.json file inside our project directory, we’d see the following contents:
{
  "name": "vue-from-npm",
  "version": "1.0.0",
  "description": "",
  "main": "index.js",
  "scripts": {
    "test": "echo \"Error: no test specified\" && exit 1"
  },
  "keywords": [],
  "author": "",
  "license": "ISC"
}
Note that the npm init command only adds a package.json file to an empty directory. That’s all that it does!
Adding Vue is then as simple as running this command:
npm install vue --save --verbose
The preceding command will do a few things, namely:
- It will add the
node_modulesdirectory. - It will put the entire Vue library inside the
node_modulesdirectory. - It will create the
package-lock.jsonfile in the root of our project. - It will update the
package.jsonfile in the root of our project.
The updated package.json file now looks like this:
{
  "name": "vue-from-npm",
  "version": "1.0.0",
  "description": "",
  "main": "index.js",
  "scripts": {
    "test": "echo \"Error: no test specified\" && exit 1"
  },
  "keywords": [],
  "author": "",
  "license": "ISC",
  "dependencies": {
    "vue": "^2.6.7"
  }
}
If it is not obvious, the file has been updated with a new entry: dependencies. This entry lists all the dependencies included in the project. Specifically, we have added Vue (version 2.6.7 or above) to our project.
A great thing about NPM is that we can add any other library to our project, just as easily as we did with Vue. For example, to update our project with accounting.js, we just run this command:
npm install accounting-js --save --verbose
Once the installation is complete, let’s again inspect the node_modules directory as follows:
vue-npm/node_modules/
 ├── accounting-js/
 │ ├── dist/
 │ ├── lib/
 │ ├── CHANGELOG.md
 │ ├── package.json
 │ └── README.md
 ├── is-string/
 ├── object-assign/
 └── vue/
Note that for the sake of brevity, we are only showing the second level of folders and files inside the accounting-js folder. The is-string, object-assign, and vue folders are shown collapsed.
What this shows us is that sometimes other NPM modules come bundled with the actual libraries that we installed. In the case of accounting-js, we also got the is-string and object-assign NPM modules. Let’s also inspect the updated package.json file in the root of our directory, as follows:
{
  "name": "vue-from-npm",
  "version": "1.0.0",
  "description": "",
  "main": "index.js",
  "scripts": {
    "test": "echo \"Error: no test specified\" && exit 1"
  },
  "keywords": [],
  "author": "",
  "license": "ISC",
  "dependencies": {
    "accounting-js": "^1.1.1",
    "vue": "^2.6.7"
  }
}
As we can see, the root package.json file has been updated with the proper version of accounting-js. Let’s locate another package.json file, this time inside the node_modules/accounting-js folder. If you opened that file, it holds a lot more information, in just a bit over 100 lines of code. This information is specific to the actual NPM module, accounting-js.
OK, so now our project is ready for collaboration. The way to do it? Let’s see how a colleague of ours, let’s call him John, would add the project we just created, and all the project dependencies, on his own computer.
To do this, we’ll create a new folder, let’s call it johns-computer, and let’s just copy the root level package.json from our vue-from-npm folder into our johns-computer folder.
Next, let’s simply run this command:
npm install --verbose
Running the preceding command will install all the projects and dependencies that we had in the vue-from-npm folder.
JavaScript task runners and NPM scripts
Around the same time during which NPM was gaining popularity, another frontend technology was also on the rise: task runners. Task runners are simple tools; they run repetitive tasks. Sometimes, task runners are referred to as build tools because they act as intermediaries between updates that a developer makes to a codebase, and what the production ready code ends up being. This is what’s known as a build step, a part of the software development process in which something happens to your code after you’ve written it.
For example, new features that get added to CSS3 usually start off as vendor prefixes (also known as browser prefixes). In other words, before a new CSS functionality is available in all browsers, it gets implemented in an experimental stage in individual browsers, using browser-specific prefixes as follows:
-ms-
-moz-
-o-
-webkit-
In this alphabetically ordered list of browser prefixes, we can see browser prefixes for Microsoft browsers, Mozilla, old versions of Opera, and finally, all the webkit-based browsers (Chrome, Safari, newer Opera, and so on).
Keeping track of updates to browser prefixes is kind of difficult. It is probably not the best use of a developer’s time to monitor for changes to CSS implementations, and then update their code accordingly. For example, at a certain point in the past, it was necessary to use the following browser prefixes on the CSS transition property:
-webkit-transition: background-color 1s;
-moz-transition: background-color 1s;
-o-transition: background-color 1s;
-ms-transition: background-color 1s;
Obviously, today we simply use the transition property in our CSS declarations, without any browser prefixes, because the transition property is widely supported in all modern browsers.
Having to deal with the constantly shifting landscape of changes to the CSS specification and its implementations in various browsers led to a solution in the form of a task runner. Instead of having to manually add vendor prefixes to their CSS code, frontend developers could now simply add a plugin to their task runner and it would do the dirty work for them: add vendor prefixes where needed.
Of course, what we saw previously was just one example of what task runners are used for. Some other examples include: minifying CSS and JS files, transpiling from ES6 to ES5, compiling CSS from SASS, removing unused CSS, reloading the browser whenever a file is saved in your project, and so on.
Today, there are a number of different tools that help us to effectively automate some tasks in our development process. Three tools stand out: Grunt, Gulp, and NPM scripts.
While Grunt and Gulp are standalone task runners that you can install via NPM, NPM scripts are an interesting alternative for the following few reasons:
- You are using NPM anyway, so why not get more familiar with a tool you are already using?
- Using NPM scripts instead of the aforementioned task runners will streamline your development further.
- By using NPM, you avoid the complexity of having to use a task runner plugin for tasks that can be automated straight in NPM.
Up until this point, we’ve looked back at the history and the evolution of the JS ecosystem. We’ve seen how IIFEs were used to take care of accidental scope leaks. We’ve also seen how NPM takes care of code sharing. We’ve further looked at how some repetitive tasks can be automated with the help of task runners, and how NPM can be used to remove an unnecessary layer of abstraction by keeping our tasks inside NPM scripts.
However, we still haven’t looked at ways to solve the problem of code modularization in JS. So, let’s look at that next.
Modules in JavaScript
In any programming language, a module is a self-contained piece of functionality. You can think of them as different episodes of a TV show. They can be looked at independently. They can stand on their own, although they are a part of a greater whole.
And just like an episode in a TV show has a season and a number, so that we know where it fits in the bigger plot, a module also holds the information that tells us what other modules it relies on (the module dependencies), and what functionality it adds to the entire app; this is what’s known as a module’s interface, the API that’s exposed to other modules.
We’ve seen how in the beginning, JS did not have modules at all. This changed with the introduction of Node.js. Node.js is actually an implementation of CommonJS, a project that was started in 2009 by Mozilla’s Kevin Dangoor.
CommonJS project’s purpose was to define a standard library that would provide JS APIs to be used outside of the browser. This included a module specification, which resulted in developers being able to use code like this in Node.js:
var bootstrap = require('bootstrap');
Working with modules in Node.js
Let’s require and use some modules in Node.js:
To begin, we’ll create a new directory. Let’s call it module-practice. Let’s point our Git Bash to this folder.
Once inside it, let’s create two new files. Let’s call these files main.js and whatever.js as follows:
touch main.js whatever.js
Next, let’s open this entire folder in VS Code as follows:
code .
Now, let’s add some code to whatever.js as follows:
console.log('whatever');
This is as simple as a piece of code in JS can get.
Let’s now see how can we make it available in our main.js file. We’ll just need to require whatever.js as follows:
let whatever = require('./whatever');
Now that it is required, we can use it, so let’s update main.js to this:
let whatever = require('./whatever');

whatever.returnWhatever();
Let’s now run this code with the following:
node main.js
What will happen now is, we will see the word whatever printed inside Git Bash.
Let’s take our experiment a step further. Here’s our updated whatever.js:
module.exports = {
    returnWhatever: function() {
        console.log('whatever');
    }
}
Consequently, we need to update main.js too as follows:
whatever.returnWhatever();
As we have already seen, the require keyword imports a module’s code and makes it available in another file; in our example, the main.js file.
The exports keyword lets us make the code available to other files, with one caveat. It also allows us to choose what parts of our module we want to make available to other files. As we see, the module.exports is an object. The contents of this object is what will be returned when our whatever module is required by main.js. This allows us to expose only certain sections of our code, and enables the setup of a module’s interface. In other words, module.exports is what enables us to keep parts of our code private. Consider this update to whatever.js:
module.exports = {
    returnWhatever: function() {
        returnSomething();
    }
}

let returnSomething = () => {
    console.log('whatever');
}
We don’t need to make any changes to main.js. If we ran it from Git Bash, we’d still get the word whatever output to console. But we have made parts of whatever.js not directly accessible.
As a side note, notice that in the preceding code, the function syntax of ES3 and ES5 are used alongside one another. The section of code that defines the returnSomethingfunction is using newer syntax, which lets us write function definitions without having to use the function keyword.
Module bundlers, a way to use modules in the browser
Unfortunately, you can’t just use the require keyword, as we just saw, straight in the browser. The require keyword is not a part of JS’s browser API. It is important to note here that Node.js has the ability to read from and to the filesystem of your computer. Thus, if you installed any NPM package in a project, using Node.js, you would be able to require such a module as explained previously.
However, JS in the browser does not have access to the file system of your OS, and thus this leaves us with a conundrum: how do we use the JS module syntax inside the browser?
The answer: we have a tool for that, and it’s called a module bundler.
Today, in 2019, there are a number of different module bundlers available, such as webpack, FuseBox, Parcel, rollup.js, or Browserify.
What is a module bundler? Here is a quote from the Browserify home page, which puts it succinctly:
“Browserify lets you require (‘modules’) in the browser by bundling up all of your dependencies.”
Besides bundling all the dependencies that get required through modules in your project, module bundlers also solve issues such as cyclical dependencies; that is, they use algorithms that resolve the order in which all the project’s dependencies should be bundled in your project.
We have almost finished our overview of the JS ecosystem. Next, we’ll look at one particular flavor of a module bundler, and that is webpack.
Once we know just what exactly webpack is and how it works under the hood, we’ll be able to fully comprehend where it fits within Vue CLI.
What is Webpack
Webpack is a module bundler for the web. Some people also refer to it as an asset compiler for web applications.
According to webpack’s GitHub page:
"”It packs many modules into a few bundled assets and so on. Modules can be CommonJs, AMD, ES6 modules, CSS, images, JSON, CoffeeScript, LESS, and so on, and your custom stuff.””
Earlier in this chapter, in the section titled Working with modules in Node.js, we barely scratched the surface of how modules get exported and required in Node apps. What we did not mention is that there are all kinds of different module syntaxes that we can use. As already mentioned, Node.js works with the CommonJS module syntax. Besides CommonJS, there is also Asynchronous Module Definition (AMD). Alongside AMD, you can use ESM modules. With ESM modules, the syntax is a bit different from what we saw earlier.
Let’s rewrite the whatever module using ESM syntax by taking the following steps, and use it in main.js.
To keep things easy, let’s also create a new folder as follows:
mkdir es6-module-practice;
Let’s point our Git Bash to this folder by using the cd command (the change directory command) as follows:
cd es6-module-practice
Let’s add our two files as follows:
touch whatever2.mjs main2.mjs
Now, let’s open our folder with VS Code as follows:
code .
Next, let’s add the code for main2.mjs as follows:
import returnWhatever from './whatever2';

returnWhatever();
Finally, let’s follow it up with code for whatever2.mjs as follows:
let returnWhatever = () => {
    returnSomething();
}

let returnSomething = () => {
    console.log('whatever');
}

export default returnWhatever;
As we can see, we needed to save the files as ESM modules, using the mjs file extension. Node.js supports ESM modules experimentally, so you need to run the following command in Git Bash:
node --experimental-modules main2.mjs
Upon running the preceding command, this is the output you’ll see in the console:
(node:12528) ExperimentalWarning: The ESM module loader is experimental.
whatever
As we can see, besides receiving the expected output in the console, we also got the ExperimentalWarning message. Hopefully, this demonstration of two different kinds of module syntaxes helps us understand what webpack will do for us. Among other things, it will level the playing field, so that we can use various standard and non-standard ways to work with modules in our projects.
Basically, what webpack does is, it takes our modules with dependencies (including our project’s assets such as .png, .jpeg, and .scss files), and it outputs static assets (.js, .css, and image files).
How webpack works
We’ve seen how to use the CommonJS and ESM module syntax. Again, CommonJS is the syntax used for Node.js modules. This means that all the dependencies in a Node.js module are described using the require command. Contrary to this, a webpack module’s dependency can be described in a wide variety of syntaxes. For example, if your module’s dependency was an SCSS partial, you’d use an @import statement. If you were importing an AMD module’s dependency, you’d be using it’s own require and define syntax.
What this means is, that basically, webpack modules accept all the different syntaxes for importing various dependencies of a module. Even the src attribute (for the img HTML element) is considered a webpack module’s dependency.
Building a new project and running webpack on it
Let’s now build a project and integrate webpack bundling into our workflow by taking the following steps:
Let’s add a new directory. Let’s run a command that doesn’t exist as follows:
new-project-with-webpack
The console will return the following:
bash: new-project-with-webpack: command not found
Great! Now, let’s use the repeat last command shortcut, the double exclamation mark, as follows:
mkdir !! && cd !!
Next, let’s add our package.json, and accept all the defaults (using the -y flag) as follows:
npm init -y
Let’s inspect the contents of our folder in VS Code as follows:
code .
Once VS Code is running on our screen, we can double-click the package.json file and verify it’s contents as follows:
{
  "name": "new-project-with-webpack",
  "version": "1.0.0",
  "description": "",
  "main": "index.js",
  "scripts": {
    "test": "echo \"Error: no test specified\" && exit 1"
  },
  "keywords": [],
  "author": "",
  "license": "ISC"
}
Now, let’s add webpack to our project as follows:
npm install --save-dev webpack webpack-cli --verbose
Once done, let’s go back to VS Code and review our package.json again as follows:
{
  "name": "new-project-with-webpack",
  "version": "1.0.0",
  "description": "",
  "main": "index.js",
  "scripts": {
    "test": "echo \"Error: no test specified\" && exit 1"
  },
  "keywords": [],
  "author": "",
  "license": "ISC",
  "devDependencies": {
    "webpack": "^4.29.5",
    "webpack-cli": "^3.2.3"
  }
}
As we can see, a new key has been added: devDependencies. Inside it, we have the webpack and the webpack-cli development dependencies. These devDependencies are the dependencies that you will be using only while building your project, and webpack is a perfect example of such a dependency: you will not need webpack in production. That’s why we’ve used the --save-dev flag when we installed webpack via NPM.
Looking at the file structure of our project, we can now see the following:
node_modules/
package.json
package-lock.json
If you open the node_modules folder, you see over 300 folders inside. This huge list of dependencies begins with a .bin folder. Contrast this with one of our previous examples, vue-from-npm, where we had only four subfolders inside the node_modules folder, even though we installed both the vue and accounting-js NPM packages. Note also that inside the vue-from-npm folder, there is no .bin folder. This is the case regardless of whether you install it with the --save or the --save-dev flag when running npm install. While this might be obvious to more experienced developers, it might be important for better understanding to those developers who do not have enough experience with Node.js and NPM ecosystem.
So, what is this .bin folder? It just stores the compiled native binaries (that is, executable files) of a Node module that you installed using npm install. Not all NPM modules have these compiled native binaries and this is why you won’t always see the .bin folder inside the node_modules folder. Inside this .bin folder, there are many different Node modules. These are all necessary for webpack to work properly.
Back to our project, let’s now add two files to it: index.js, and whatever.js as follows:
touch index.js whatever.js
Currently, we won’t be adding any code to either of those files. Right now, we’ll focus on running webpack in our project.
Running webpack on a project
Let’s go back to our new-project-with-webpack folder, and examine the contents of package.json again, with the focus on the scripts key as follows:
"scripts": {
    "test": "echo \"Error: no test specified\" && exit 1"
},
Use the following command in Git Bash to run test script:
npm run test
This will throw an error, with exit code 1.
Let’s make some changes to it as follows:
"scripts": {
    "test": "echo \"You haven't specified any tests\""
},
Let’s run the test again with npm run test. This time the output in the console will not be as ghastly, because we removed the exit 1 command, and we altered the wording of what will be echoed when running the test command.
Let’s try something else entirely as follows:
// add up 2 numbers
console.log(2+2)
Save changes to index.js, run npm run test again, and this time the output in Git Bash will be number 4 printed to the screen.
What does this tell us? It tells us that we are in complete control of what our scripts are going to do! So, initially we had a script that was named test. This script would echo out a message and throw an error with exit code 1.
And just as we can give our scripts any arbitrary key name, such as test, we can also give them any arbitrary value. Of course, console.log(2+2) is a silly value to give to a script key. We can give our scripts keys much better values, for example:
  "scripts": {
    "webpack": "webpack"
  },
Now, when we run an NPM script with the value of webpack, this script will then run the webpack executable. Let’s try it out as follows:
npm run webpack
This returns an error, but out of all the information that gets logged out, the following two lines are the most important:
Insufficient number of arguments or no entry found.
Alternatively, run 'webpack(-cli) --help' for usage info.
The reason we got this error is because webpack looks for an entry point to get started on. By default, this entry point is set to ./src/index.js. So, let’s add this src folder, and move our index.js into it as follows:
mkdir src && mv index.js $_
Now, let’s run webpack from the command line again as follows:
npm run webpack
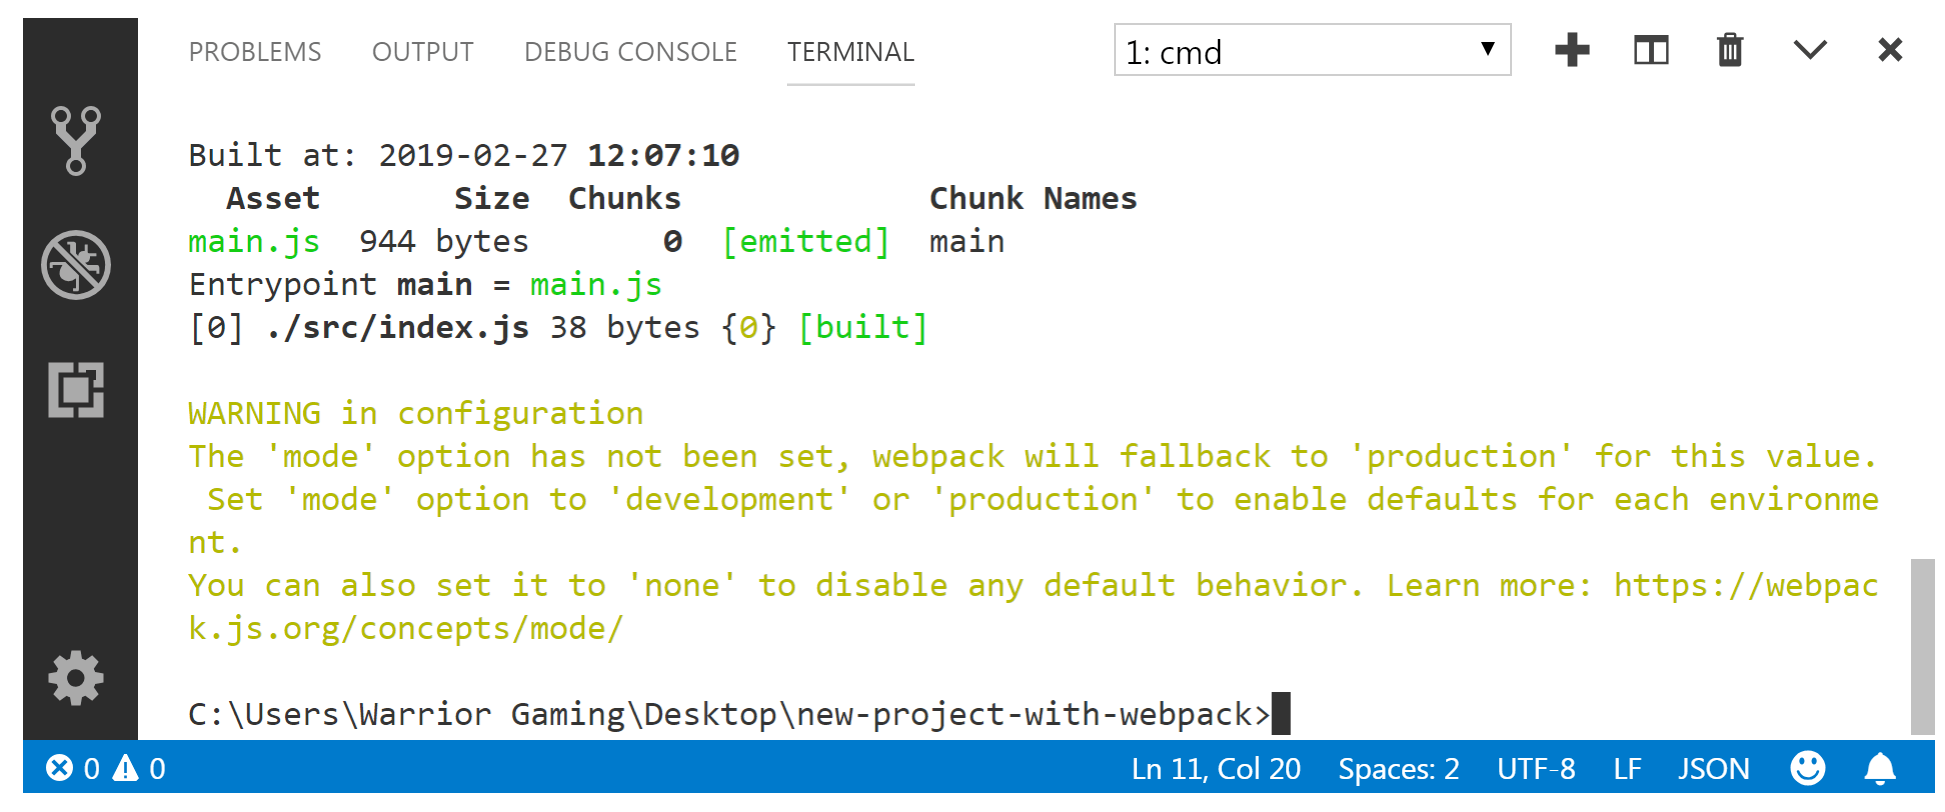
This time we’ll get a much better output. However, there is no syntax highlighting in Git Bash by default. This can be fixed really fast. Since we are already using VS Code, simply type the keyboard shortcut of Ctrl ~. If you’re not familiar with this symbol, it’s called tilde, and it’s located right under the Esc key, and above the Tab key. Pressing this keyboard shortcut will open up a terminal window inside VS Code, and if you execute the npm run webpack command again, you’d get nicely formatted and color highlighted output, like this:
As a side note, your screen’s colors might look different, depending on the color scheme you are using in your VS Code. To access the color themes, use the following keyboard shortcut: Ctrl K Ctrl T.
Looking at the message that was output to the console, we can see that it can be grouped in two sections: the one with the actual information (hash, version, time, built at, entrypoint, and so on) and the warning. The warning reads that we haven’t set the mode option.
If unset, the mode option defaults to production. However, we can also set it to development, which is optimized for faster builds. This means that we can add another script in our scripts section of package.json, and this script can then be used for the development build of our project. This is the updated scripts section:
"scripts": {
    "webpack": "webpack",
    "dev": "webpack --mode=development"
},
Now, we can run the development mode in webpack, with the following command:
npm run dev
Here is the complete output in the console:
Hash: 86c0da41f48381d9bd70
Version: webpack 4.29.5
Time: 108ms
Built at: 2019-02-27 12:23:30
  Asset Size Chunks Chunk Names
main.js 3.81 KiB main [emitted] main
Entrypoint main = main.js
[./src/index.js] 38 bytes {main} [built]
As we can see, it took webpack 108ms to bundle my project in the development mode. When I ran it in production mode (the default npm run webpack command in my setup), it took 447ms.
What does actually happen when we run this command? What does webpack do in the background? It builds a dependency graph of all the module dependencies. To go back to our analogy from earlier in the chapter, it’s as if we gave it a bunch of episodes of a TV show, recorded on a bunch of Blu-ray discs, and it takes all of them and lines them up properly. Webpack figures out the correct place for each of these modules, and then bundles them up and serves them to the dist folder. If you look at your project’s file structure again, you’ll see that now there’s a new addition: the dist folder. If we inspect the contents of the dist folder, this is what we’ll see:
./dist/
   |- main.js
If we inspect the main.js file, we’ll see that there is a lot of stuff that webpack adds. Even on a tiny project like ours, the output gets to be about 100 lines long.
The first few lines of our main.js file look like this:
/******/ (function(modules) { // webpackBootstrap
/******/ // The module cache
/******/ var installedModules = {};
...
Let’s run our npm run webpack command again to see how it will affect the output in main.js.
If we inspect main.js, we will see that now we have only a single line of code, beginning with the following:
!function(e){var t={};function n(r){if(t[r])return t[r].exports;var ...
What this means is that webpack uglifies and minifies our code when run in production mode.
Obviously, this affects the file size too. While the bundled main.js file has the file size of 3.81 KB in development mode, when bundled in production mode, it has just 944 bytes.
Finally, to avoid seeing the warning message, we can update our scripts entry in package.json to this:
"scripts": {
    "webpack": "webpack --mode=production",
    "dev": "webpack --mode=development"
},
At this point, we can start using webpack with Vue. However, we won’t be using the Vue CLI. Instead, we’ll see how to set everything up manually. This is not the best way to do things, but it will help us better understand why things are done the way they are in the Vue ecosystem.

