Before you build your first app in Rails 6
Things you should know before you start building a Rails app
By: Ajdin Imsirovic 18 December 2019
In this article, we’ll go into a number of concepts to learn before starting to code real apps in Ruby on Rails.
 Image by CodingExercises
Ruby on Rails is the first MVC web framework.
Once you’ve setup your Rails development environment, you can start adding projects.
In this article, we’ll be building our first Rails app with a PostgreSQL backend.
Let’s start.
Add a new Rails Project and Track it with Git
We’ll start a new Rails project:
rails new firstapp -d postgresql
This is the output in the console:
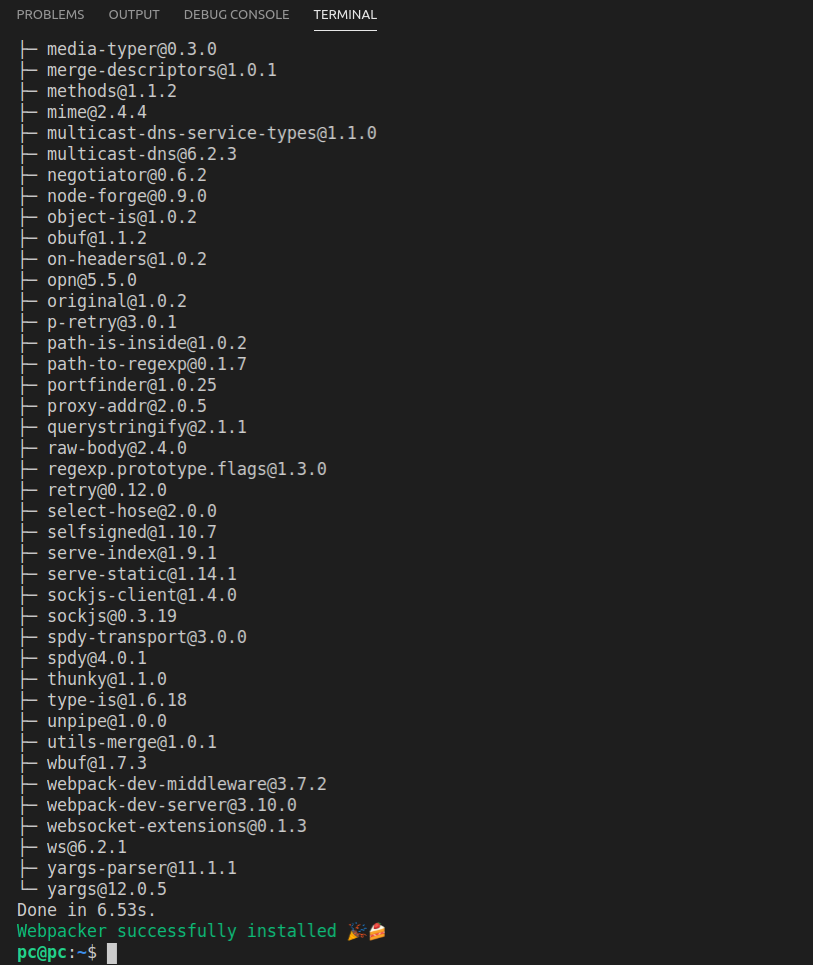
The above screenshot is not showing the complete output, as it spans several screens. Basically, what happens above is that the rails new command installs all the gems that are required for our project to be ran.
The gems are installed using the bundle command, which can be seen on this line of the output:
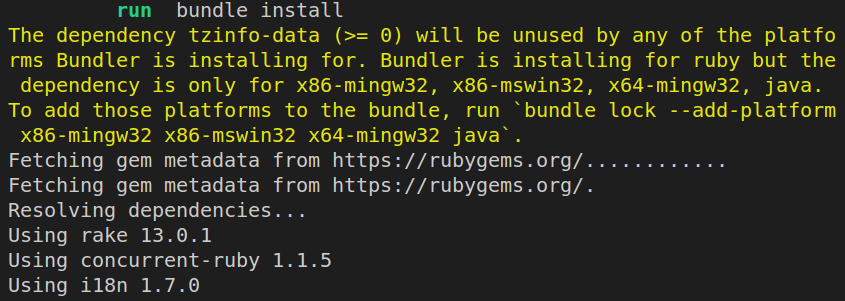
Setting up Git and Github
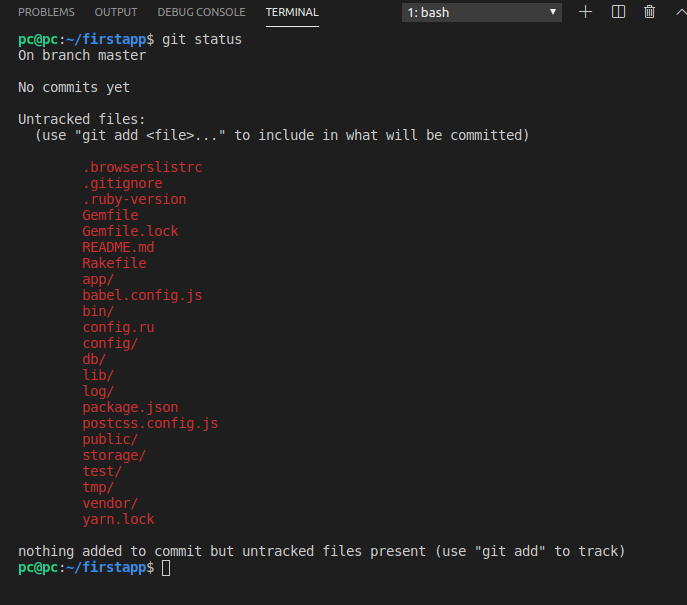
If we run the git status command right after we’ve added a new Rails project, we’ll see that it has No commits yet.
Let’s run git add --all, then git commit -m "Initialize Rails 6".
Next, let’s open Github and add a new repository.

Next, let’s push our existing repository from the command line:
git remote add origin https://github.com/<username>/<projectname>.git
git push -u origin master

Here’s the output in the console:
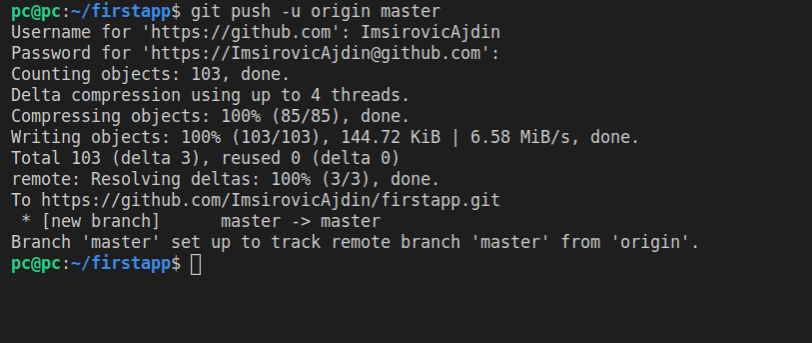
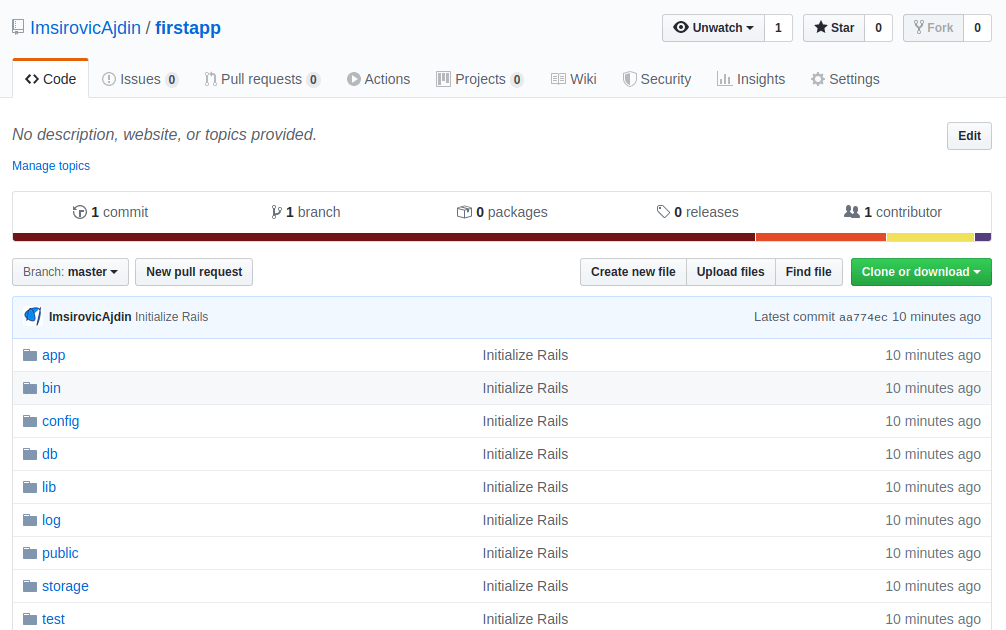
Now we can view the pushed repository on GitHub.
Note that 99.99% of the time, all the command line commands will be run from the root of our Rails application.
The Structure of a Rails 6 Project
Below is the screenshot of the file structure of our newly-installed Rails 6 app. Our MVC folders are all placed inside the app folder.
This is the file structure of our brand new Rails 6 app in VS Code.
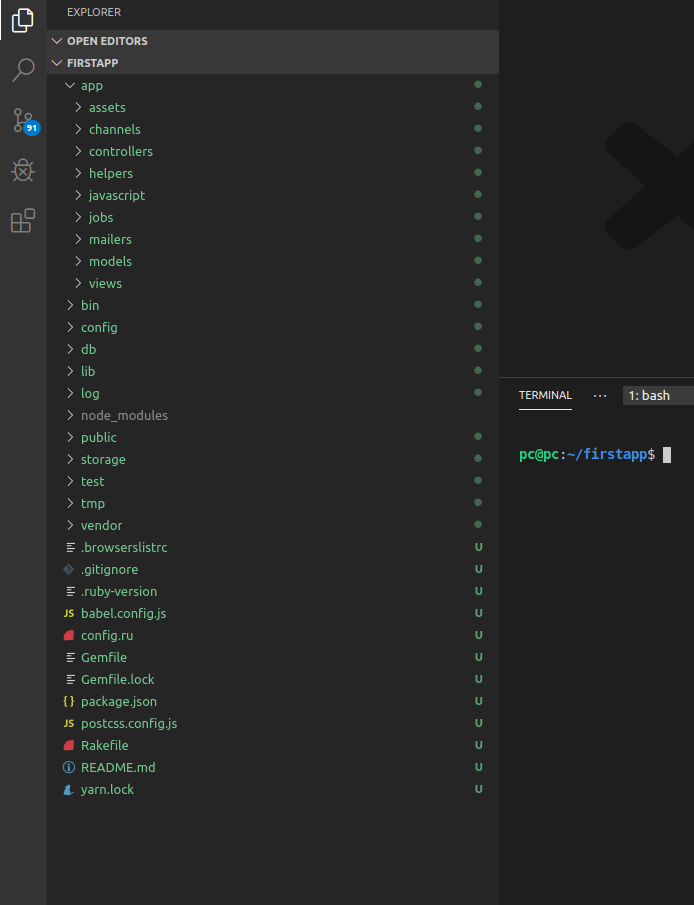
Here’s the quick rundown of what can be found inside the app folder:
- the
assetsfolder holds images and styles - the
channelsfolder allows us to work with ActionCable; ActionCable allows us to work with websockets - the
controllershold the C in the MVC pattern - the
helpersfolder holds our view helper files - the
javascriptfolder is now a top-level folder; in previous versions, it used to be placed inside the assets folder - the
jobsfolder is for things like chron jobs; periodical operations that need to be performed on the server, for example, every day, in 24-hour periods mailersare for sending emailsmodelsare the M in the MVC patternviewsare the V in the MVC pattern
The config folder holds our app’s configurations; we can override these if needed, but for the most part, we should be fine, since this is a starter app.
The db folder holds our database files: database migration files.
The lib directory is a place to put our own reusable code - this is the code that we want to share in various Rails projects.
The node_modules folder holds all the Node.js modules that our app is using.
The public folder holds static files that don’t need to be processed by our server; in other words, it holds plain HTML files that can be served directly to the user without going through the MVC pattern.
The log folder holds our application logs, so that we can find the history of errors in our Rails 6 app.
The test folder holds our test files.
The Gemfile holds our application’s gems. To add functionality to our app, sometimes we need to work on the Gemfile, and Rails works on the Gemfile.lock.
The vendor directory is a place for third-party Ruby code - if it’s not being added to our app as a gem, and listed in a Gemfile.
Inspecting the Gemfile
The Gemfile is the place to get a quick overview of what’s happening in our project.
For example, we can see the rails gem:
gem 'rails', '~> 6.0.2'
We can also see the version of pg gem, which allows us to work with PostgreSQL:
gem 'pg', '>= 0.18', '< 2.0'
If we want to add any additional functionality to our Rails 6 app, we usually add it as a gem, by simply typing it in.
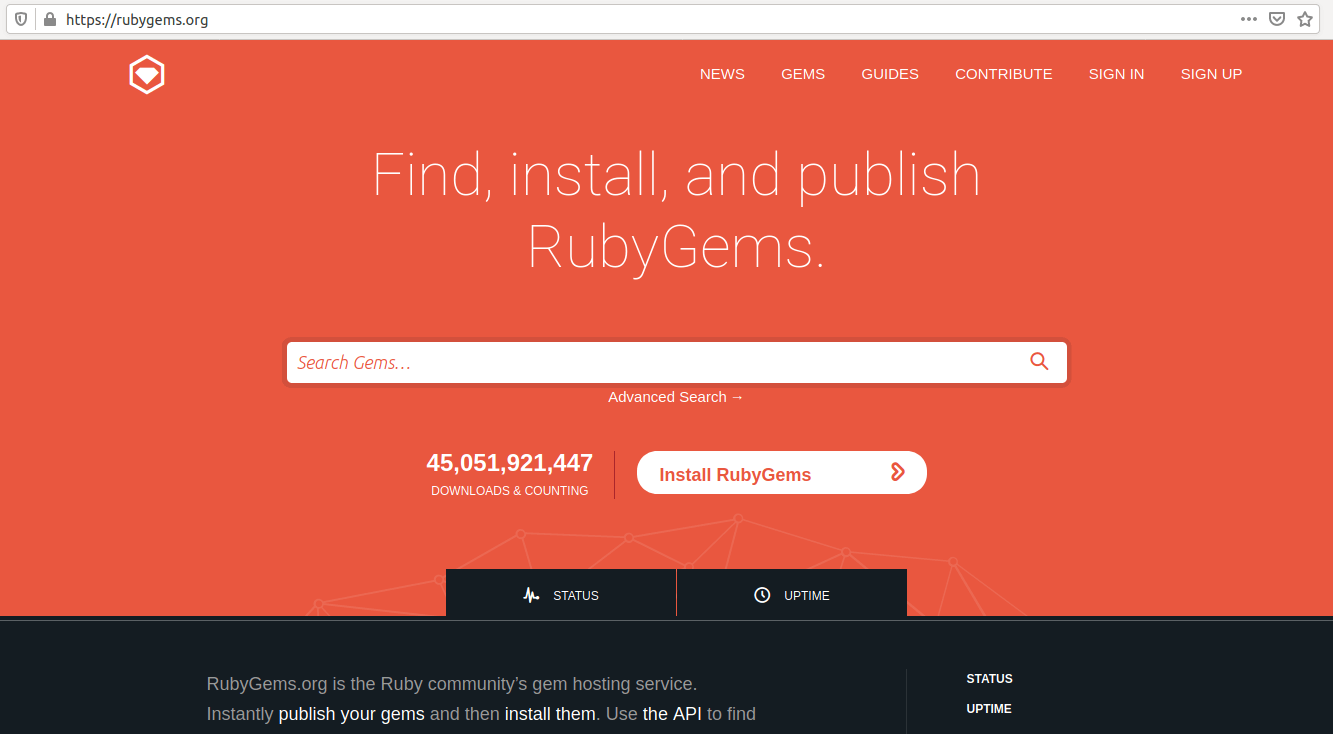
For a list of available gems, we can visit the rubygems website, at rubygems.org.
To add a new gem, we locate it on the website above, copy-paste the specific gem snippet, then run this in the command line:
bundle
The bundle command is provided by the bundler gem.
Bundler, as it’s website description says, is “the best way to manage a Ruby application’s gems”.
Working with Our Apps Database
To add our database, we need to run rails db:create.
Here’s the result of running the above command:

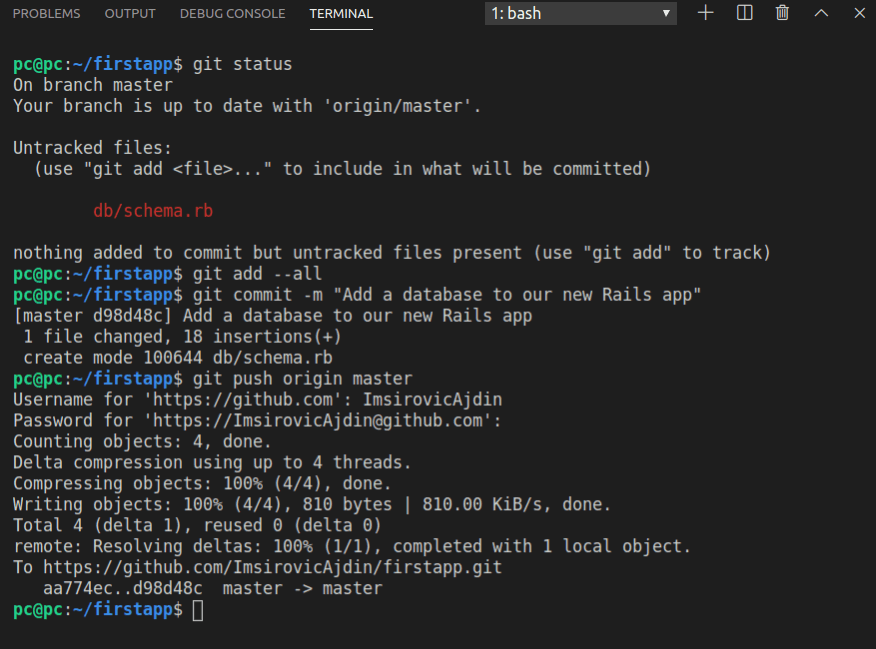
If you run git status right now, you’d see the following message:
On branch master
Your branch is up to date with 'origin/master'

nothing to commit, working tree clean
So, as we can see, there are no changes in our app.
Now we’ll run the rails db:migrate command.
Let’s run the git status again.
This time, we do have some changes, namely a new file (currently untracked): db/schema.rb.
We can inspect the schema.rb file in VS Code by using the file launcher with CTRL + p, and typing: db/schema.
This is enough for the launcher to pin-point our file location, so now we can just click on it to open it.
Here’s a screenshot of the new schema.rb file:
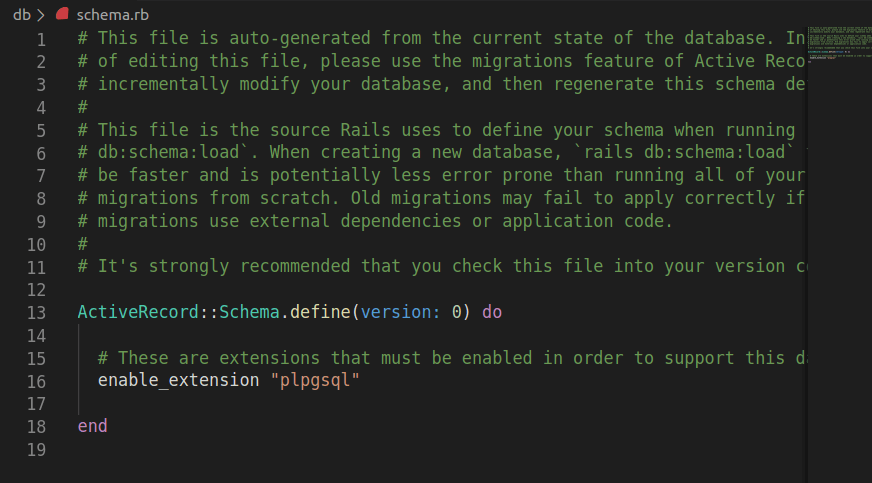
Sidenote: Rails keeps information about our database inside config/database.yml file.
Let’s now commit our changes and push them to our origin/remote on Github, like this:
Back in Github, we can see that our repository now lists “2 commits”. This is actually a clickable link, and when we click it, it will take us to this screen:
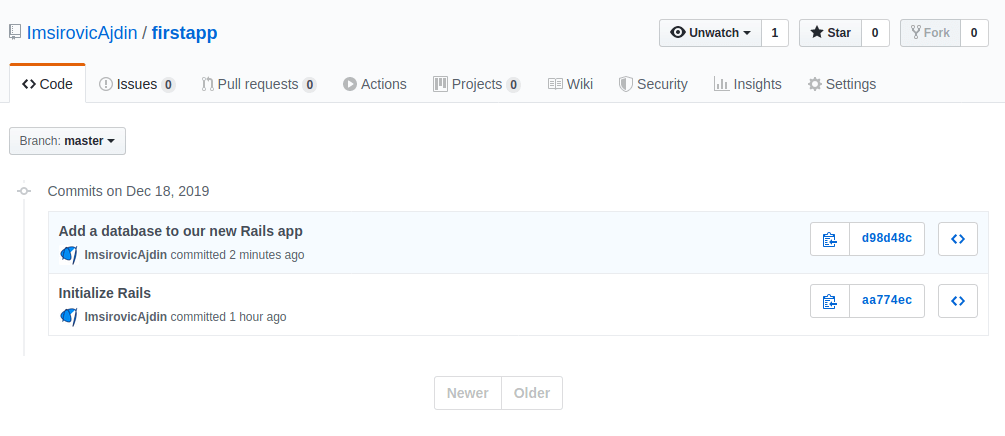
Here we can click on individual commit messages (these are links too!). For example, if you click on the commit message of “Add a database to our new Rails app”, a new page will open, listing all the files included in that commit.
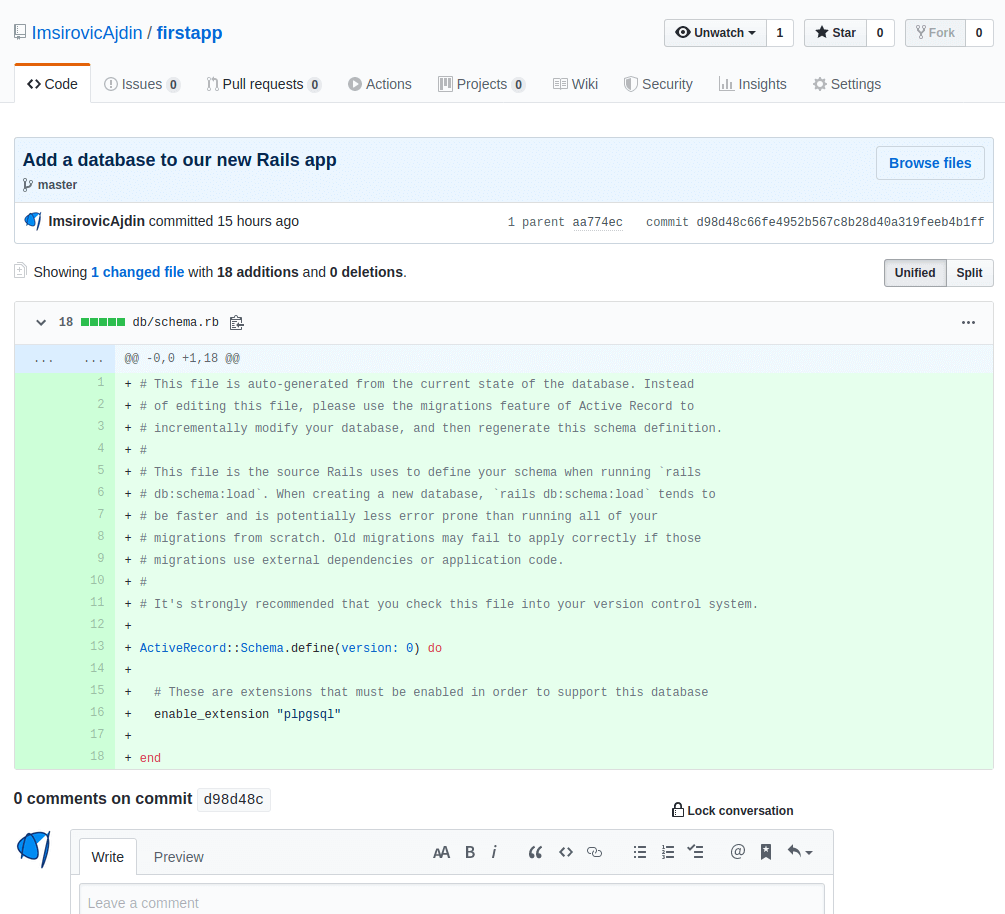
The description reads:
Showing 1 changed file with 18 additions and 0 deletions.
Looking at the actual file, we can see that all 18 lines of it have the + sign at the beginning of each line; that means all these 18 lines are newly added lines. If there were any deletions in this commit, they’d be shown with a minus sign instead of the plus.
Next, we’ll serve our Rails project locally in our browser.
Serving a Rails 6 Project Locally
WEBrick is the default web server in Rails. WEBrick actually comes bundled with Ruby standard library.
To serve our web application, we need to run a command from the root of our Rails web app.
Once we’re at the right location, we’ll just run this command in the console:
rails server
Alternatively, we could use the shorthand command:
rails s
The result is the same.
Here’s a screenshot of the above command executing in the console:
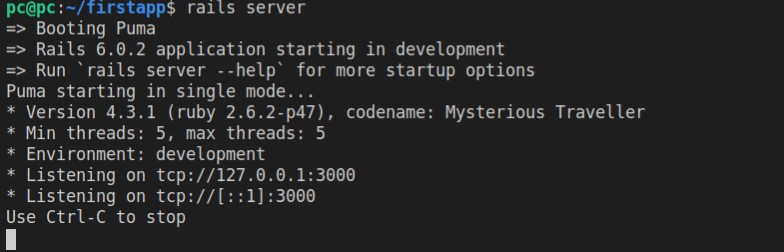
Notice the section in the console output that says: “Listening”. This means that whatever URL we try to access in the browser, the web server running in the console will listen to and try to resolve (access).
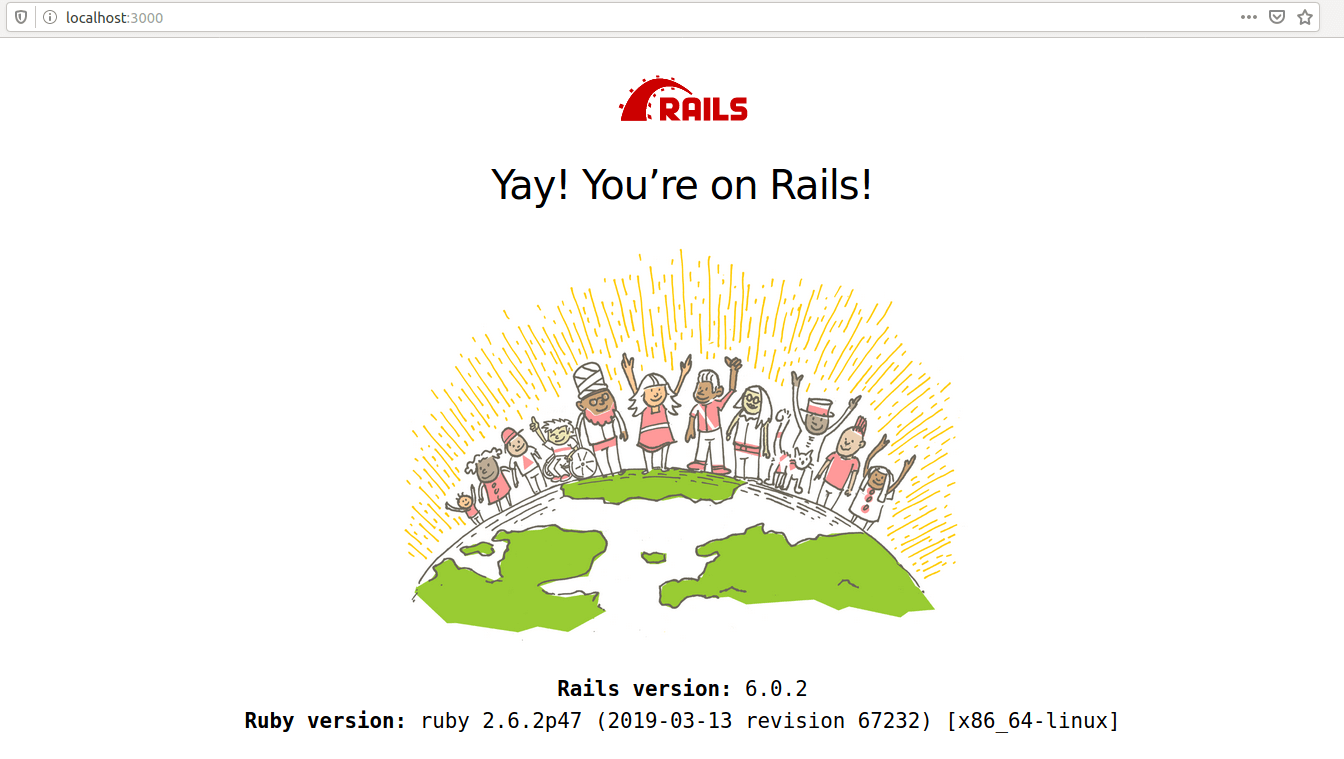
Here’s the app being served in the browser, at localhost:3000.
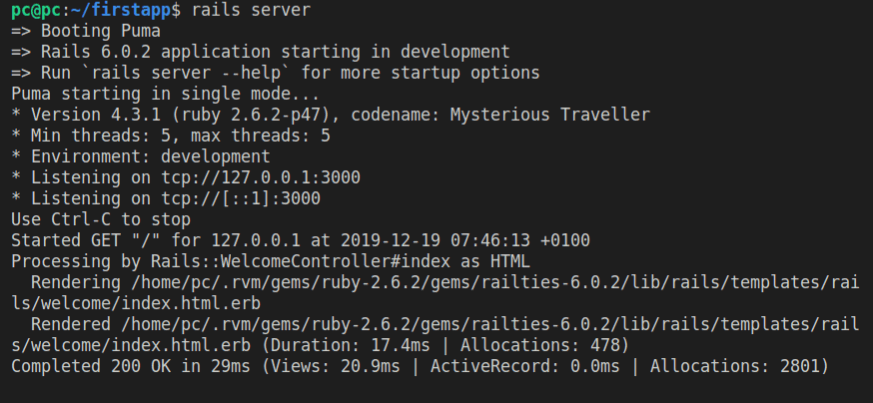
As soon as we’ve typed in the address of localhost:3000 in our browser, and pressed the enter key, this is what happened in the console showing the Rails server running:
To stop the server, use CTRL + c keyboard combination.
Using Rails Generate Commands to Add New Functionality
Rails has a wonderful utility that we can use.
It’s the rails generate command.
It’s the way to add new files, be it model, view, or controller.
To see all the available generate options, we’ll just run this command in the root of our app:
rails generate
In Rails 6, this is what gets returned:
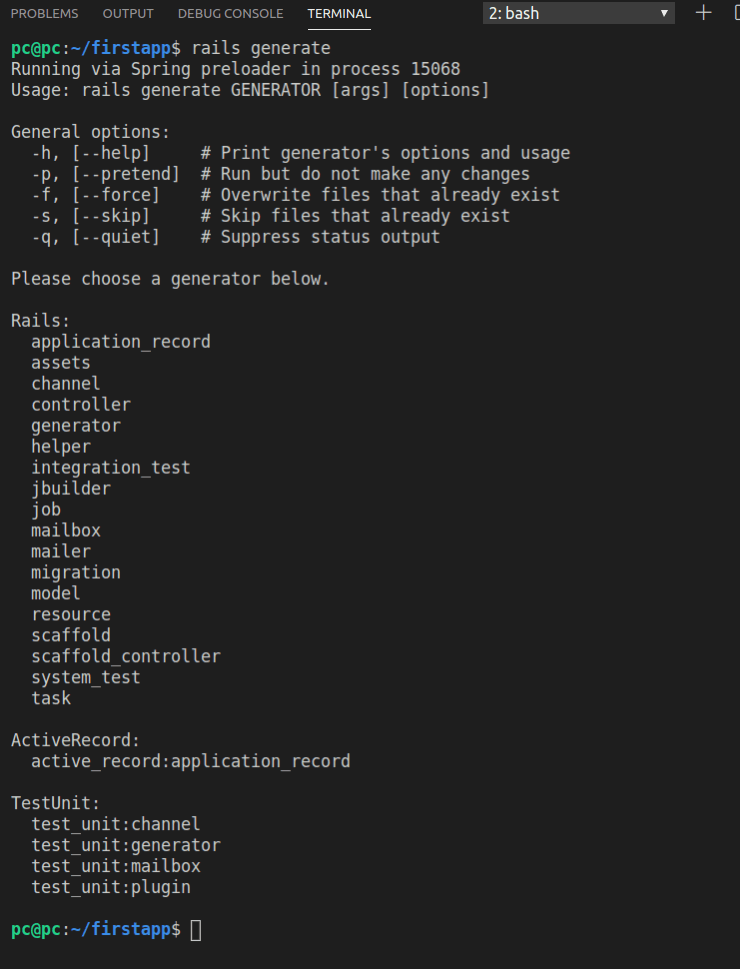
Obviously, we need to pass a parameter to our rails generate command.
The parameter falls into three possibilities:
- Rails
- ActiveRecord
- TestUnit
It we type any of these parameters, the returned output will give us further information of the available possibilities.
For example:
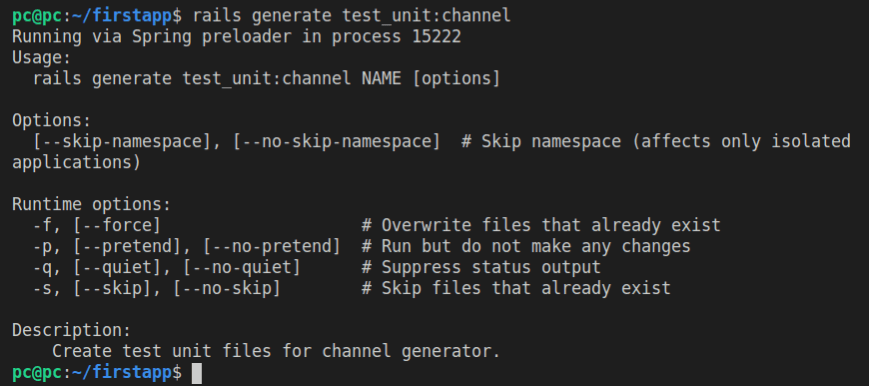
rails generate test_unit:channel
We get the same output if we provide the -h flag to our generate command. Another way to do it is to pass the --help flag, like this:
rails generate test_unit:channel --help
The description section in the returned output reads:
Description:
    Create test unit files for channel generator.
Let’s see how a model generator would work:
rails generate model --help
Whoa, that’s a lot of output! About 2 screens’ worth.
If you look at the Usage section, at the very top of the output, you’d see:
Usage:
    rails generate model NAME [field[:type][:index] field[:type][:index] [options]]
The Description section describes how the model generator works:
Description:
    Stubs out a new model. Pass the model name, either CamelCased or
    under_scored, and an optional list of attribute pairs as arguments.

    Attribute pairs are field:type arguments specifying the
    model's attributes. Timestamps are added by default, so you don't have to
    specify them by hand as 'created_at:datetime updated_at:datetime'.

    As a special case, specifying 'password:digest' will generate a
    password_digest field of string type, and configure your generated model and
    tests for use with Active Model has_secure_password (assuming the default ORM
    and test framework are being used).

    You don't have to think up every attribute up front, but it helps to
    sketch out a few so you can start working with the model immediately.

    This generator invokes your configured ORM and test framework, which
    defaults to Active Record and TestUnit.

    Finally, if --parent option is given, it's used as superclass of the
    created model. This allows you create Single Table Inheritance models.

    If you pass a namespaced model name (e.g. admin/account or Admin::Account)
    then the generator will create a module with a table_name_prefix method
    to prefix the model's table name with the module name (e.g. admin_accounts)
It also gives the Available field types explanation, as well as some examples under the Examples section.
Adding a Controller
Let’s see the options for adding a controller:
rails generate controller --help
Looking at the Example section, we see the following:
Example:
    `rails generate controller CreditCards open debit credit close`

    CreditCards controller with URLs like /credit_cards/debit.
        Controller: app/controllers/credit_cards_controller.rb
        Test:       test/controllers/credit_cards_controller_test.rb
        Views:      app/views/credit_cards/debit.html.erb [...]
        Helper:     app/helpers/credit_cards_helper.rb
Before we continue, let’s make sure that git is up to date with the changes in our app.
git status
We get back the following output:
On branch master
Your branch is up to date with 'origin/master'.

nothing to commit, working tree clean
Great! This means that we’ll be able to see the changes that our rails generate command adds, and we’ll also be able to save these changes in a separate commit message.
Since this is just a test app to play with, let’s add a controller we’ll call play. We’ll be using the camel_cased appoach to controller-naming.
We’ll also need to add actions to this controller. To start, we’ll just add the default action, index.
Before we run the actual generate command, let’s take it for a test-drive.
We’ll pretend to generate a controller with the --pretend option, like this:
rails generate play index --pretend
Here’s the output:
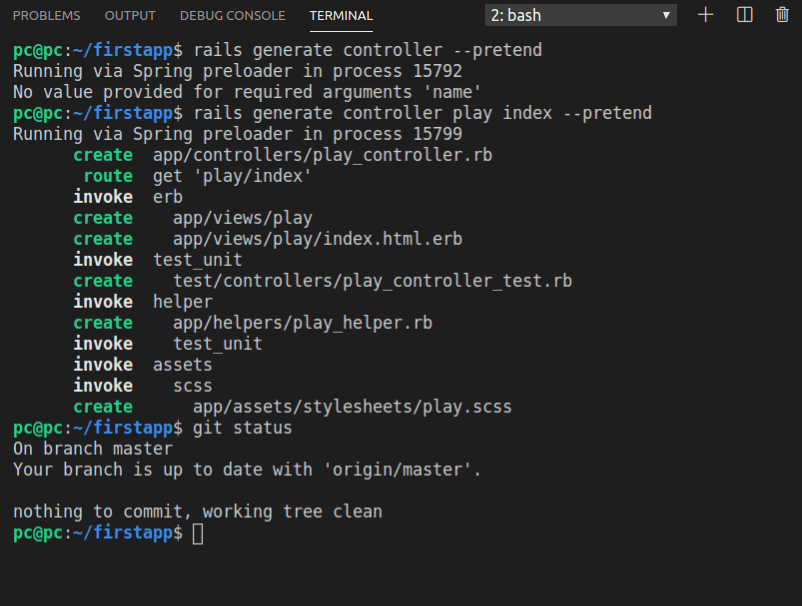
As can be seen, indeed, no changes were made, which we verified by running the git status command.
From the output above, we can conclude that the following files would be added, if we were to use the generate command without the --pretend flag:
app/controllers/play_controller.rb
app/views/play/
app/views/play/index.html.erb
test/controllers/play_controller_test.rb
app/helpers/play_helper.rb
app/assets/stylesheets/play.scss
Running the generate controller play index command would create 5 files and 1 new folder.
Let’s now run this command then verify that this is the case, using git status.
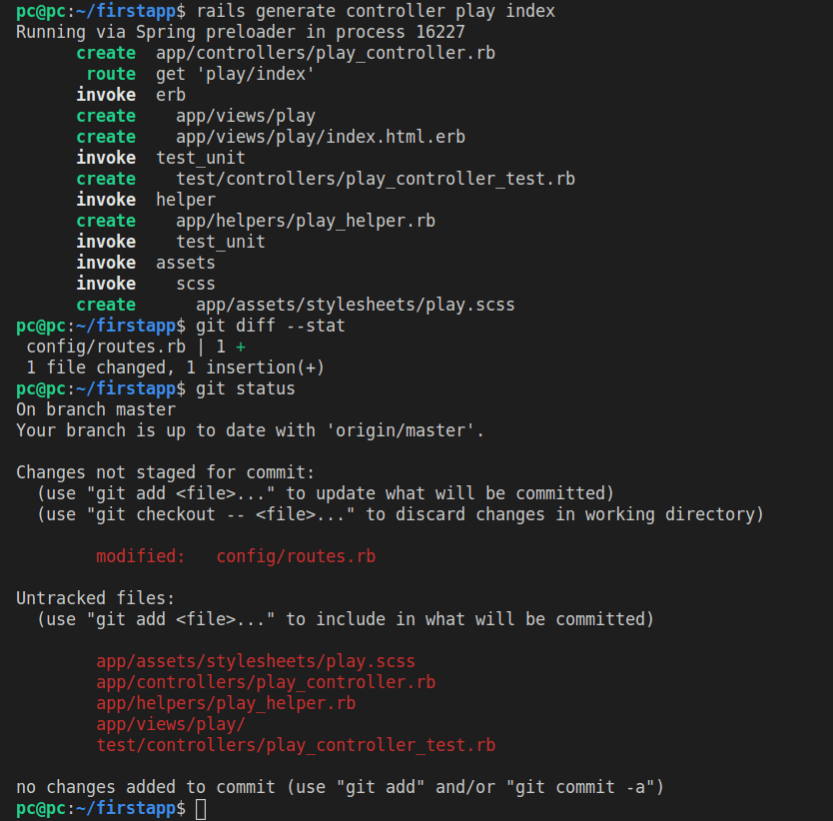
First we’ll run the generator:
rails generate play index
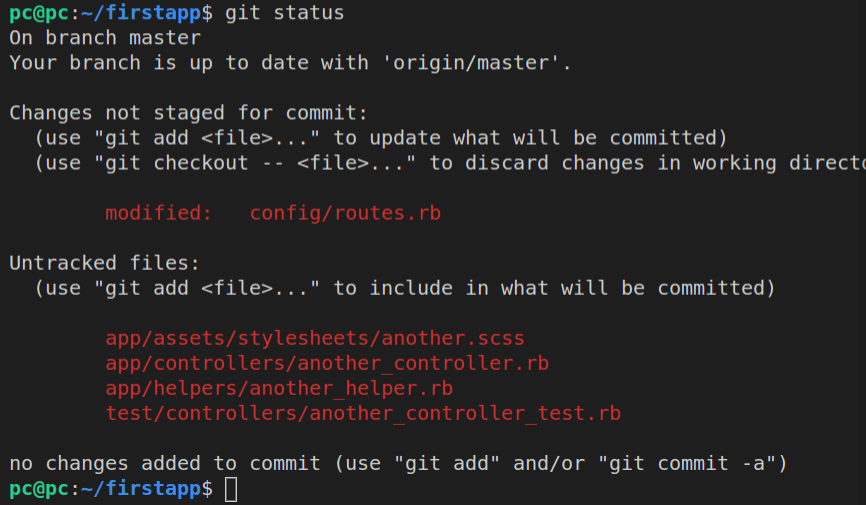
Then we’ll run the git status command:
git status
Here’s the result of running these two commands:
In VS Code interface, if we click the third icon from the top in the left-most vertical menu, we’ll see the source control with “6 pending changes”.
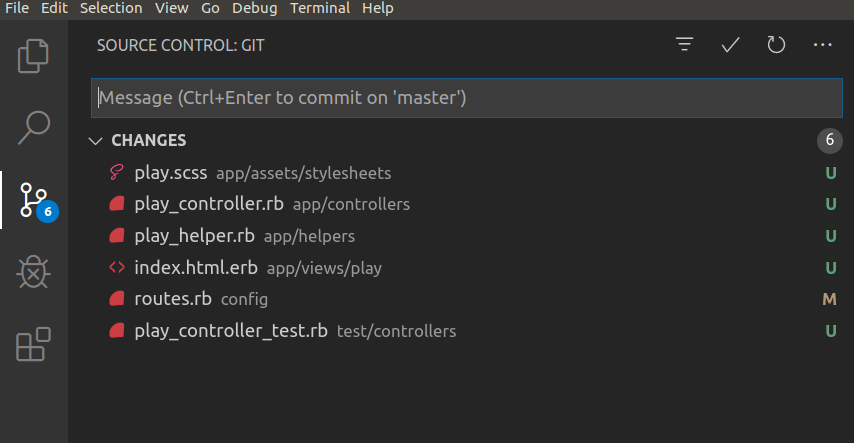
To the right of each file, we can see the letters U and M: the former is for the untracked files, while the latter is for the modified files (meaning these files were already there).
Let’s use the command line to see the changes made to the routes.rb file.
git diff config/routes.rb
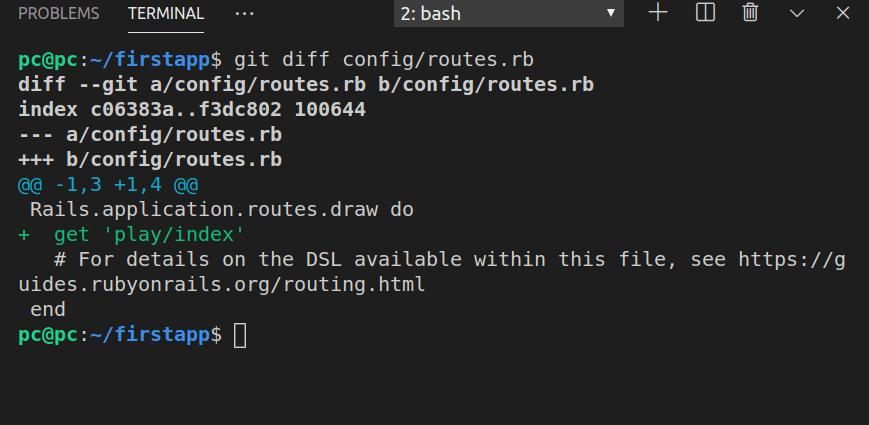
Running the rails generate controller play index command, among other things, caused an update on the config/routes.rb file. Basically, it added a new route:
get 'play/index'
This means that a GET request will be invoked when a user tries to access the play/index route (via the play controller).
After committing our changes with the commit message of “Add ‘play’ controller, ‘index’ action”, we can see a list of our commits right in the console.
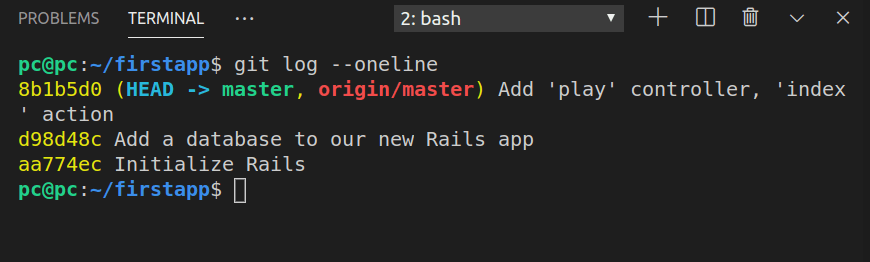
To have all the commits fit a single line each, we run the following command in the console:
git log --oneline
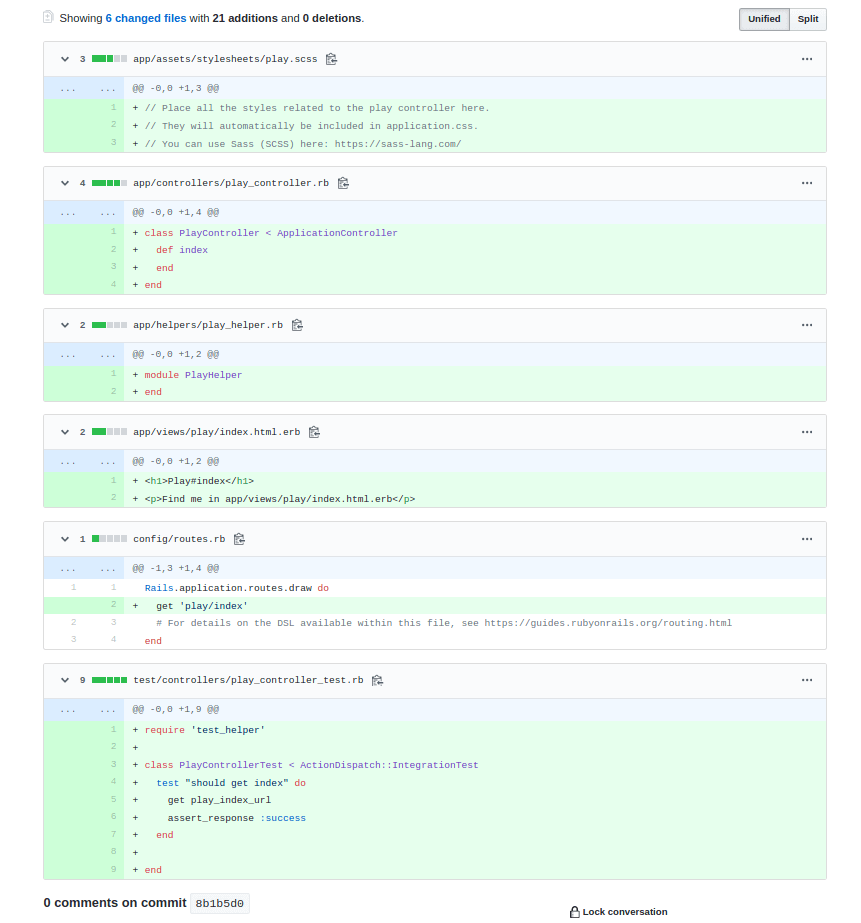
Once you push the changes to GitHub, you’ll see the updates there too:
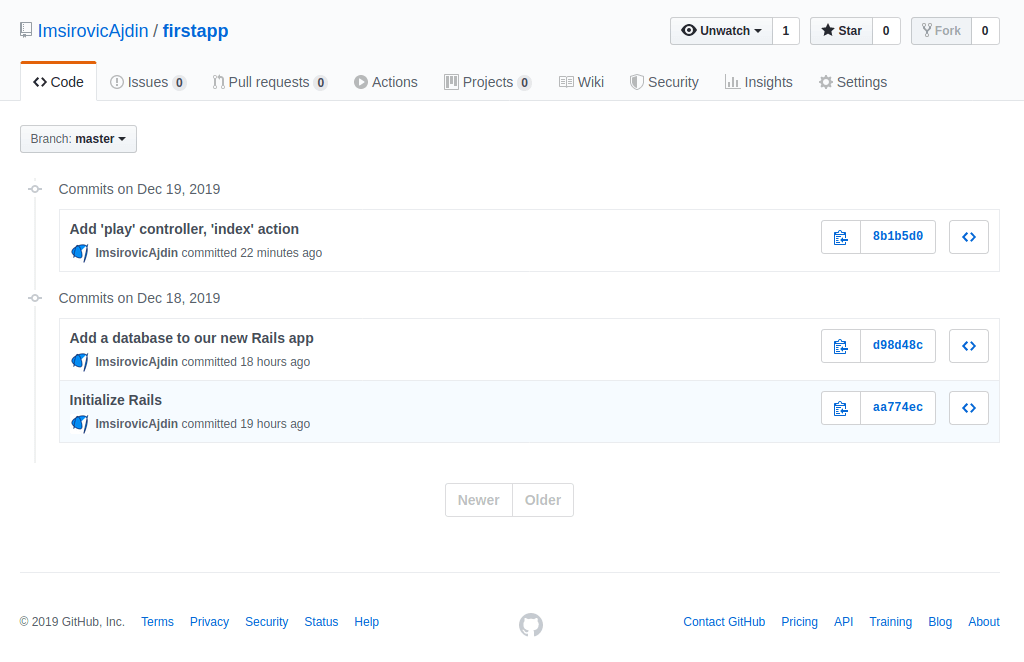
Clicking the newest commit’s link, we can see nicely formatted changes in a single screen.
The play_controller.rb file contains just a Ruby class definition:
class PlayController < ApplicationController
  def index
  end
end
In line with the good OOP practices, the PlayController inherits from ApplicationController.
Inside the class, there’s our index action.
def index
end
The index action is just a method of our PlayController class.
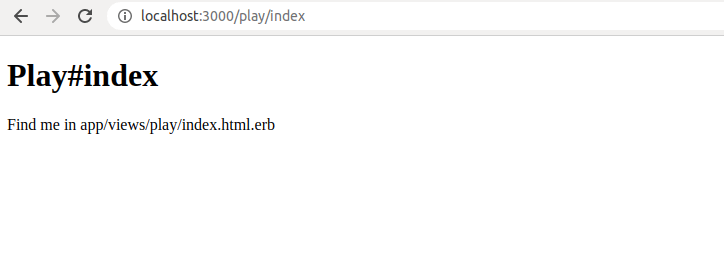
This index action has a corresponding view, in views/play/index.html.erb:
<h1>Play#index</h1>
<p>Find me in app/views/play/index.html.erb</p>
At this point, you might ask: “But wait, where’s the rest of the file?”.
Actually, the above-referenced index.html.erb is sort of “injected” into a layout file.
Layout files can be found inside the views/layouts/ folder.
Specifically, the layout file that injects the views/play/index.html.erb file is this file: views/layouts/application.html.erb.
Here’s the contents of the application.html.erb file:
<!DOCTYPE html>
<html>
  <head>
    <title>Firstapp</title>
    <%= csrf_meta_tags %>
    <%= csp_meta_tag %>

    <%= stylesheet_link_tag 'application', media: 'all', 'data-turbolinks-track': 'reload' %>
    <%= javascript_pack_tag 'application', 'data-turbolinks-track': 'reload' %>
  </head>

  <body>
    <%= yield %>
  </body>
</html>
If you’re wondering what this erb is, it’s just the “embedded Ruby” format. Basically, HTML files that can have Ruby code in them. Similar to how php files can have either only PHP, or only HTML, or a combination of the two.
Looking at views/layouts/application.html.erb file, we can see the <%= yield %> section of code.
This <%= yield %> code is what gets “injected” into the application.html.erb file, which depends on what URL was called.
So, when a user causes the app to navigate to the localhost:3000/play/index route, the application.html.erb will receive the contents of the views/play/index.html.erb file, and “inject” it into the section of the page that has the <%= yield %> line of code.
Understanding erb files
We said that erb files are plain HTML files that can have Ruby code in them.
This means that all the processing of these files will be done in Ruby - if we have Ruby code inside erb files.
This Ruby code can be self-contained, meaning, just do some operations based on the instructions stored in that single file, or it can call the database and communicate with other parts of our application.
To add Ruby code in an erb file, we use this syntax:
<% ruby_code_here %>
The above code will simply run the Ruby code found in between the erb delimiters (<% and %>), but will NOT show the output inside our HTML.
Alternatively, we can use this syntax:
<%= ruby_code_here %>
The above code will run Ruby code found between the erb delimiters, and then it WILL show the output inside the HTML.
An easy way to remember this difference is to:
- read the
<%=characters as “output the result of running”, - read the
<%characters as “run the”
So, reading this line of code:
<%= ruby_code_here %>
…we could say it reads: “Output the result of running ruby_code_here”.
Similarly, looking at this line of code:
<% ruby_code_here %>
…we could read it like: “Run the ruby_code_here”.
Thus if we used, for example, <% yield %>, nothing would get returned to our HTML.
But since we are using <%= yield %>, it works perfectly.
Working with requests and routes
Two most common request types on the web are GET and POST.
The GET request is used when you click on links or type a web address directly inside the browser’s address bar.
The POST request is used when you submit some data to a web page, usually with forms.
There are 3 kinds of routes in Rails:
- root route
- simple match route
- default route
Simple match route, short form:
get "play/index"
Simple match route, long form:
match "play/index", :to => "play#index", :via => :get
The above code means that the router should take play/index and match it toplay#index; that is, play controller, index action.
If we used only the simple match route, that would mean that every static page in our app would need to have a static string associated with it.
This can work, but we can do better, and write a routing rule which could handle multiple cases.
That’s what the default route allows us to do.
The default route structure is:
:controller/:action/:id
Default route uses symbols.
get ':controller(/:action(/:id))'
match ':controller(/:action(/:id))', :via => :get
The round parentheses above mean that the /:action and the /:id symbols are optional. Thus, we we typed just this url:
localhost:3000/play
… the router would still call the play controller, and its index action, and that’s what would be served under the localhost:3000/play URL.
Root route long form:
match "/", :to => "play#index", :via => :get
Root route short form:
root "play#index"
The newest changes are saved in commit titled “Working with routes”.
Add another controller, without the generate command
In this section, we’ll add another controller.
We’ll call this controller: another.
To add it, let’s first run git log --oneline. Here’s the output:
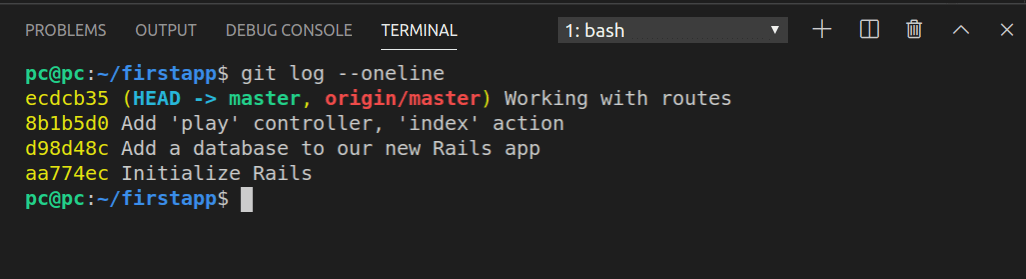
Now we’ll run git diff on the two commits: d98d48c and 8b1b5d0. That way, we’ll see the changes that were made between “Add a database to our new Rails app”, and “Add a ‘play’ controller, ‘index’ action”.
Effectively, we’ll see what files were added and modified when the play controller was added using the generate command.
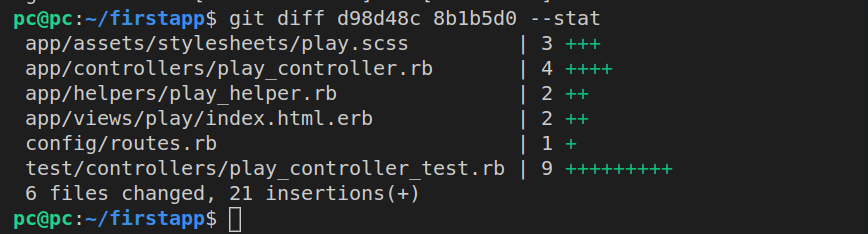
So let’s run our command:
git diff d98d48c 8b1b5d0 --stat
Here is the list of files we receive back:
Now we can inspect the changes in each individual file. For example:
git diff d98d48c 8b1b5d0 app/assets/stylesheets/play.scss
Here’s the result:
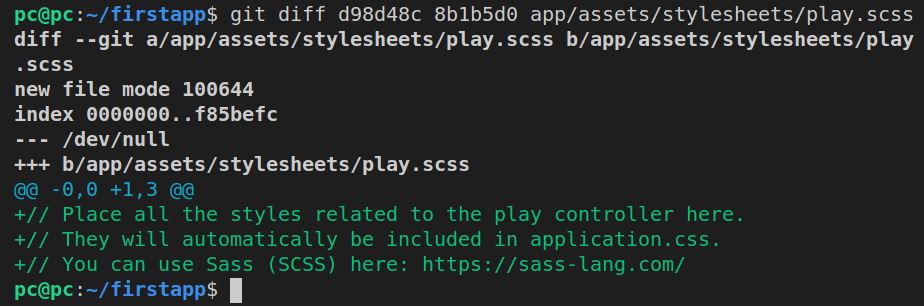
Obviously, there are no significant changes in this file. It’s important to note the text in the comment: place all the styles related to the play controller here.
So let’s add our new controller’s SCSS file, from the command line:
touch app/assets/stylesheets/another.scss
Next, let’s open it in VS Code:
code app/assets/stylesheets/another.scss
Now we’ll re-type the text of the comment:
// Place all the AnotherController styles here.
// These will be auto-imported to application.css.
// Visit https://sass-lang.com for info.
Ok, we didn’t write the comments word-for-word, but the gist is the same.
Next, let’s run git diff on play_controller.rb:
git diff d98d48c 8b1b5d0 app/controllers/play_controller.rb
This is the output:
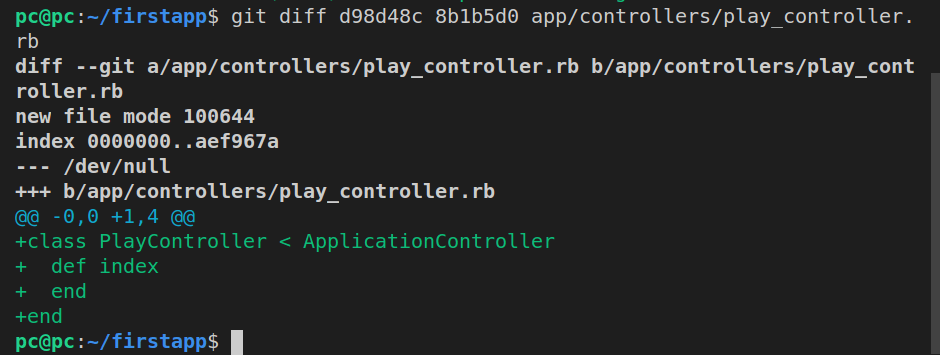
Let’s add our another_controller.rb file. We’re using snake case, just like the generator command did with the play controller earlier:
touch app/controllers/another_controller.rb
Next, we’ll open the file:
code app/controllers/another_controller.rb
Now, let’s code it up:
class AnotherController < ApplicationController
  def index
  end

  def update
  end

  def edit
  end

  def hello
  end
end
In the above code, we’ve extended our new AnotherController from AppController and we’ve defined four methods: index, update, edit and hello.
Now we can continue, by inspecting the contents of the app/helpers/play_helper.rb file:
git diff d98d48c 8b1b5d0 app/helpers/play_helper.rb
What we get back is just a small file with two lines of code:
module PlayHelper
end
We can easily add a similar file for AnotherController.
First, we’ll add the actual file:
touch app/helpers/another_helper.rb
Next, we’ll open it in VS Code:
app/helpers/another_helper.rb
Now we’ll add the code:
module AnotherHelper
end
We’ll skip the views for now, and continue with adding the routes. Let’s remind ourselves of what was changed in the routes.rb file:
git diff d98d48c 8b1b5d0 config/routes.rb
Here’s the output:
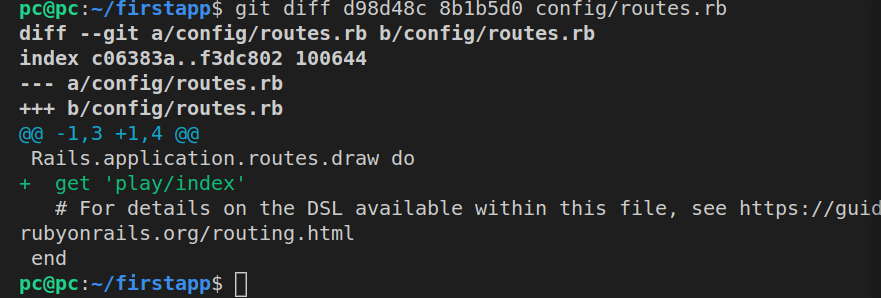
As we can see, the only addition was this line:
get 'play/index'
However, since that change, we’ve updated our routes.rb file with default routes. Thus, there’s no need to list out each single route matching using the above simple route syntax. In other words, no need to update routes for now!
If we use git diff to inspect the changes made to play_controller_test.rb file inside the test/controllers/ folder, we’ll see the following update:
require 'test_helper'
  class PlayControllerTest < ActionDispatch::IntegrationTest
    test "should get index" do
      get play_index_url
      assert_response :success
    end
end
It would be too difficult for us to simply “know” how to write the code for our AnotherController test file. Additionally, we haven’t even added our views yet!
Luckily, we have a possibility to call the generator to rescue.
Our plan of action is this:
- We’ll inspect the current changes with git status, just so that we are sure about the current changes to our codebase
- We’ll run the generate command for yet another controller:
rails g controller yet_another index update edit hello - We’ll copy the contents of YetAnother controller’s test file (so that we don’t have to think how to do it)
- We’ll tweak the contents of our new AnotherController’s test file
- Next, we’ll inspect the
index,update,edit, andhelloview files of our YetAnother controller - Last but not least, we’ll run the
rails destroycommand on ourYetControllerto remove it, and all the files that got generated with it.
This 5-step process we came up with on the fly will allow us to update the code of our another_controller_test.rb file with certainty. Using the options given to us by the Rails framework, we’re removing guesswork from the equation while still sort of coding AnotherController by hand.
Let’s firstly run git status:
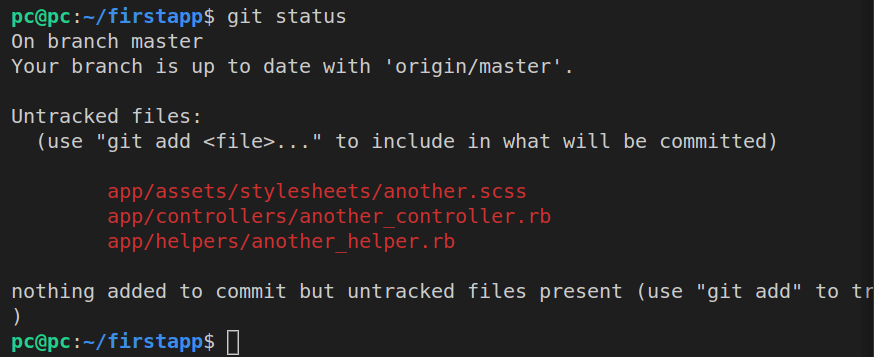
Alright, great, so we can confirm now that we’re still missing the controller test file and the erb view files.
Secondly, let’s run the generate command for our temporary controller:
rails g controller yet_another index update edit hello
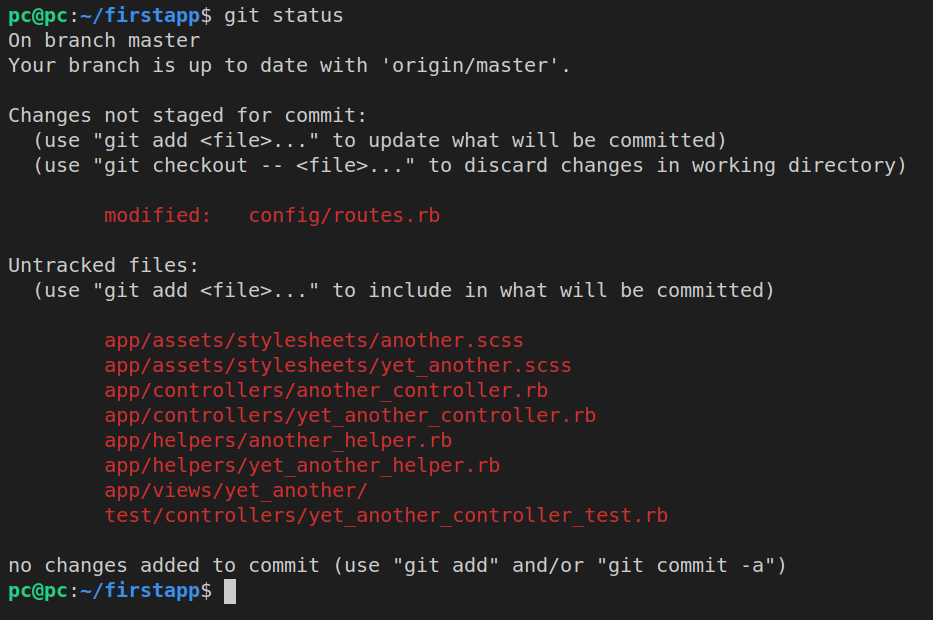
After the updates, let’s run git status again to preview the changes:
Thirdly, let’s copy the contents of test/controllers/yet_another_controller_test.rb.
For this, we’ll use the handy cp command in Ubuntu.
Here’s how it works:
cp existingFile.file newFile.file
In the above command, existingFile.file is test/controllers/yet_another_controller_test.rb, and newFile.file is test/controllers/another_controller_test.rb.
So:
cp test/controllers/yet_another_controller_test.rb test/controllers/another_controller_test.rb
Fourthly, after successfully copying YetAnotherController’s test file into AnotherController’s test file, we’ll need to tweak our new file.
First, we’ll open the file:
code test/controllers/another_controller_test.rb
Now, let’s update it to:
require 'test_helper'

class AnotherControllerTest < ActionDispatch::IntegrationTest
  test "should get index" do
    get another_index_url
    assert_response :success
  end

  test "should get update" do
    get another_update_url
    assert_response :success
  end

  test "should get edit" do
    get another_edit_url
    assert_response :success
  end

  test "should get hello" do
    get another_hello_url
    assert_response :success
  end

end
Now we can see that Rails adds the following generic piece of code for each controller’s action:
test "should get <action-name>" do
  get <controller-name>_<action-name>_url
  assert_response :success
end
In the fifth step, we’ll inspect the view files of our YetAnother contoller.
So:
code app/views/yet_another/index.html.erb
…will show this:
<h1>YetAnother#index</h1>
<p>Find me in app/views/yet_another/index.html.erb</p>
Similarly:
code app/views/yet_another/update.html.erb
…will show this:
<h1>YetAnother#update</h1>
<p>Find me in app/views/yet_another/update.html.erb</p>
Again, the Rails framework’s generator generates a view file for each action specified. This view file follows this pattern:
<h1><ControllerName>#<action-name></h1>
<p>Find me in <action-name-full-url></p>
Now we’ve reached the sixth step, in which we’ll destroy the YetAnother controller.
Here’s the command:
rails destroy controller yet_another
Here’s the output in the console:
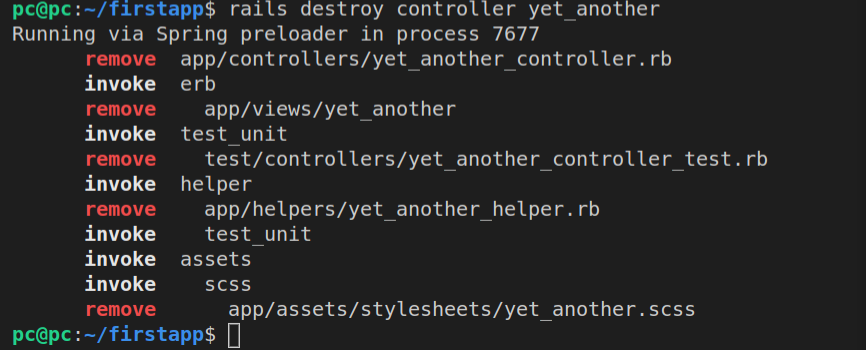
Let’s run the git status now.
Great! This means that all that is left is to add the view files!
First, let’s add the another folder:
mkdir app/views/another
Now we can add our files into it:
touch app/views/another/index.html.erb
This will add a blank file called index.html.erb inside another folder - a folder dedicated for our AnotherController’s view files.
With a press on the up arrow key on the keyboard, we can get the most recent command we typed inside our bash program.
So let’s press the up arrow key and replace the word “index” with “update”. This is what we’ll get:
touch app/views/another/update.html.erb
We’ll repeat this for a couple more times, so we can easily run these commands:
touch app/views/another/edit.html.erb
touch app/views/another/hello.html.erb
Now we can add some contents to each of these files.
Practice makes perfect, so let’s practice adding the exact same HTML that the rails generate adds.
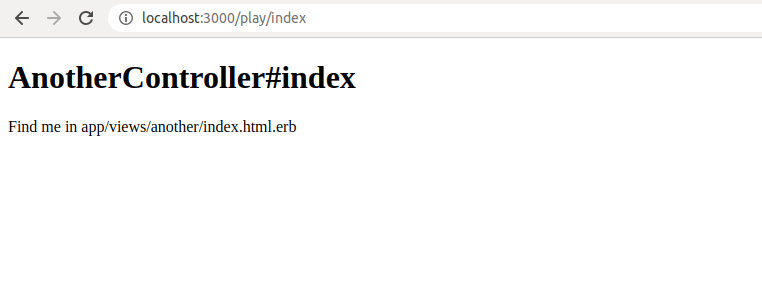
For another#index:
<h1>AnotherController#index</h1>
<p>Find me in app/views/another/index.html.erb</p>
For another#update:
<h1>AnotherController#update</h1>
<p>Find me in app/views/another/update.html.erb</p>
For another#edit:
<h1>AnotherController#edit</h1>
<p>Find me in app/views/another/edit.html.erb</p>
For another#hello:
<h1>AnotherController#hello</h1>
<p>Find me in app/views/another/hello.html.erb</p>
That’s it! We’ve successfully added another controller from scratch! We did have a little help from the rails generate, rails destroy, and some git commands, but importantly, we saw that there’s no magic there. Just some easy code that gets added automatically using the rails code generator.
Before commiting all these changes, all we need to do is rectify what’s left over from YetAnother controller inside the config/routes.rb file.
Here’s the current state of config/routes.rb:
Rails.application.routes.draw do
  get 'yet_another/index'
  get 'yet_another/update'
  get 'yet_another/edit'
  get 'yet_another/hello'
  # get 'play/index'
  # get ':controller(/:action(/:id))'
  match "/", :to => "play#index", :via => :get
  match ':controller(/:action(/:id))', :via => :get

  # For details on the DSL available within this file, see https://guides.rubyonrails.org/routing.html
end
We could simply erase the yet_ portion so that we have 4 simple routes with get requests.
However, we’ll just comment out all these simple routes, since we’re already using the default route under them anyway.
Thus, our updated routes.rb file will look like this:
Rails.application.routes.draw do
  # get 'yet_another/index'
  # get 'yet_another/update'
  # get 'yet_another/edit'
  # get 'yet_another/hello'
  # get 'play/index'
  # get ':controller(/:action(/:id))'
  match "/", :to => "play#index", :via => :get
  match ':controller(/:action(/:id))', :via => :get

  # For details on the DSL available within this file, see https://guides.rubyonrails.org/routing.html
end
All these changes are saved in commit titled “Add another controller”.
Using render syntax inside controller files
Rails is set up so that it does this automatically, but if we want to be precise or if we want to alter the deafult behavior, we can use this code:
render(:template => 'another/index')
We can even write the above in shorthand code:
render('another/index')
Let’s try this inside the play controller.
class PlayController < ApplicationController
  def index
    # render the another/index template
    render('another/index')
  end
end
With the above code, we are “forcing” the PlayController’s index action to render AnotherController’s index action. In other words, we’re forcing Rails to re-route Play#index to Another#index.
If we wanted to render the index action of the controller itself, we can completely omit the controller name.
class PlayController < ApplicationController
  def index
    render('index')
  end
end
With the code above, we’ll now render PlayController’s index action, as expected.
Actually, we don’t even have to specify this render code.
RoR’s convention over configuration will always render the corresponding controller/view when we use just this code:
def index
end
We don’t see a render there, but Rails “knows” it’s there.
Redirecting users
Besides using render, we can also redirect users.
So let’s make a brand new action inside the PlayController, and we’ll call it home.
def home
  redirect_to(
    :controller => 'another',
    :action => 'index')
end
Running the above code is different from what happened with render. With render, we had the same URL of controller/action, but the rendered view was different.
With the redirect_to, the URL changes, because, using redirect_to, we’re performing a 302 request.
Similar to how render works, if we’re staying inside the same controller, but just want to redirect to a different action, we could do, for example, this:
def house
  redirect_to(:action => 'index')
end
You can also redirect to external websites, like this:
def google
  redirect_to('https://google.com')
end
The changes added to our app in this section are titled “Routes and redirects”.
Passing data to views
In Ruby, we can have plain old variables.
We can also have instance variables.
An instance variable is easy to recognize: it has an @ sign in front of it.
An instance variable means: this variable lives in this specific instance of a class.
Remember how a controller is just a class?
class AnotherController < ApplicationController
A class is like a cookie-cutter. Thus, whenever the Rails router calls AnotherController, an object, that is, an instance of AnotherController class will be built.
Inside this object, there can be a number of @instance variables.
For example, we could add an @instance variable to the index method of the AnotherController class:
def index
  @greeting = "Good morning"
end
The @greeting instance variable will be available inside the index.html.erb view file, so we can use it there, like this:
<h1>AnotherController#index</h1>
<p>Find me in app/views/another/index.html.erb</p>
<p>
    <% @greeting %>
</p>
We’ve extended index.html.erb with <% @greeting %>, wrapped inside a p tag.
However, the above @greeting instance variable will not be displayed on the screen.
Why?
Because we are just running the Ruby code, but we are not outputting it.
Remember that earlier in this article we discussed the differences between using <% and <%=? We also explained why we need to use <%= yield %> and not <% yield %>.
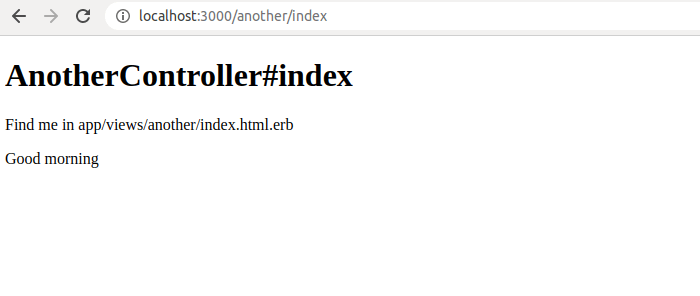
So let’s fix our index.html.erb, so that it outputs our @greeting instance variable:
<h1>AnotherController#index</h1>
<p>Find me in app/views/another/index.html.erb</p>
<p>
    <%= @greeting %>
</p>
Here’s the result in the browser:
We can conclude that @instance variables in the controller are mapped onto the @instance variables in the view.
Note that this is the ONLY way to pass data from a controller to a view.
The changes we made to our Rails app are committed as “Passing data from a controller to a view”.
Working with links in Rails
There are two easy ways to set up links in Rails:
- using the
link_tomethod, - using the
button_tomethod
We could use just plain HTML anchor tags with the href attribute, but this is not the norm.
For example, we could do this:
<a href="/play/index">Go to play#index</a>
However, using link_to and button_to is a lot more common.
Note that when Rails constructs links using link_to and button_to, it uses the routes.rb file to build the actual link.
For example, for our local development, it will build the link with localhost:3000 as the base URL, but when we deploy it to a TLD, the link will be different.
Here’s an example using link_to:
<%= link_to 'Go to another#edit',
  {:controller => 'another',
  :action => 'edit'}, method: :get %>
Great, this works, so you might think that using the button_to will work just as easily:
<%= button_to 'Go to another#edit',
  {:controller => 'another',
  :action => 'edit'}, method: :get %>
We’ve just replaced the word link with button, and that should be it, right?
Well, it doesn’t really work like that.
Instead of a nice output like we had in the link_to example, now we’ll see an error instead:
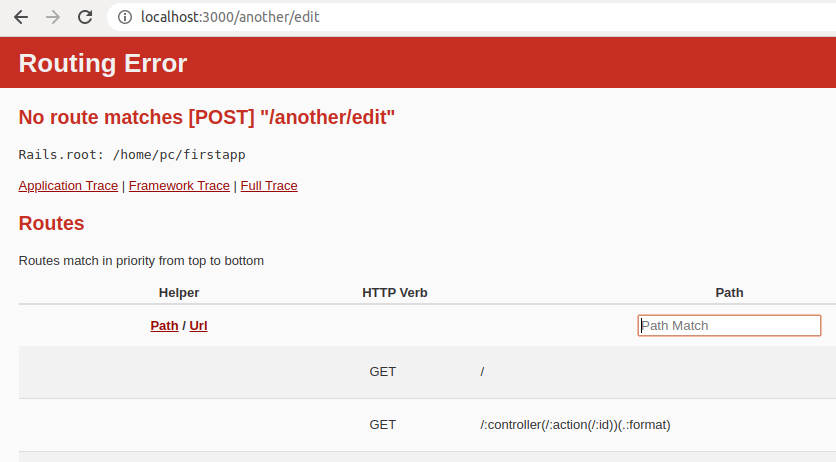
Why is this?
The error hints at the solution: When you use button_to, the implied HTTP method that is used is POST. However, we want to use a GET method.
The fix is easy:
<%= button_to 'Go to another#edit',
  {:controller => 'another',
  :action => 'edit'}, method: :get %>
We just make sure that we specify it as a GET:
method: :get
And now our app works again.
Note that if you’re linking to views inside the same controller, you can omit the :controller => 'another'.
Working with query strings in Rails
A query string is a list of parameters added to a URL on a web page.
Let’s say we had a form that we could submit.
This form “lives” on this imaginary URL:
http://example.com/cars
The form has 3 distinct parts:
- the pick a color input field
- the pick a car input field
- the submit button
Once a user fills in the form fields and clicks the submit button, these entries might be sent via a GET request, in the form of specific parameters.
These specific parameters consist of name-value pairs.
Each form’s input has a name, and the characters typed into it make up some value.
Thus, let’s assume that the pick a color input field had the name attribute of pickColor.
Let’s also assume that the value the user typed in was green.
Thus, the specific parameter, pickColor, will have the value green.
Similar to this, we could have another parameter, pickCar, with value, for example, sedan.
These two specific parameters now serve as a basis for our query parameter:
http://example.com/cars/?pickColor=green&pickCar=sedan
The full query parameter string now looks like this:
?pickColor=green&pickCar=sedan
We could have id numbers alongside these values, for example:
?pickColor=green&pickCar=&user=1
The above query param shows that the pickCar name has no value, and the user name has the value of 1.
In Rails, we can specify param values either using symbols:
params[:id]
… or using strings:
params['id']
Here’s an example of passing querystring parameters to a link_to:
<%= link_to 'Go to another#edit',
  {:controller => 'another',
  :action => 'edit',
  :pickColoe => 'blue',
  :pickCar => 'minivan',
  :user => 1}%>
To make it stand out, we’ll wrap it inside an h2 tag in our index.html.erb file.
This is what the link looks like:

Now we’ll click the new link, and we’ll get the querystring parameters showing inside the browser’s address bar.
Instead of user, we could have passed in the id name, with the value set to 1. Like this:
<%= link_to 'Go to another#edit',
  {:controller => 'another',
  :action => 'edit',
  :pickColoe => 'blue',
  :pickCar => 'minivan',
  :id => 1}%>
This changes things quite a bit, because we are using default routes.
As a reminder, let’s look at the routes.rb file again:
match ':controller(/:action(/:id))', :via => :get
Also remember that the above line of code can be abbreviated to just this:
get ':controller(/:action(/:id))'
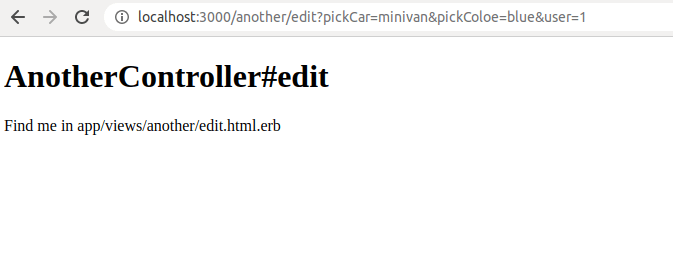
Regardless of whether we write it in its short form or its long form, once we click the link_to, the route and its querystring will look different.
Before, it was:
http://localhost:3000/another/edit?pickCar=minivan&pickColoe=blue&user=1
Now, it is:
http://localhost:3000/another/edit/1?pickCar=minivan&pickColoe=blue
Because we’re using default routes, the id of 1 is now located to the left of the ? sign, that is, before the query string.
In our Rails app’s repository, this update is saved as “Querystrings in Rails”.
Working with parameters in a controller
Now let’s focus our attention on working with parameters inside a controller.
We’ll be using the PlayController for this.
Inside the PlayController’s index action, we’ll add this code:
def index
  @id = params['id']
end
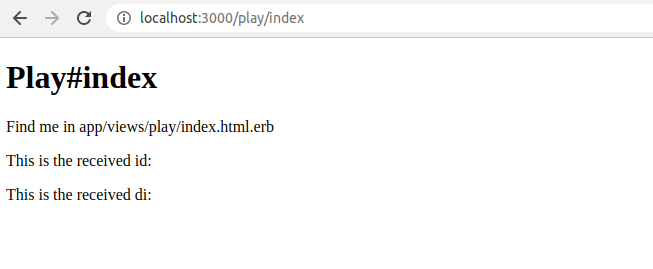
Now we have the @id instance variable available in the index.html.erb view of PlayController, so we can use it there:
<h1>Play#index</h1>
<p>Find me in app/views/play/index.html.erb</p>
<p>This is the received id:
    <%= @id %>
</p>
<p>This is the received di:
    <%= params[:id] %>
</p>
If you now just navigate to play/index, you’ll see this:
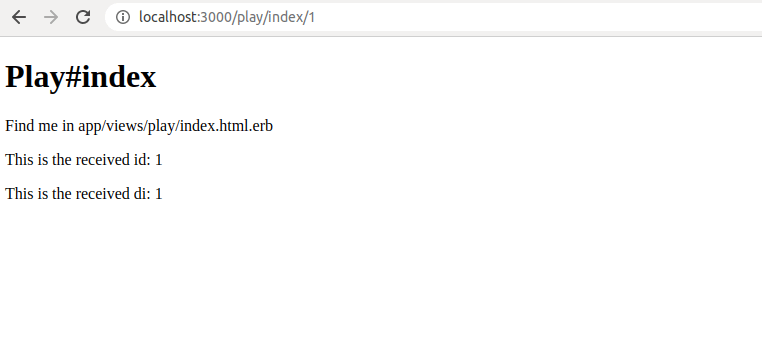
In order to see an id, we can just type it inside the URL in the address bar, like this:
localhost:3000/play/index/1
Now we can see that the id is successfully passed to the view.
These newest updates are saved in a commit titled “Params as @instance variables in controllers”.
Using databases in a Rails app
I remember learning source versioning systems.
The first time I came across SVC (aka “Source Version Control”), I said to myself: “Being able to track changes to your code is all fine and good, but how do you deal with changes in your database?”.
Rails solves this problem using database migrations. Database migrations work using a database schema.
A schema is like a blueprint for how to build a database.
But what is it actually that we are migrating?
Most of the time, we’re migrating a single database, because, most of the time, the data for an entire Rails app is stored in a single database.
Tables are the constituent parts of a relational database. So we might have a users table, a products table, an orders table, etc. All these tables together form a database.
Note that each table’s name is a pluralized noun.
When we break tables down, we can see that each table consists of columns. A single entry inside a table is a table row.
Thus, looking at an example users table, it might have the following columns:
- id
- first_name
- last_name
- dob
- role
Each row in the users table will have specific values for a single user. For example:
- 1
- “John”
- “Doe”
- 01/01/1990
- “admin”
Note that each of these entries stores a specific data type, such as a string, an integer, etc.
In Rails, you will see a model for each database table. Thus, our example users table above will have a corresponding users model in Rails.
Each single column in a database table is represented in Rails as a single attribute of a specific model.
A table in a database can also have an index. It’s a way to make searching the database faster (because all the rows in it are indexed - which speeds up the search).
Sometimes, tables are connected to other tables via ids. These connections are called “foreign keys”. To speed them up, foreign keys are almost always indexed.
Foreign keys are the way in which databases become relational.
Foreign keys make it possible for us to establish causality in different tables in a database.
So we might say, in plain English, “if a single row is deleted for a user in the users table, then we also need to delete all the users’s purchases, which are saved inside the purchases table”. This causality is made possible with the help of foreign keys.
Now that we’ve discussed what databases are and how they work, we are well equipped to add a new database to a new Rails project.
Database migrations in Rails
As already mentioned, database migrations help us keep our database schema (the “state” of our database), in sync with our app’s code at any certain point in time.
We usually track changes to code using an SVC such as Git, and database migrations make it possible to track changes to database in code too. Effectively, this makes it possible to track the entire state of our app, including the database, at any point in time.
Without database migrations, tracking our app in Git is sort of pointless - since the code depends on a properly set up database (its tables, columns, and foreign keys), at any one point in time.
A migration is a set of steps that describes how to construct a database, or how to add or remove changes from an existing database.
It’s like a snapshot of a database state at a certain point in time.
A database migration is saved in a database migration file. This file usually describes steps to “migrate up” to a new version of the database, or “migrate down” to an older version.
Migrating a database up usually means “adding new tables or table columns”, and migrating it down usually means “removing tables or table columns”.
All the migration code inside a database migration file is written in Ruby.
As you’ll see once you get more advanced with it, the Ruby on Rails framework has a nice ORM (object-relational mapper) called ActiveRecord, which makes it possible to work with our databases indirectly, by writing db-agnostic code (meaning: not using sql commands).
A huge benefit of database migrations is in the fact that it makes teamwork easy.
For example, if I introduce another table in an existing database because I’m developing a new functionality in my teams’ Rails app, once I’m done with adding changes, I’ll have to share it with my team.
All that it will take for me to share the updates is to:
- Commit all the changes to the Rails code
- Commit all the changes to the database in the form of a database migration
Once these two things are completed - and these can be a part of a single Git commit - my team is ready to pull the newly completed functionality onto their own computers, together with changes to the database.
Another added benefit is that these changes are just as easily reverted as they are added.
In a nutshell, we get all the benefits of source versioning included with the database as well as our app’s code.
Database migrations are basically “databases as code”.
Adding a migration to a Rails app
Let’s see what options we have available:
rails generate migration
Here’s just one section of the output in the console, the one that has the “Description:” title:
Stubs out a new database migration. Pass the migration name, either
    CamelCased or under_scored, and an optional list of attribute pairs as arguments.

    A migration class is generated in db/migrate prefixed by a timestamp of the current date and time.

    You can name your migration in either of these formats to generate add/remove
    column lines from supplied attributes: AddColumnsToTable or RemoveColumnsFromTable
Of course, there’s a lot more output there, but this is the gist of what this command does.
Let’s see how it works:
rails generate migration JustATest
This is what it will result in:

The migration name that we gave to the rails g migration command was JustATest.
The resulting file name is:
20191224154319_just_a_test.rb
So, when a migration file is added the upper-camelcased migration name becomes small-lettered snake-cased file name with a timestamp appended in front of it.
The timestamp consists of 14 numbers, with the following format:
YYYYMMDDHHMMSS (YearsMonthsDaysHoursMinutesSeconds)
This serves two purposes:
- Migrations are automatically listed in chronological order inside the
dbfolder - Two migrations are allowed to have the same name because their timestamps will be different - and since timestamps are a part of a migration file name, they are made unique without too much effort on our part
Here’s the code of the generated migration file:
class JustATest < ActiveRecord::Migration[6.0]
  def change
  end
end
The migration is a class that inherits from ActiveRecord::Migration[6.0].
The version number tagged at the end of the base class shows the version of Rails used to generate it.
inside the JustATest class, there’s a single method, called change.
The change method is a stand-in for two methods: up and down.
This update to our app is saved as “Add a migration using rails g”.
The change method lists only the up changes (the newer version of our database). It is up to Rails to resolve how this will work.
Alternatively, we could specify our own up and down methods.
It’s important to remember that whatever happens in the up method, the down method needs to revert.
If we ran our new migration file, Rails would run its change method, but since this method is empty, running it would not result in any actual changes to the state of our database.
Adding a model with the generate command
Similar to how we can generate a controller with views, Rails allows us to generate a model with a migration file.
Feel free to run just this:
rails generate model
…to have Rails log out a detailed explanation of what it does.
Now we’ll add an actual model:
rails generate model Movie
Rails convention over configuration requires us to give our model a singular version of the noun. The resulting database table will have the plural version of the noun.
Here’s the console output when we run the above command:
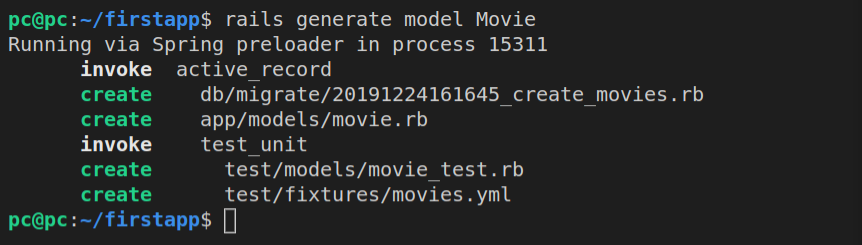
Running git status confirms to us that four files were generated:
app/models/movie.rbdb/migrate/20191224161645_create_movies.rbtest/fixtures/movies.ymltest/models/movie_test.rb
Inspecting the app/models/movie.rb file, we can see this code:
class Movie < ApplicationRecord
end
Great, so we can see that it just defines a Movie class, which inherits from ApplicationRecord.
Let’s now inspect the generated migration file, 20191224161645_create_movies.rb:
class CreateMovies < ActiveRecord::Migration[6.0]
  def change
    create_table :movies do |t|

      t.timestamps
    end
  end
end
Inside the CreateMovies class, we have the change method, which holds the create_table command.
Rails is able to perform the opposite of the create_table code, i.e to drop it, automatically.
The following code sets the |t| variable, which is the table itself:
create_table :movies do |t|
Now we can specify the columns inside the table, using t. syntax, like this:
t.column "movie_title", :string
t.column "movie_description", :string
Rails even gives us shorthand syntax, which looks like this:
t.string "movie_title"
Here’s the complete list of symbols we can use to describe types of data a column can hold:
:string:text:bigint:decimal:float:integer:numeric:date:datetime:time:timestamp:binary:boolean:primary_key
You can find more information about migrations on RoR guides page.
If there is a type that’s not referenced in the above 12 symbols, you can use it if your database has it, for example, polygon, as a geometric data type in PostgreSQL.
However, it’s best to stick to the 12 symbols listed, because they are database-agnostic.
There are also some column options available, as can be found in the third of fourth paragraph on this apidock page.
Here’s the list of available options:
:comment:default:limit:null:precision:scale
The :comment symbol is just that, a comment. It’s ignored by some db systems.
The :default symbol sets the default value for a table column. For absence of value (NULL), you should use nil.
The :limit symbol sets the maximum number of characters for different types of columns. It’s also ignored by some db systems.
The :null symbol can be set to true or false and it determines whether the NULL values are allowed on a column.
If the column type is :numeric or :decimal, the :precision symbol is used to set the level of precision. For example, the number 1.22 has a precision of 3.
Similar to :precision, the :scale column option is used on :numeric and :decimal column types. While the number 1.22 in the above example has the precision of 3, it’s scale is 2. Basically, the :scale symbol counts the number of allowed decimal places.
Now that we understand these options, we can easily understand various syntax inside the change method of a migration.
For example:
t.string "movie_description", :limit => 200, :null => false
The above line of code means that the column is of data type “string”, it’s name is “movie_description”, it cannot be null (meaning, each table row must have it), and its length is limited to 200 characters.
Rails will auto-fill database columns that have the following structure:
t.column "created_at", :datetime
t.column "updated_at", :datetime
Of course, this will work with the shorthand version of the above column definitions:
t.datetime "created_at"
t.datetime "updated_at"
Whenever a row is created or updated, Rails will save the timestamp into our database automatically.
Actually, this shorthand syntax can be made even shorter:
t.timestamps
That’s all that we need to add to have Rails do the automatic update of the two columns whenever a row is created or updated.
Even better, this is all done automatically when the database migration file is added to our project, i.e when we run the rails generate migration command.
Let’s inspect the code that was added once again:
class CreateMovies < ActiveRecord::Migration[6.0]
  def change
    create_table :movies do |t|

      t.timestamps
    end
  end
end
There, we already have the t.timestamps inside the change method.
Besides the t.timestamps that Rails adds automatically, there’s another entry that gets added in the background - and it’s never even showing in the migration files.
That’s the id column, of type integer, which auto-increments every time a new row is added, and acts as a primary key in each table in our database.
Since Rails adds an id column to each new table added to our database, the only way to turn it off is if we specifically order it not to do it, like this:
create_table :movies, :id => false do |t|
All this being said, here’s our updated migration file, using the up and down methods instead of change.
class CreateMovies < ActiveRecord::Migration[6.0]
  def up
    create_table :movies do |t|
      t.column "title", :string, :limit => 150
      t.column "description", :string, :limit => 300
      t.column "rating", :integer, :limit => 5
      t.timestamps
    end
  end

  def down
    drop_table :movies
  end

end
We can see a couple of table migration methods in the code above: create_table and drop_table. Another table migration method available is rename_table.
Additionally, we can use index migration methods, namely:
add_index(table, column, options)remove_index(table, column)
The options available for index migration methods include:
:uniquesymbol (which can be set totrueorfalse), and:namesymoble (which can be set to"whatever_name_we_want")
We can also use column_migration_methods, which include:
add_column(table, column, type, options)change_column(table, column, type, options)remove_column(table, column)rename_column(table, column, new_name)
In the code above, we saw that we used the drop_table method.
Running migrations
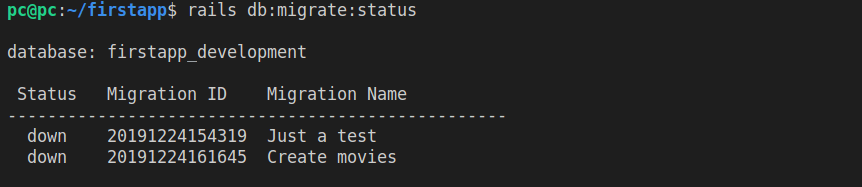
The best way to check where we stand with our migrations is to run:
rails db:migrate:status
Whatever migration hasn’t been run will have the Status column showing as “down”.
Now that we have an overview of migrations that are available to be run, we can either run them all, or run them one by one. To run them one by one, we can use the Migration ID, which gets exposed when we run the rails db:migrate:status command. Then it’s just a matter of running the specific migration, using the specific ID.
Here’s the output when we run the above command:
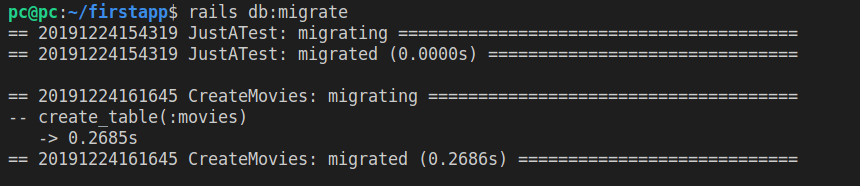
Alternatively, to run all migrations at once, we can just use the following command:
rails db:migrate
Notice that it ran both existing migrations:
*_just_a_test.rb, and*_create_movies.rb
Again, whenever we run the rails db:migrate command, it will run all the migrations that haven’t been run before. Rails keeps count of migrations that have already been run by saving them inside the schema_migrations table. This table has a single column called version, and it stores each executed migration’s timestamp.
Here’s the output of running rails db:migrate:
Another thing that happens whenever we run the rails db:migrate command is: the db/schema.rb file gets updated.
Here’s the contents of the db/schema.rb file after we ran our migrations:
To revert all migrations, we can run:
rails db:migrate VERSION=0
Here’s the output of running the above command:
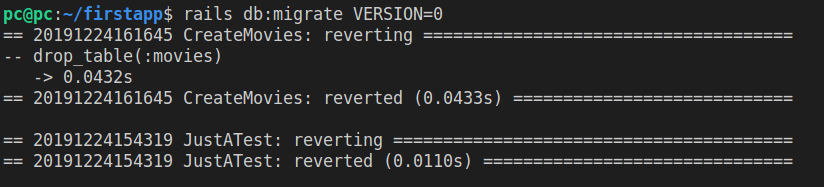
The way it works is this: it reverts the newest migration first, then the one before it, etc.
Alternatively, using the Migration ID obtained by using the rails db:migrate:status command, we can also migrate to a specific version.
For example:
rails db:migrate VERSION=20191224154319
The above command will run both the *_just_a_test migration, and all the other migrations before it (if there are any).
Running the above command will produce the following output:

Alternatively, to run only a single migration with the exact version we specify, we can run:
rails db:migrate:up VERSION=<version-timestap>
We can also revert a single migration by running:
rails db:migrate:down VERSION=<version-timestamp>
Finally, we can re-run a migration that was already run, by appending :redo:
rails db:migrate:redo VERSION=<version-timestamp>
This command is basically a combination of us running the :down and then the :up migration with the specific version number provided.
To migrate to the newest migration, simply run rails db:migrate:

We can also view all the tables that were added using the Rails console.
What is this Rails console?
Well, when you install Ruby on your system, you also get a sort of a REPL (read-eval-print loop), called irb, which stands for “interactive Ruby”. It’s simply an easy way to run Ruby commands right inside the bash window.
Rails console is irb with “superpowers”, because besides having the functionality of the Ruby language made available inside the console, we also have access to our entire Rails application: the models, the ActiveRecord (with its ability to write to the database!), etc.
So how do we run the console?
The long-hand syntax is:
rails console
The shorthand syntax is:
rails c
Next, we look at our tables using ActiveRecord:
ActiveRecord::Base.connection.tables
The above command will result in this output:
Running via Spring preloader in process 21587
Loading development environment (Rails 6.0.2)
2.6.2 :001 > ActiveRecord::Base.connection.tables
 => ["schema_migrations", "ar_internal_metadata", "movies"]
Additionally, we can inspect the actual movies table using this syntax:
ActiveRecord::Base.connection.columns('movies').map(&:name)
The above command will return all the column names of the movies table:

Debugging migrations
Sometimes, someone on our team might write faulty code, making the :up and :down on a migration stuck.
If that happens, we need to debug a migration.
So, to see how migrations are debugged, we’ll need to do several things:
- Run a new
rails g migration SomeName - Add the
:upand:downsymbols inside it (these should be complete opposites from one another) - Introduce a bug into the
:upsymbol on purpose - See how debugging works
Let’s first add a new migration.
rails g migration ChangeMovies
Here’s the contents of the new migration file:
class ChangeMovies < ActiveRecord::Migration[6.0]
  def change
  end
end
This is a good time to add a commit, so let’s save all our changes so far with this message: “Generate movies model and add two migrations”.
Like before, this commit can be viewed on Github.
Now let’s replace the change method with the up and down methods inside the ChangeMovies migration class.
Here’s the updated version:
class ChangeMovies < ActiveRecord::Migration[6.0]
  def up
    rename_table("movies", "greatest_movies")
  end

  def down
    rename_table("greatest_movies", "movies")
  end
end
In the above code, we can see that the changes in the up method are the exact opposite to the changes in the down method.
Let’s continue with a few more additions. We could, for example, rename a column inside the table.
First, let’s run rails console, then make sure we are sure about the current table names:
ActiveRecord::Base.connection.columns('movies').map(&:name)
Alright, great, let’s rename the description column to plot_description.
Here’s the updated code:
class ChangeMovies < ActiveRecord::Migration[6.0]
  def up
    rename_table("movies", "greatest_movies")
    rename_column("greatest_movies", "descriptin", "plot_description")
  end

  def down
    rename_column("greatest_movies", "plot_description", "description")
    rename_table("greatest_movies", "movies")
  end
end
Notice how we introduced a bug on purpose on this line of code:
rename_column(
  "greatest_movies",
  "descriptin",
  "plot_description")
Obviously, there is no “descriptin” column in our table. We’ve misspelt it on purpose.
Let’s now save everything and run rails db:migrate.
Note: make sure to exit out of rails console by typing the word quit, or, alternatively, by opening a different bash window.
Here’s a part of the error that gets output in the console:

Alright, great, we introduced the error, but how do we solve it?
First, let’s run the rails console again and look at our tables in the database now.
ActiveRecord::Base.connection.columns('movies').map(&:name)
Ok, they all still look the same.
Let’s try passing “description” as the first argument of the rename_column method.
class ChangeMovies < ActiveRecord::Migration[6.0]
  def up
    rename_table("movies", "greatest_movies")
    rename_column("greatest_movies", "description", "plot_description")
  end

  def down
    rename_column("greatest_movies", "plot_description", "description")
    rename_table("greatest_movies", "movies")
  end
end
Now our migration runs and everything works as expected.
Sometimes we need to debug complex problems in our migrations. The trick is to make either the up or down method work. Sometimes that means that we need to temporarily comment out sections of the offending code inside the up or down method.
Once either the up or down method is “unstuck”, we can uncomment the code and run the migration again for a full update.
Alternatively, we can go directly into our database and alter the tables and columns right there to fix the issue with the database migration file.
Finally, let’s run another migration:
rails g migration ChangeMoviesAgain
Next, let’s open the newly created db migration file, *_change_movies_again.rb:
class ChangeMoviesAgain < ActiveRecord::Migration[6.0]
  def up
    rename_table("greatest_movies", "movies")
  end

  def down
    rename_table("movies", "greatest_movies")
  end
end
Before we run this newest migration, let’s open the schema.rb file. This is what we’ll find:
# It's strongly recommended that you check this file into your version control system.

ActiveRecord::Schema.define(version: 2019_12_24_205624) do

  # These are extensions that must be enabled in order to support this database
  enable_extension "plpgsql"

  create_table "greatest_movies", force: :cascade do |t|
    t.string "title", limit: 150
    t.string "plot_description", limit: 300
    t.bigint "rating"
    t.datetime "created_at", precision: 6, null: false
    t.datetime "updated_at", precision: 6, null: false
  end

end
Now let’s run the newest migration file:
rails db:migrate
Here’s the output:

This update is saved with this commit message: “Update migrations”.
Alright, so now, let’s divert our attention to how ActiveRecord works.
ORM, ActiveRecord and ActiveRelation
Active record is a general design approach used for working with relational databases.
ActiveRecord is a Rails approach to using the active record design pattern in practice.
ActiveRecord is an example of an ORM: object-relational mapper.
ORM is achieved when we map relational data from a database into objects in our code. So rather than just retrieving data, we retrieve the data and map it to an object - Ruby being an object-oriented programming language, this is a big deal.
Since our database data is mapped into objects, these objects can then be read, updated, deleted, and created with Ruby code, then finally sent back to the database for database updates.
Using ActiveRecord simplifies how we create, read, update, and delete records in our databases: instead of using our chosen database query language, we use the concise, clean, and fast Ruby syntax.
Here’s an example.
Writing data to database using ActiveRecord
First, we’ll start the Rails console:
rails console
Now, let’s see the available tables:
ActiveRecord::Base.connection.tables
We get this back:
=> [
  "schema_migrations",
  "ar_internal_metadata",
  "movies"]
Obviously, we’re interested in the contents of the movies table, so:
ActiveRecord::Base.connection.columns('movies').map(&:name)
The above command will output this:
 => ["id",
     "title",
     "plot_description",
     "rating",
     "created_at",
     "updated_at"]
Next, let’s add a new movie:
m = Movie.new
m.id = 1
m.title = "Spiderman: Away from home"
m.plot_description = "It's a movie about Venice"
m.rating = 5
After each line, we’ll see an upadate made to the attributes of the m object.
Finally, we can save our m object with:
m.save
Here’s the output:
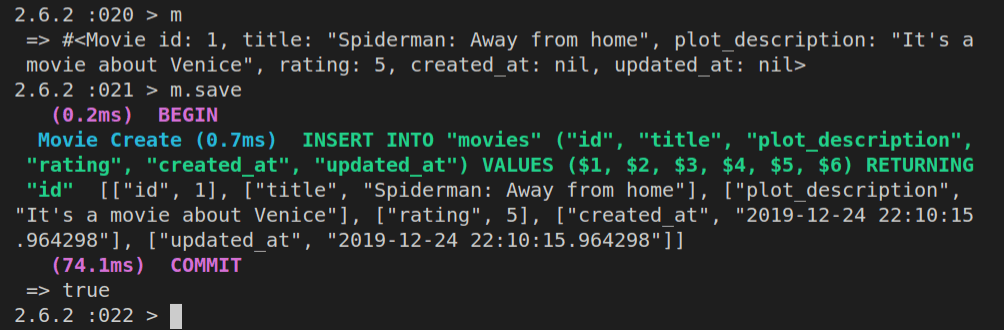
In the above screenshot, we can see that we first inspected the contents of the m object, and then when we were sure it looks as expected, we saved it to the database with m.save.
Notice that the underlying database query was also highlighted (in green letters in our console).
Now we can inspect the contents of the movies table with this command:
Movie.all
Here’s what gets returned:

Let’s add another movie:
m = Movie.new
m.title = "Spiderman: Into the Spiderverse"
m.plot_description = "It's a movie about Spiderman"
m.rating = 5
Notice that now we didn’t specify the id. Let’s run m.save again and see what happens.
This is the result of running the above operation in the console:
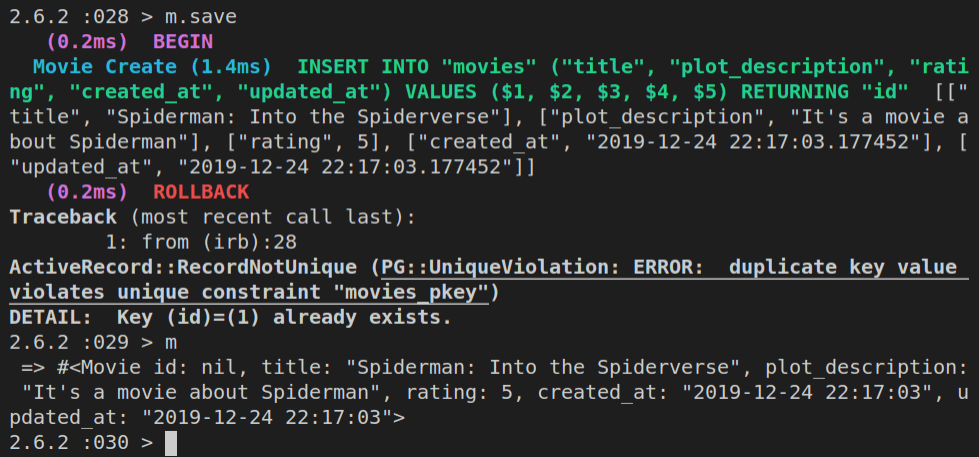
As you can see above, the save was unsuccessful, but since our m object is directly mapped to values that will be saved, we can preview it again, and see that the id is nil.
So, let’s update the id with m.id = 2, then run the m.save again, and this time it works.
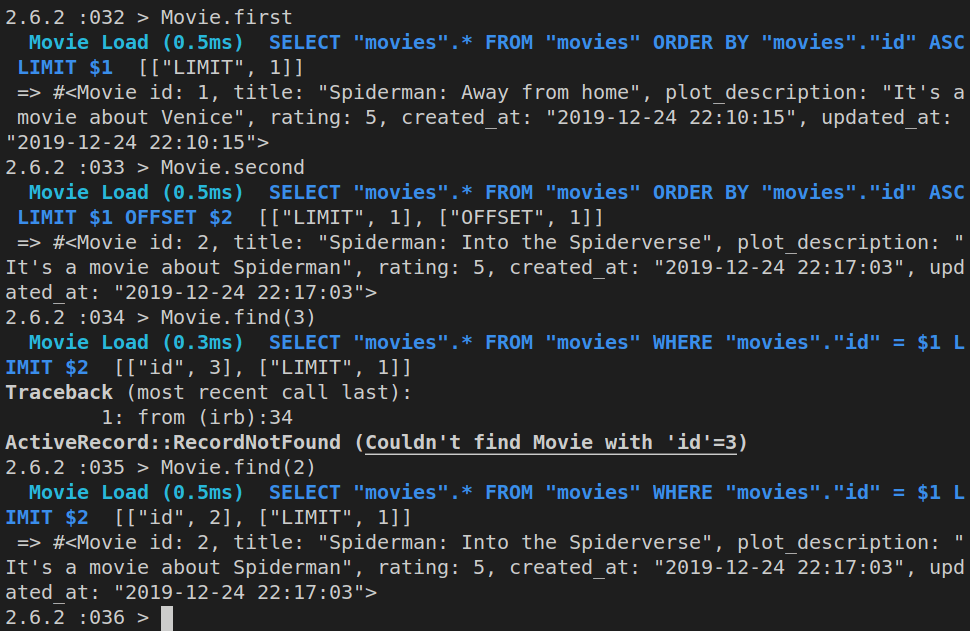
Obviously, we can now inspect all the rows in the table with Movie.all.
However, we can also inspect the first movie with Movie.first, the second one with Movie.second, or any id that we want with Movie.find(n) - where n is the value of id.
So, this will also work:
Movie.find(2)
Here’s the output of all of these ran in the console.
Now that we know what ActiveRecord is and how it works, let’s discuss ActiveRelation.
ActiveRelation is the foundation on which ActiveRecord works.
ActiveRelation makes difficult database queries easy to generate, makes them chainable, and efficient.
Here’s an example of ActiveRelation:
m = Movie.where(:id => 2)
m = m.order("plot_description ASC").limit(10)
The first line of code will produce this query:
SELECT "movies".* FROM "movies" WHERE "movies"."id" = $1 LIMIT $2
The second one will produce this query:
SELECT "movies".* FROM "movies" WHERE "movies"."id" = $1 ORDER BY plot_description ASC LIMIT $2
Fixing model names
In the previous section of this article, we’ve ran a migration that changed the name of our movies table to greatest_movies. Trying to work with greatest_movies in the console would now throw an error.
To fix this, we would need to update the movie.rb file that stores our Movie model (Movie class), like this:
class Movie < ApplicationRecord

  self.table_name = "greatest_movies"

end
Alternatively, we could rename the movie.rb file to greatest_movie.rb and the class name from Movie to GreatestMovie. This means we don’t have to use the above-referenced self.table_name approach.
It is best, however, to stick with Rails conventions - because they allow for some significant automation and make our lives as developers easier. This means, plan your tables ahead of time, use the Rails generator, and don’t mess with renaming table names unless it is really necessary.
Working with model attributes
In Ruby, we need to explicitly define attributes on objects, as follows.
Let’s say we have our Movie object (Movie class):
class Movie
  attr_accessor :plot_description
end
Above, we are defining the name of one attribute, plot_description.
Alternatively, we could use extended syntax, which is written in the form of a getter and a setter. Note that vertical dots below represent “more code” that’s not the focus of the example.
Here’s the attribute getter:
class Movie
  def plot_description
    @plot_description
  end
  .
  .
end
And here’s the attribute setter:
class Movie
  .
  .
  def plot_description = (value)
    @plot_description = value
  end
end
Now we can work with the variable called plot_description, to both read it and (re)write it.
In Rails, we don’t have to explicitly define these attributes with getters and setters.
This is made possible due to the fact that we’re inheriting from ActiveRecord::Base in our Movie class:
class Movie < ActiveRecord::Base
Because we are inheriting from ActiveRecord::Base, all the columns inside the movies database table are automatically made available to us inside the Movie class in our Rails app.
It gets even better than that: our Movie class also knows how to assign correct data types to each of the model attributes - i.e each of the database column entries. Thus, if the column in the database is of type string, it will be fetched from the database as a string and saved into it as a string. Obviously, this works for all the data types.
All this being said, we can still add our own attributes to the Ruby class (Ruby object) that represents our database table.
It’s important to remember that such additional attributes live only inside the object, and they don’t change the behavior of the database table because they don’t belong there.
So for example, we could have this:
class Movie < ActiveRecord::Base
  attr_accessor :whatever

  m = Movie.new
  m.whatever = "whatever happens"
  m.whatever # "whatever happens"

end
This makes it very versatile because we can work with database tables as attributes in our objects, and we can add our own attributes that won’t ever be saved inside a db table, but which might be useful for some other processing inside our objects.
Looking at the above code:
m = Movie.new
… what is this Movie.new?
It’s a new movie object - an instance of the Movie class.
Of course, now we can update the m object just like we saw earlier. We can even save our changes in the database using m.save.
Like we already saw, we first need to build a new object from the Movie class, i.e we need to build an instance m of the Movie “cookie-cutter”. To verify that this instance is indeed new, we can check it with the new_record method, like this:
m.new_record?
It will return true, because it indeed is a new record.
Next, we add the values for m attributes - all of them are defined inside the Movie class.
We can both instantiate a new object and assign values to its attributes on a single line, like this:
m = Movie.new(:id => :id, :title => "Modern Times", :plot_description => "It's a Charlie Chaplin movie", :rating => 5)
Let’s see if Rails added the id automatically:
m.id
Once our values are set, we can save the object to the database with m.save.
It will now return false if we check if m is the new record, using: m.new_record?.
An alternative, faster way to instantiate, build and save a new object from a class, is to use the create command, which works like this:
m = Movie.create(
  :title => "Modern Times",
  :plot_description => "Charlie Chaplin movie",
  :rating => 5)
Note that the above code will usually be typed out on a single line in the Rails console (here we’ve formatted it for presentation purposes).
Deleting rows from the database using ActiveRecord
Besides adding new records, we can also delete them.
Here’s how to do it:
Movie.find(3).destroy
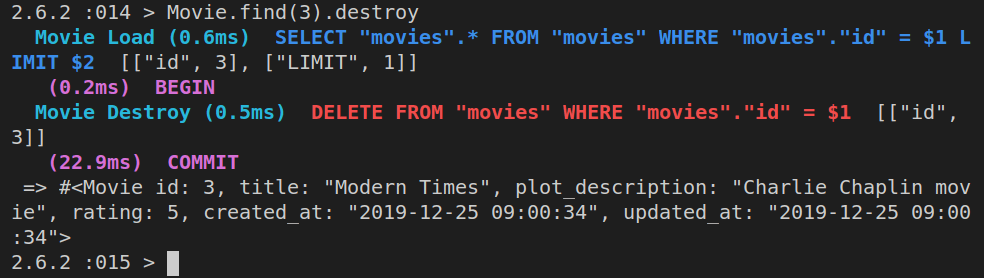
That’s it, we’ve successfully deleted the movie with the id of 3!
Note that if we ran the command like this:
m = Movie.find(3).destroy
…we would still have a Ruby object m, with all its attributes, inside the Rails console. However, we’re no longer allowed to work with it, because it’s a frozen object (frozen hash).
Finding rows in the database using ActiveRecord
Besides the Movie.find(n) method, where n is the id of a specific movie, we can also use dynamic finders.
Dynamic finders look like this:
find_by_*
In the above code, the * is replaced with the actual attribute, so we could have:
Movie.find_by_title("Modern Times")
If we ran the above dynamic finder, here’s what would get returned:

If we want to show all the movies, we can just run:
m = Movie.all
This will return an array of movie objects and now we can iterate over them:
m.each do |m|
  puts m.title
end
Here’s the resulting list of movie titles:

Note that |m| is just a temporary variable. We might have just as easily done this:
x = Movies.all
x.each do |y|
  puts y.title
end
Updating rows from the database using ActiveRecord
First we’ll find a movie:
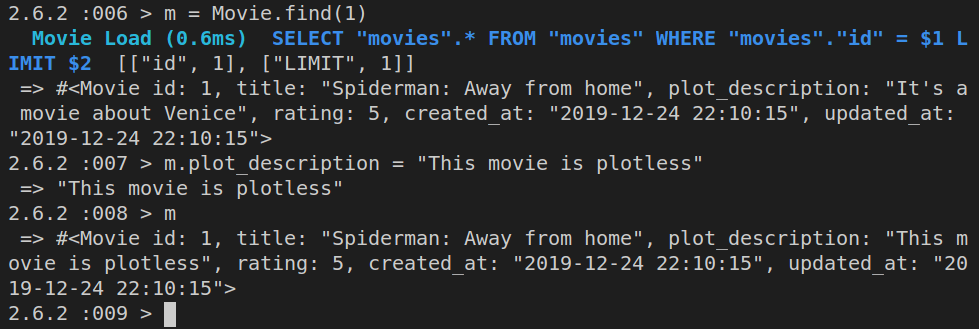
m = Movie.find(1)
Then we’ll update it:
m.plot_description = "This movie is plotless"
Here’s the output of the above commands in the Rails console:
If we ran Movie.find(1) now, we’d get back this:
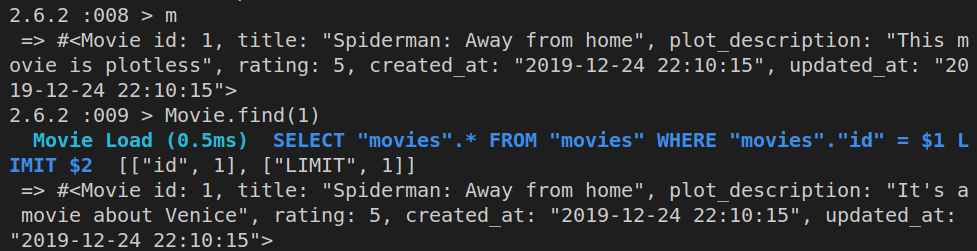
Obviously, although our m object - the instantiated Movie class - has the updated plot_description attribute, this change still needs to be saved to our database.
We’ll achieve that using m.save.
This is the result of running the above command:
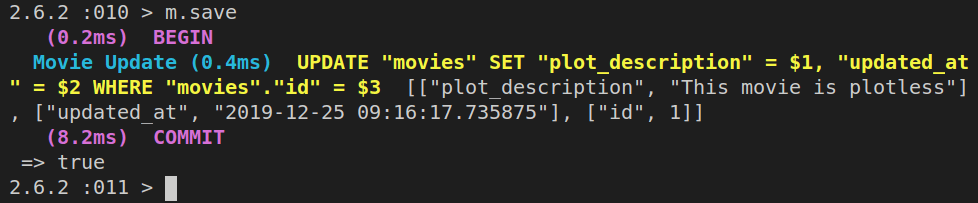
If we now ran Movie.find(1), we’d get back the same plot_description from the database as what we had inside the m Ruby object.
Alternatively, we could do this:
m = Movie.find(1)
m.update_attributes(:title => "Spiderman, Away From Home", :plot_description => "It's a movie about Venice")
Advanced Database Querying with ActiveRecord
Whenever we need to construct a complex query of the data inside our database, we need to run the where method.
We can pass either a string, a hash, or an array to the where method.
We still need to be vary of SQL injection here, so we need to make sure to use the where method properly.
Note that the where query will not execute right away, like it was the case with other examples so far.
An example of where method in use:
Movie.where(:title => "Modern Times", :rating => 5)
Passing a hash to our where method ensureds that we prevent SQL injections because in the background, Rails will escape the SQL queries.
The where method returns an ActiveRelation, so we can chain multiple where methods, like this:
Movie.where(:title => "Modern Times).where(:rating => 5)
Like already mentioned, the SQL query with where will not be ran immediately.
Here’s a proof of that in the Rails console:
m = Movie.where(:title => "Modern Times")
Here’s the output of the above where query:
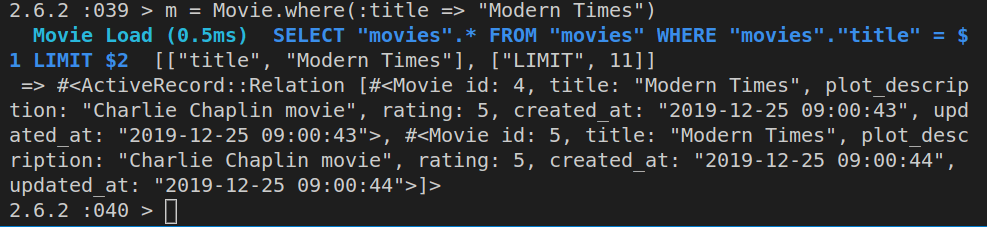
A where query doesn’t run SQL right away, except inside the Rails console.
Let’s see the class of the m object:
m.class
It will return:
Movie::ActiveRecord_Relation
Contrast that result with:
m = Movie.find(1)
m.class
This will now return:
Movie(id: integer, title: string, plot_description: string, rating: integer, created_at: datetime, updated_at: datetime)
We can also to the to_sql method:
m.to_sql
The above will throw an error if we’re not using the where method on the Movie class. In other words, make sure to do this:
m = Movie.where(:title => "Modern Times")
m.to_sql
Instead of an error, we’ll now get this back:
"SELECT \"movies\".* FROM \"movies\" WHERE \"movies\".\"title\" = 'Modern Times'"
Besides the where method, we can also use the order, limit, and offset methods. For example, like this:
Movie.order(:title).limit(20).offset(40)
The argument to the order method can be a "string" or a :symbol. We can specify only the column to order by - in the example, it is the :title column, or we can additionally pass the :asc symbol for “ascending”, :desc for “descending”, etc.
For example:
Movie.order(:title)
Movie.order(:title => :asc)
Movie.order(:title => :desc)
The :asc is the default order setting, so even if we don’t specify it, it’s implied.
The order method can accept a string instead of symbols:
Movie.order("title")
Movie.order("title ASC")
Movie.order("title DESC")
The strings above are referred to as “SQL fragment notation”.
If we need to use more than one database table column, we can do that too, separating them using commas:
Movie.order(:title => :desc, :plot_description => :desc)
Ordering joined tables
If we are working with joined tables to get back our data, we need to specify which tables we’re querying, using table disambiguation.
For example:
order("users.updated_at DESC", "movies.updated_at DESC")
Using limit and offset methods
Besides the order method, we also have the limit method, which allows us to limit the number of returned rows. For example, if we wanted to show pagination, and instead of returning a thousand movies, we just wanted to return ten movies per page, we could use the limit method. If we were on the tenth page, we’d want to skip the first 100 rows of results, so we’d use the offset method.
These methods are chainable, so this is possible:
Movie.order(:title => :desc).limit(10).offset(100)
Let’s try this with the actual rows in our movie database:
m = Movie.where(:title => "Modern Times").order("created_at DESC").limit(10).offset(1)
Let’s run this again, this time without the offset method:
m = Movie.where(:title => "Modern Times").order("created_at DESC").limit(10)
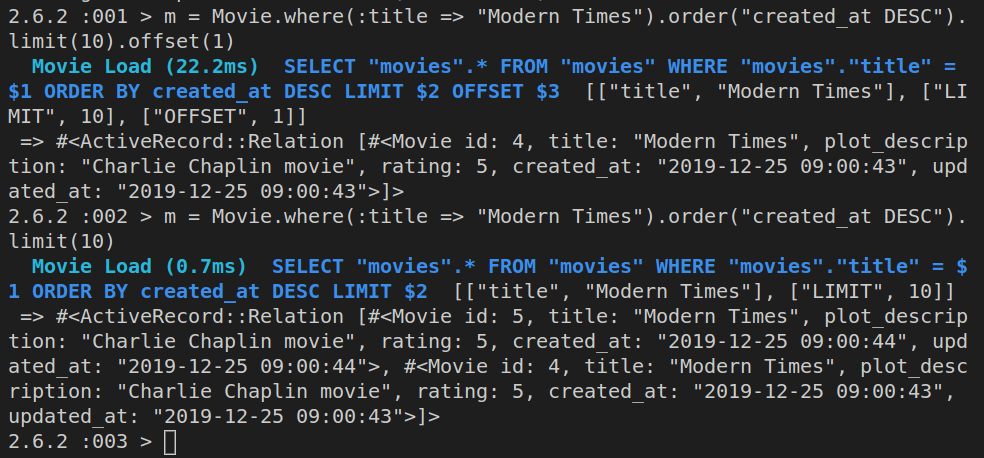
Writing and saving our own database query methods
So far, we’ve used the functionality made available to us via ActiveRecord.
We can also write our own queries in our models.
After all, that’s what models are for: to talk to our database.
Writing our own queries is made possible using named scopes.
To write a named scope, we begin with:
scope :name_of_scope
We follow it up with a comma, and behind it, we write a lambda expression, which starts with either the word lambda, or these characters: ->.
lambda {where(:title => "Modern Times")}
-> {where(:title => "Modern Times")}
Once defined, we can call our named scope like this:
Movie.name_of_scope
This is a major point to remember: named scopes are only evaluated when they’re called, NOT when they’re defined.
We can pass parameters to named scopes like this:
scope :some_name,
 lambda {|the_title| where(:title => the_title)}
We write our named scope definitions inside models, using Activerecord query methods already covered.
Also, writing named scopes like above is much more desirable (more “Railsy”) than writing them as methods on the class:
def self.some_name(the_title)
  where(:title => the_title)
end
Reminder: in Ruby, self is the name of the class in which we’re defining the method.
Once we’ve defined our named scopes properly, calling them on our models makes for some very expressive syntax:
Movie.blockbuster.highly_rated.rom_com
Even without looking at the underlying code of the above-referenced named scopes, it is safe to assume that the above query will return a list of highest-rated romantic comedy blockbusters.
Let’s add a few named scopes to our movie model, i.e to the movie.rb file:
class Movie < ApplicationRecord
    scope :from_newest,
      lambda { order("created_at DESC") }
    scope :lookup,
      ->{|titlestring| where(["title LIKE ?", "%#{titlestring}%"]) }
end
Note that the above named scopes have been split on two lines so that the above code is more readable, but actually, it should fit on a single line.
Also, in the above three named scopes, the complexity of each next scope is greater then the previous one.
Thus, the first one is relatively straightforward.
The second one uses a parameter, titlestring, and we’ll pass it when we search for a title.
It also uses SQL query segment title LIKE ?, and the %#{titlestring}% needs some explanation.
The #{titlestring} is variable interpolation in Ruby. If you’ve used SCSS before, this shouldn’t be new. Also, if you’ve used ES6 template strings, it’s very similar to that ES6 feature. The only difference is, in ES6, the syntax is: ${titlestring}, and here it’s #{titlestring}.
We are surrounding the interpolated string with %% characters. They are used when we want SQL to perform a wildcard search.
The entire %#{query}% bit will be inserted in the place of the ? character in title LIKE ? SQL fragment. Using the ? makes sure that we’ve also sanitized our query.
This should all be a lot clearer when we run the actual named scopes next.
Running named scopes on the movie model
First, we’ll run the Rails console: rails c.
Next, we’ll run Movie.all, just to make sure it works.
Now we can test our named scopes:
Movie.from_newest.lookup("Modern Times")
This is what the Rails console will return:
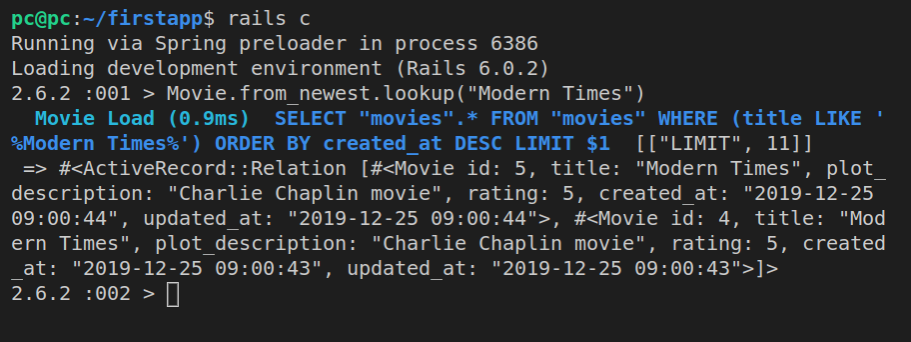
This update is saved as “Named scopes” in our repository.
Working with relational databases in Rails
So far we’ve covered how to work with single tables in our Rails apps using ActiveRecord.
However, ActiveRecord also allows us to work with relational databases, by defining relationships between various tables.
There are several relationship types:
- one-to-one
- one-to-many
- many-to-one (which is really the same as number 2 above)
- many-to-many
To be able to define these relationships, we need to do some thinking.
For example, if we have a user model, and a movie model in our Rails app, how will these two work together?
Will it be the case of “one user can have many movies”? Or will it be the case of “one user can have only one movie”?
It’s our app’s business logic which ultimately determines how we need to describe these relationship types.
For example, if we are building a movie reviews site, we might have this situation:
- One user can review many movies
- One movie can have many reviews
- Each user can review each movie only one time
- A user can have various statuses, for example: commenter, critic, buff - but they can have only one status at a time
Each of these database table relationships can be defined using the relationship types: one to one, one to many, and many to many.
Next, we’ll see how each of these three types works in practice.
One-to-one relations
All these relations are defined using database associations.
In our example of a movie website, we saw how one user can have one status at a time.
This is a 1:1 relationship association.
Each user has one status.
One status belongs to one user.
To set this up, we could add a foreign key on the users database table.
This foreign key, by Rails convention, should be called: status_id.
Since one-to-one is still a one-to-one even when we flip it, meaning: user-to-status is the same as status-to-user, we could define this differently:
Each status has one user.
One user belongs to one status.
Now we’d be adding a foreign key to the status database table, and call this foreign key column: user_id.
The foreign key is always used on the noun that’s on the left side of the belongs to association; this is the formula: table_id belongs to table.
So if one user belongs to one status, following the formula, we’d have this:
user.status_idbelongs tostatus
Alternatively, if one status belongs to one user, we’d have this:
status.user_idbelongs touser
It’s up to us to pick either one of the two, based on which approach makes more sense, but the end result is the same.
One-to-many relations
An example of a one-to-many (1:M) relationship is this: one user has many movies.
Each movie belongs to one user, so:
movie.user_idbelongs touser
Many-to-many relations
Let’s say we have a jobs site, and this jobs site has different categories, for example, it jobs, construction jobs, design jobs, and so on.
Then we might have two tables, jobs and categories.
The association between jobs and categories would be a many-to-many relationship (an M:N relationship):
- one job can have many categories
- one category can have many jobs
For example, we could have a job post for a UX designer. This could fall both into the it category and into the design category.
Alternatively, the it category could have many jobs, and the design category could also have many jobs.
This leads to a conundrum: where do we place the foreign key? We can’t say that the UX designer job belongs to the design category, because it also belongs to the it category. Similarly, we can’t say that the it category belongs to UX designer jobs only. What if there are other jobs?
The solution is to use a join table, a table we could call, for example, jobs_to_categories.
This table would have two rows:
job_idcategory_id
Effectively, the jobs_to_categories table has a 1-M association with the jobs table, and another 1-M association with the categories table.
In other words, we can say that:
- one job has many categories and belongs to many categories
- one category has many jobs and belongs to many jobs
Writing the above relationships using ActiveRecord would look like this:
- job has_many :categories
- job belongs_to :categories
- category has_many :jobs
- cagtegory belongs_to :jobs
The above is actually written using a single method name:
- job has_and_belongs_to_many :categories
- category has_and_belongs_to_many :jobs
For the earlier example between users and statuses in our movie site, we could write:
- user has_one :status
- status belongs_to :user
Using one-to-one association
An example to use a one-to-one association is when we want to normalize our database, i.e split a single table in the database, into two or more tables, depending on the specific circumtances.
Normalization of relational databases is a topic in itself; most tables are good enough if they’re normalized up to the Boyce-Codd normal form.
Why normalize a database? Because it makes our tables more maintainable and faster.
When writing one-to-one associations, make sure to go both ways, i.e define both the has_one and the belongs_to association.
Before we can see an example of a one-to-one relationship as an association in our movies model, we need to add a column to the movies table, so that it also has the status column. For that, we’ll run a migration.
Altering the tables in the database using migrations
We’ll start by messing up our movies table. The status should be added as a column inside a separate table called users.
However, we’ll instead add it as a column of our movies table.
This is obviously a mistake, and we’ll first make this mistake using the rails generate migrations command, then we’ll fix it using the rails generate model command.
Migrating the status column into the movies table
First, let’s run rails c and make sure we understand the structure of the movies table:
Activerecord::Base.connection.columns('movies').map(&:name)
We see the returned column names in the movies table:
[
  "id",
  "title",
  "plot_description",
  "rating",
  "created_at",
  "updated_at"
]
Now we’ll exit the Rails console, and run a new migration:
rails generate migration AddStatusToMovies
Let’s now open the newly generated migration file, *_add_status_to_movies:
class AddStatusToMovies < ActiveRecord::Migration[6.0]
  def change
  end
end
Now we’ll use a column migration method: add_column.
class AddStatusToMovies < ActiveRecord::Migration[6.0]
  def change
    # add_column(table, column, type, options)
    add_column(:movies, :status, :string)
  end
end
Adding the status column will allow us to add a descriptive status to our movies table.
Let’s inpect the schema.rb file before running the updated migration:
ActiveRecord::Schema.define(version: 2019_12_24_215938) do

  # These are extensions that must be enabled in order to support this database
  enable_extension "plpgsql"

  create_table "movies", force: :cascade do |t|
    t.string "title", limit: 150
    t.string "plot_description", limit: 300
    t.bigint "rating"
    t.datetime "created_at", precision: 6, null: false
    t.datetime "updated_at", precision: 6, null: false
  end

end
Now let’s run rails db:migrate.
Once the migration is run, this is the result:
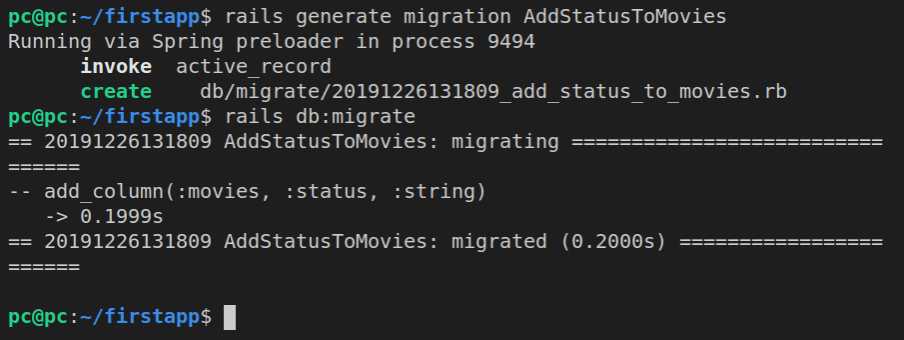
Let’s reopen the schema.rb file:
ActiveRecord::Schema.define(version: 2019_12_26_131809) do

  # These are extensions that must be enabled in order to support this database
  enable_extension "plpgsql"

  create_table "movies", force: :cascade do |t|
    t.string "title", limit: 150
    t.string "plot_description", limit: 300
    t.bigint "rating"
    t.datetime "created_at", precision: 6, null: false
    t.datetime "updated_at", precision: 6, null: false
    t.string "status"
  end

end
We can see the addition of t.string "status" at the bottom of the database definition.
Like announced earlier, this is obviously wrong, so let’s fix it now using migrations.
Fixing a wrong migration
Just like we added a column, we can remove it.
First, we’ll make a new migration:
rails generate migration RemoveStatusFromMovies
Now we’ll open *_remove_status_from_movies, and update it so that it looks like this:
class RemoveStatusFromMovies < ActiveRecord::Migration[6.0]
  def change
    # remove_column(table, column)
    remove_column(:movies, :status)
  end
end
Next, we’ll run the migration:
rails db:migrate
Again, we’ll verify that it’s indeed gone by verifying the contents of the schema.rb file:
ActiveRecord::Schema.define(version: 2019_12_26_134034) do

  # These are extensions that must be enabled in order to support this database
  enable_extension "plpgsql"

  create_table "movies", force: :cascade do |t|
    t.string "title", limit: 150
    t.string "plot_description", limit: 300
    t.bigint "rating"
    t.datetime "created_at", precision: 6, null: false
    t.datetime "updated_at", precision: 6, null: false
  end

end
Great, we’re back to the desired state of our movies table.
Next, we’ll run the rails generate model to add a new model.
rails generate model
  user first:string
  last:string
  username:string
  email:string
  status:string
Note that the above command is split up on several lines for readability; in practice, this will all go on a single line.
The four files that got added to our app are:
db/migrate/*_create_users.rbapp/models/user.rbtest/models/user_test.rbtest/fixtures/users.yml
Let’s inspect the migration file:
class CreateUsers < ActiveRecord::Migration[6.0]
  def change
    create_table :users do |t|
      t.string :first
      t.string :last
      t.string :username
      t.string :email
      t.string :status

      t.timestamps
    end
  end
end
And here’s the contents of the user.rb file:
class User < ApplicationRecord
end
Ok, now let’s run the rails db:migrate command.
The output:
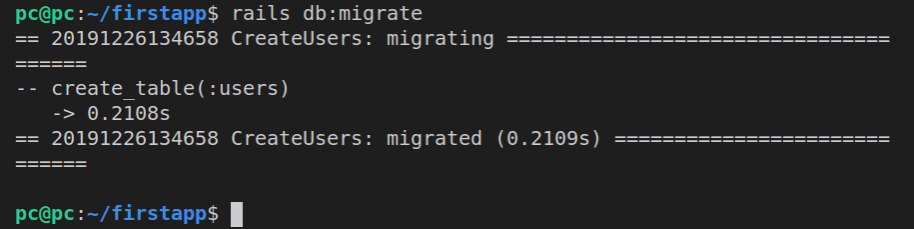
Now let’s see the updates this has made to schema.rb:
ActiveRecord::Schema.define(version: 2019_12_26_134658) do

  # These are extensions that must be enabled in order to support this database
  enable_extension "plpgsql"

  create_table "movies", force: :cascade do |t|
    t.string "title", limit: 150
    t.string "plot_description", limit: 300
    t.bigint "rating"
    t.datetime "created_at", precision: 6, null: false
    t.datetime "updated_at", precision: 6, null: false
  end

  create_table "users", force: :cascade do |t|
    t.string "first"
    t.string "last"
    t.string "username"
    t.string "email"
    t.string "status"
    t.datetime "created_at", precision: 6, null: false
    t.datetime "updated_at", precision: 6, null: false
  end

end
We can also notice that the created_at and the updated_at table columns were added automatically by the Rails framework itself.
Now we’re ready to add the one-to-one relation.
Note that this is just a demo, to see how such a relation is added, but we won’t really be using it because it doesn’t make sense.
Let’s open movie.rb, and add this:
has_one :user
One movie can have only one user.
Back in the user.rb file:
class User < ApplicationRecord
    belongs_to :movie, { :foreign_key => 'movie_id' }
end
Let’s now test this in the rails console:
rails c
Let’s look at the first movie:
m = Movie.find(1)
Let’s look at the related user:
m.user
We’re going to get the error: column user.movie_id does not exist.
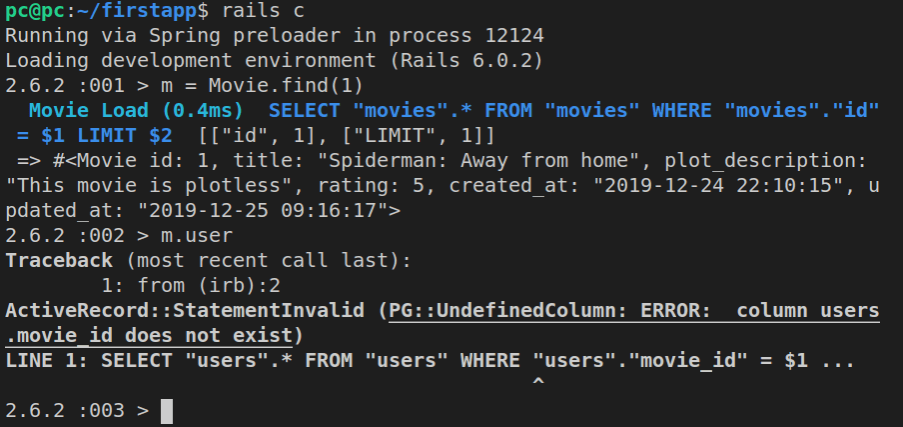
To fix this, we need to add and then run another migration:
rails generate migration AddForeignKey
In the migration file, *_add_foreign_key, we’ll add the movie_id foreign key column:
class AddForeignKey < ActiveRecord::Migration
  def change
  # add_foreign_key(from_table, to_table, options = {})
    add_foreign_key(:users, :movies)
  end
end
Now we’ll run rails db:migrate to propagate the updates to our database.
However, this will throw another error:
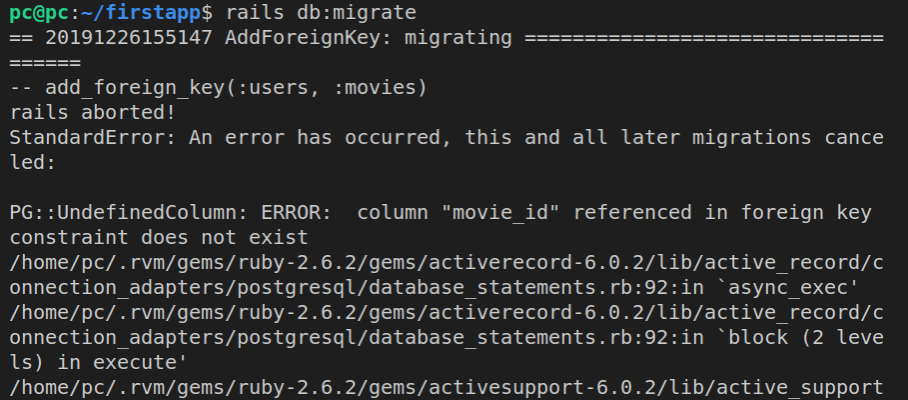
The root cause of the error is spelled out in the output to the console:
.
.
PG::UndefinedColumn: ERROR:  column "movie_id" referenced in foreign key constraint does not exist
.
.
Thus, we’ll need to update our migration file, by first adding the movies_id column to users table, and only then adding it as a foreign key.
Thus, here’s the complete, updated migration file ( *_add_foreign_key.rb):
class AddForeignKey < ActiveRecord::Migration[6.0]
  def change
    # add_column(table, column, type, options)
    add_column(:users, :movie_id, :bigint)

    # add_foreign_key(from_table, to_table, options = {})
    add_foreign_key(:users, :movies)
  end
end
Now run rails db:migrate again, and this time it will run successfully:
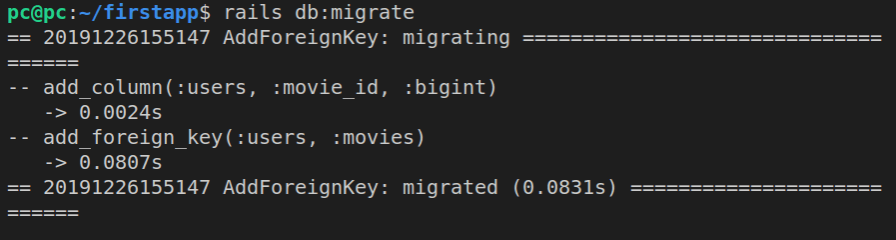
Let’s inspect schema.db for good measure:
ActiveRecord::Schema.define(version: 2019_12_26_155147) do

  # These are extensions that must be enabled in order to support this database
  enable_extension "plpgsql"

  create_table "movies", force: :cascade do |t|
    t.string "title", limit: 150
    t.string "plot_description", limit: 300
    t.bigint "rating"
    t.datetime "created_at", precision: 6, null: false
    t.datetime "updated_at", precision: 6, null: false
  end

  create_table "users", force: :cascade do |t|
    t.string "first"
    t.string "last"
    t.string "username"
    t.string "email"
    t.string "status"
    t.datetime "created_at", precision: 6, null: false
    t.datetime "updated_at", precision: 6, null: false
    t.bigint "movie_id"
  end

  add_foreign_key "users", "movies"
end
Once this is done, we can try rails console again:
rails c
Now try:
m = Movie.find(1)
m.user
This time, instead of an error, we’ll get back a nil:
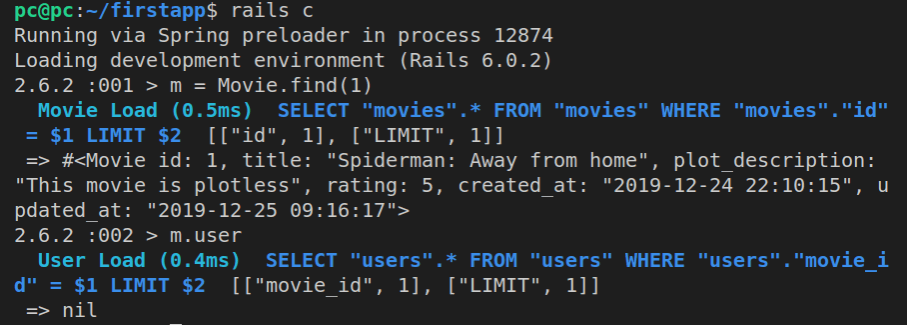
This is a good thing!
It means that everything is running correctly, but there is no data when we ask the movie about its user.
If you look at the SQL code that ActiveRecord sent to the database, here it is:
SELECT "users".*
  FROM "users"
  WHERE" "users"."movie_id" = $1 LIMIT $2
  [["movie_id", 1], ["LIMIT", 1]]
As usual, we’ve split the one-liner from the rails console on multiple lines for easy reading.
We’re querying the database for all users that have the movie_id set to 1.
Note that ActiveRecord also gave us another method to use on the m object, called user.
When we set up the has_one and belongs_to methods inside our models, ActiveRecord makes some new getter and setter methods available:
# getters
movie.user
user.movie

# setters
movie.user = user
user.movie = movie
Now let’s add a new user, so that we can connect that user to a movie.
First, let’s inspect our users table:
ActiveRecord::Base.columns('users').map(&:name)
Here’s the array of our users table’s column names:
[
  "id",
  "first",
  "last",
  "username",
  "email",
  "status",
  "created_at",
  "updated_at",
  "movie_id"
]
Now, let’s fill out a new user object in Rails console:
u = User.new()
u.first = "John"
u.last = "Doe"
u.username = "jd"
u.email = "jd@example.com"
u.status = "commenter"
u.movie_id = 1
Now we can inspect the object we built by simply typing: u.
Here are the outputs of all these commands:
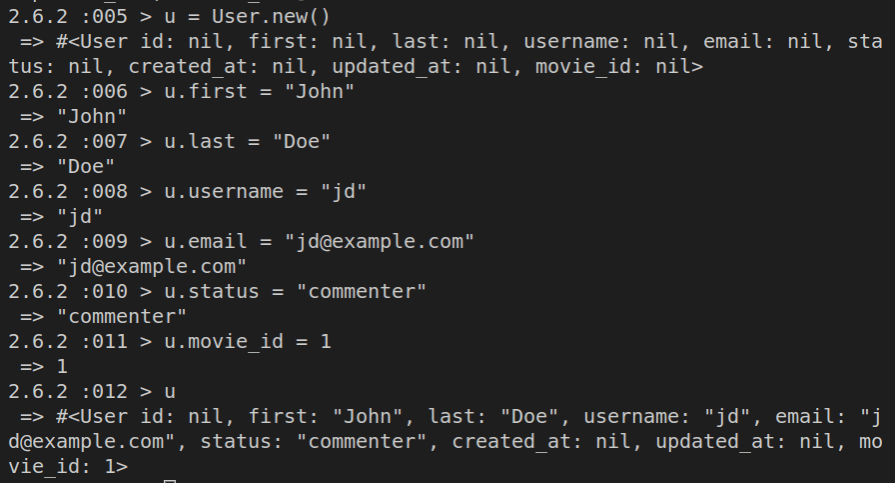
Now we can save the u object to the database.
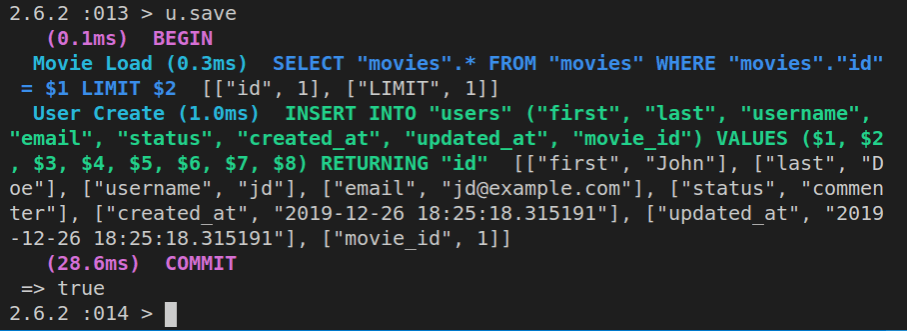
Now we can look up the first movie again:
m = Movie.find(1)
… and we can also find the user on the movie:
m.user
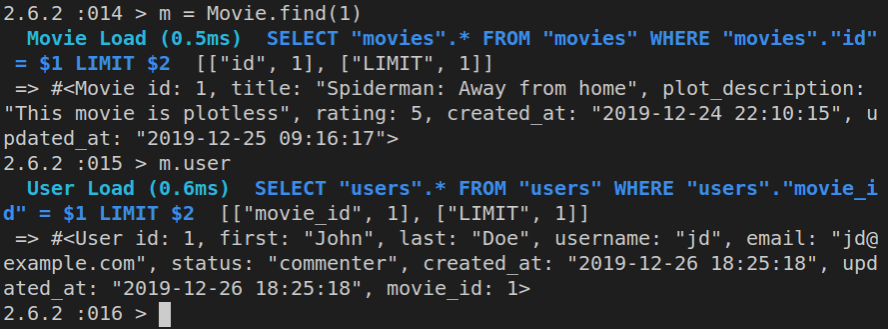
Now we can find the user on the movie in on equick ActiveRecord command:
Movie.find(1).user
Now let’s try this:
u = User.find(1)
u.movie
Running the above code now shows the movie association on the u user object. Currently the associated movie is “Spiderman”.
Remember that the u.movie is a getter method.
To reaassign another movie to the u object, we need to use the setter method:
u.movie = Movie.find(4)
Now we’ve updated the associated movie; it’s no longer “Spiderman”. Now it’s “Modern Times”.
We can even remove the association, so that the u object has no association with any movie:
u.movie = nil
Running u.movie now will return nil.
To both remove the association and the associated movie, we need to run the destroy method:
u = User.find(1) # assign User(1) to u object
u.movie = Movie.find(1) # set the movie on the user
u.movie.destroy # remove association AND erase the movie
Running the above code will throw a foreign key violation:
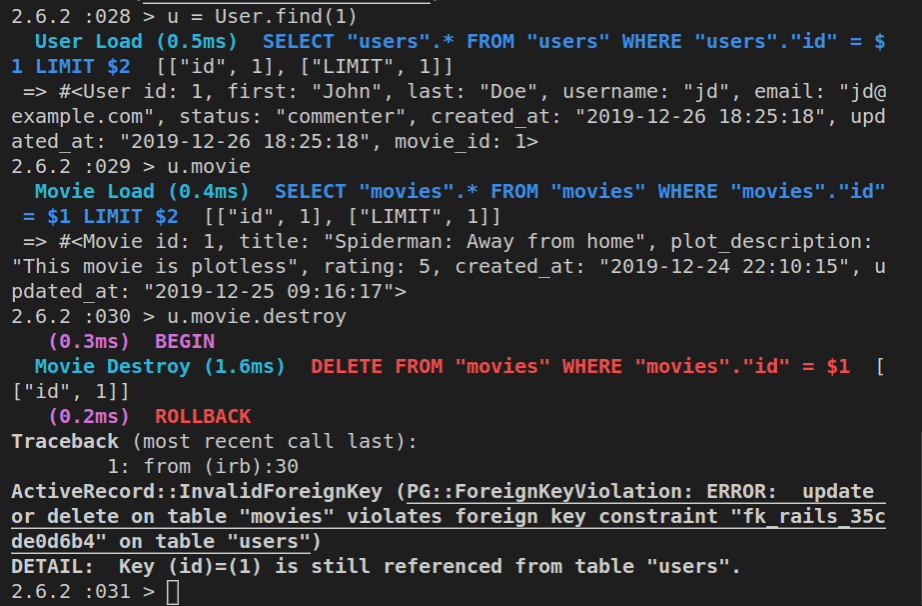
To fix this, we need to extend the user.rb model like this:
class User < ApplicationRecord
    belongs_to :movie,
    { :foreign_key => 'movie_id' },
    dependent: :destroy # on_delete: :cascade
end
Now it should work properly.
Next, we’ll work with one-to-many associations.
Working with 1:M associations
The 1:M association is a lot more common, and because of the nature of the association, we need to use plural relationship names.
These associations return an array of hashes rather than a single hash.
Let’s now update our app so that one movie has many users, and one user belongs to one movie.
Once we’ve set up the relation using has_many, a number of methods gets exposed:
m.users
m.users << user # append a user
m.users = [user, user, user]
m.users.delete(user)
m.users.destroy(user)
m.users = []
m.users.clear
m.users.size
m.users.empty?
To append a movie, we use the append operator, <<.
We can even assign an array of movies to m.users, but that would mean we’d have to specify all the users that belong to a movie; thus, the append operator is a lot more flexible.
To delete a single movie association, we run m.users.delete(user), and to destroy it we just replace the delete method with the destroy method.
To remove all the users from a movie, we just assign them to an empty array. The equivalent of doing that is the clear method.
To check the length of the users array, we use the size method, and to check if the users array is empty, we use the empty? method.
Now we can update our movie.rb model with this:
class Movie < ApplicationRecord
    # self.primary_key = 'id'

    has_many :users

    scope :from_newest, lambda { order("created_at DESC") }
    scope :lookup, lambda {|titlestring| where(["title LIKE ?", "%#{titlestring}%"]) }

end
We can also make sure that our user.rb looks like this:
class User < ApplicationRecord
    belongs_to :movie #, { :foreign_key => 'movie_id' }, dependent: :destroy # on_delete: :cascade
end
Looking at the above code, we can say that one movie has many users, and that one user belongs to one movie.
Let’s now run rails c, and then:
movie = Movie.find(1)
movie.user
The movie.user command will return an error. Because we’re using has_many :users, to make it work, we need to use the pluralized form:
movie.users
Let’s now add another user, and after that, append it to the movie.users array:
user = User.new()
user.first = "Jane"
user.last = "Doe"
user.username = "jane"
user.email = "jane@example.com"
Note that we didn’t set user.movie_id = 1 for example.
Right now, getting user.movie_id returns nil.
If we ran user.save we’d get back false, because it won’t save without a movie_id.
Let’s now append our new, in-memory user object to our in-memory movie object’s users array:
movie.users << user
If we now ran the movie.users getter, we’d see an array of two hashes, with users John and Jane.
If we run user.save now, it returns true.
We can confirm that this is the case by querying the database using ActiveRecord:
User.find(2)
This now returns the Jane Doe user that we’ve just added to our database.
Once everything is saved, the movie object no longer has new records. Running movie.new_record? will return false.
However, if we add another user and append it to the movie object, then run movie.new_record?, it will return true:
u = User.new(:first => "Joe", :last => "Whatever", :username => "jw", :email => "jw@example.com", :status => "commenter")
movie.users << u
movie.new_record?
The real “click” in understanding, once you work with these long enough, can be summed up in a simple exercise:
- view the
movieobject - view the
movie.usersarray
Here’s what we get:
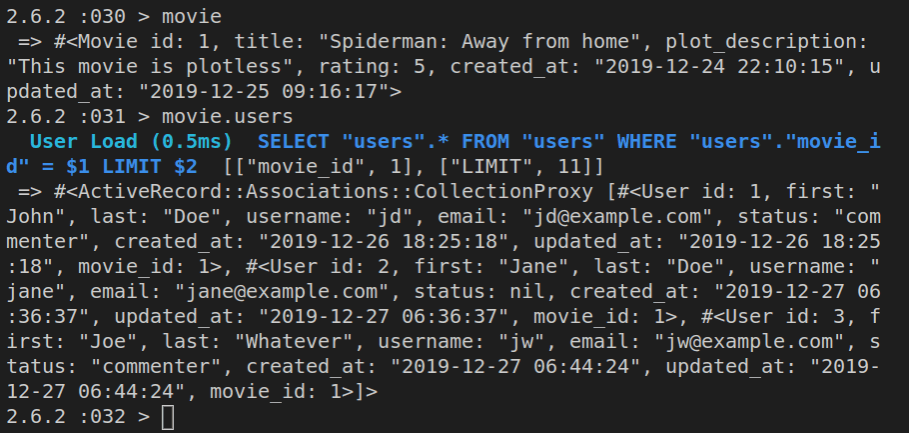
Here we’re seeing two different results:
- The
movieobject shows just a single row from the movies table inside our database - The
movie.usersarrays shows the filtereduserstable, where the filter used is the column ofusers.movie_idwith the value of1.
Let’s now try removing the latest addition to the movie.users array:
movie.users.delete(user)
Now we’ll have only two users in the movie.users array (with user.id 1 and 3).
Both the u and user objects are still available in memory:
user
u
Here’s a screenshot of running these several commands:
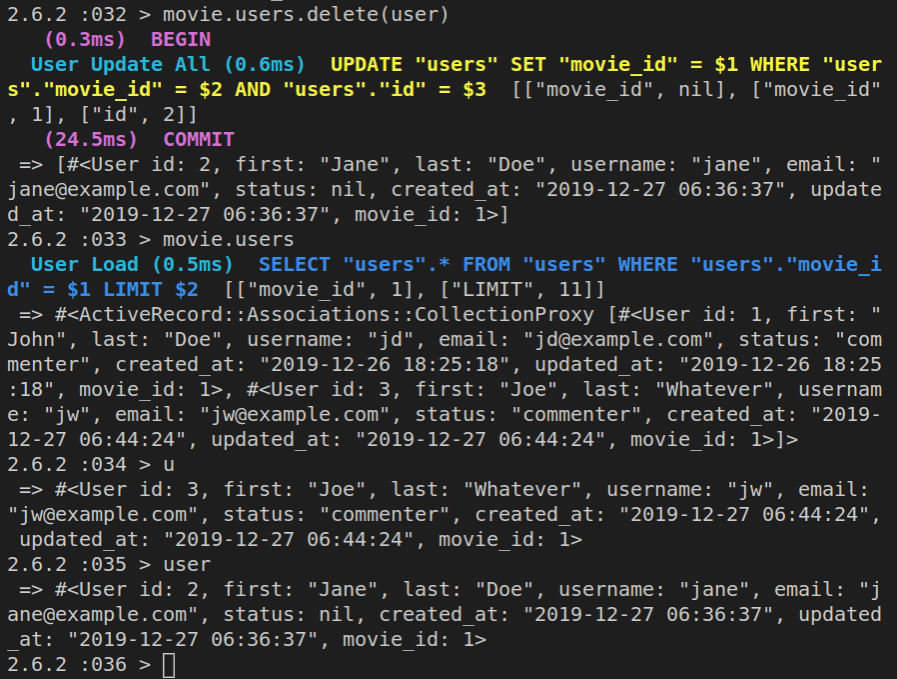
Since we deleted the user object from the database, we can’t re-add it to the movie.users array:
movie.users << user
If we ran movie.users.count it would still show 2 users (with id 1 and 3).
We could, however, do this:
jane = user
jane.id = 4
Now we can add Jane back in:
movie.users << jane
Here’s a screenshot showing the re-adding of the deleted user:
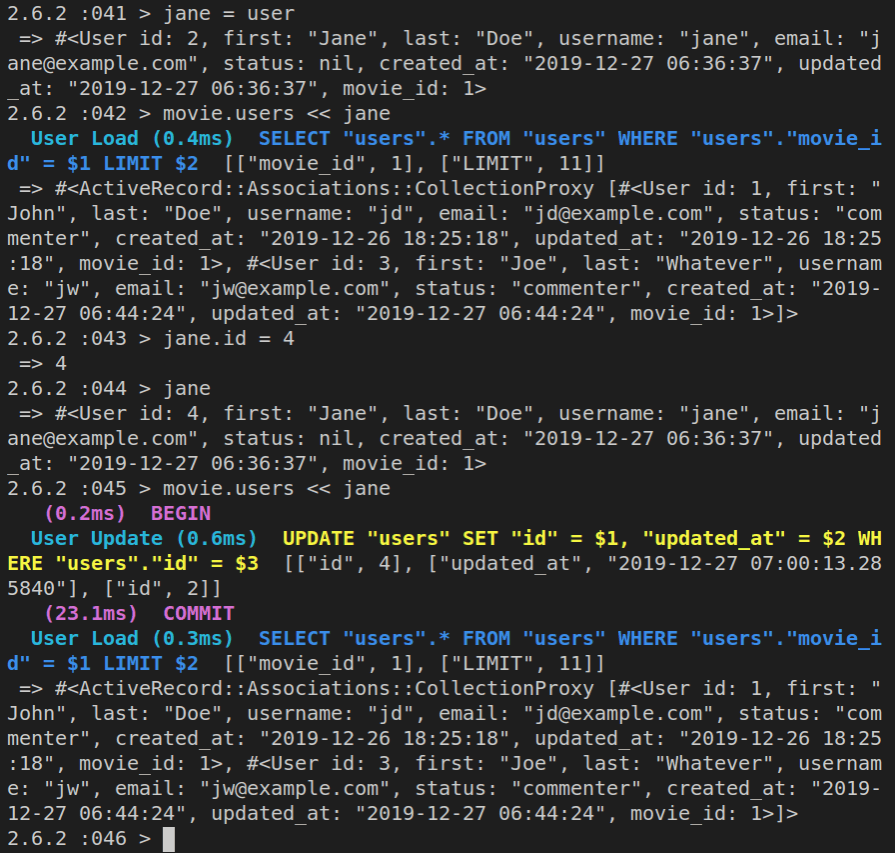
It might take a few times to get it right, but once you get used to how things work in the Rails console, it’s a breeze.
Now let’s look at the relation from the users side, and check for what movie they belong to:
User.find(1).movie
User.find(2).movie
User.find(3).movie
User.find(4).movie
We can see that all the users that exist in the database belong to movie with the id of 1, via the foreign key specified in each of the returned user rows, namely, specified in the entries for the movie_id column.
This also means that changing the movie_id column’s value would reassign a user to a different movie.
For example:
u = User.find(4)
u.movie_id = 4
u
u.movie
Now Jane belongs to “Modern Times”:
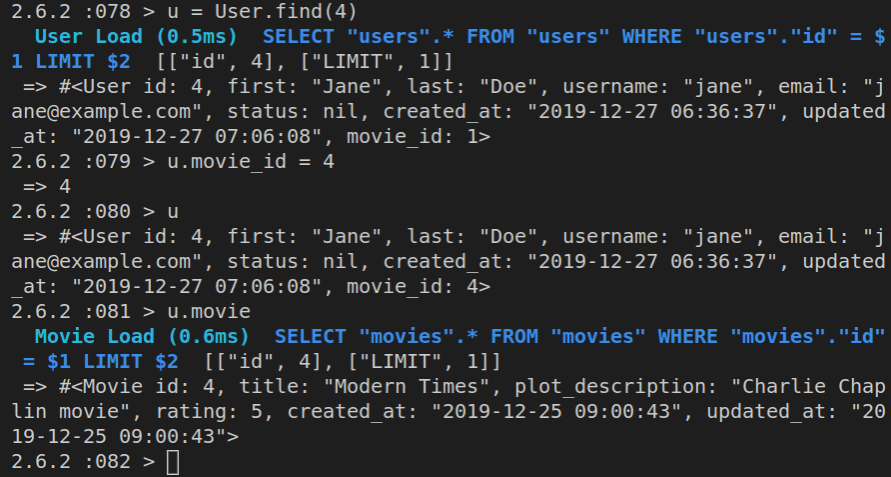
Presence Validation of belongs_to
An object that had a belongs_to association, could be saved to the database even if it didn’t have a parent object associated with it, that is, the belongs_to association was not required to be present.
Starting in Rails 5, the belongs_to relationship is not optional by default.
Now, when we add a belongs_to, ActiveRecord adds a validation on the object, for related object’s presence.
So if we add a new user, it won’t save to the database unless we have a movie associated with it.
Validation is there to check and make sure that the data is correct, before allowing it to be saved to the database.
So if a movie is not present, then a user can’t be saved:
u = User.new()
u.first = 'James'
u.last = 'Doe'
u.save
Currenlty, the u.save will return false.
But, if we do this:
u.movie_id = 4
u.save
Running the u.save after we’ve specified the related movie now returns true, which means that the new user was successfully saved to the database, which can be confirmed by looking at the screenshot of the output:
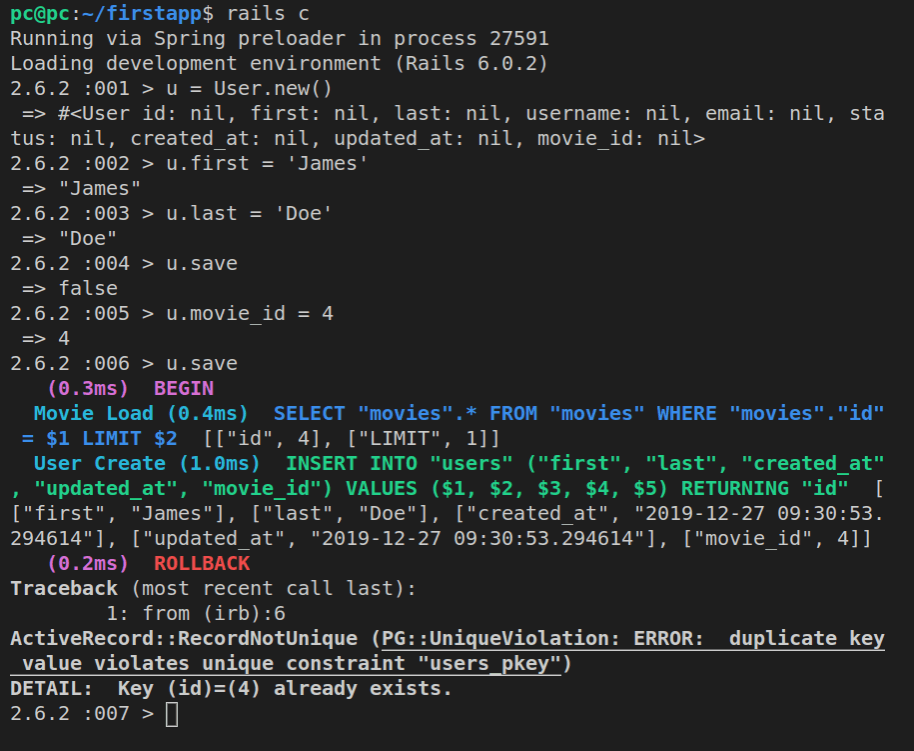
However, it’s possible to change a Rails app’s configuration so that this is not required - you’d do this when you’re migrating an older Rails app (pre-version 5) to a newer version.
Alternatively, you can disable the validation of belongs_to presence using: {:optional => true}.
Let’s first a new user without a movie_id and see that it won’t save (just like it didn’t save before).
u = User.new()
u.first = "Someone"
u.save
This will return “false”.
We can inspect the error with:
u.errors.full_messages
The console returns:
=> ["Movie must exist"]
As before, we could assign this user to a movie, and that would take care of it.
Alternatively, we can update the user.rb model, so that the belongs_to is optional:
class User < ApplicationRecord
  belongs_to :movie, {:optional => true}
end
Now trying to save a user without the movie_id will work:
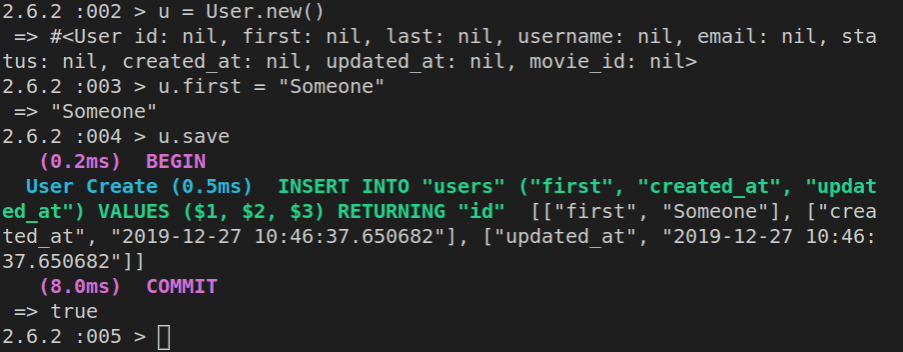
Even though it’s possible, most of the time we should avoid inserting rows into our db tables that have broken associations, so adding {:optional => true}should be avoided, most of the time.
All these different updates are committed as “Relational dbs in Rails”.
Working with many-to-many associations in Rails
Many-to-many is similar to one-to-many, but in M:N, the object can belong to more than one owner.
In the previous example, a user always belonged to a single movie. But in the following examples, we’ll see how to set up an association in which a user can belong to several movies, and vice versa, a movie can belong to several users.
These are the associations:
- a movie has_and_belongs_to_many :users
- a user has_and_belongs_to_many :movies
As we mentioned earlier, for this to work, we need to have a join table, with two foreign key columns. Both of them will need to be indexed.
This also means that each of the many-to-many tables will not have a primary key column itself, and thus, we’ll set their automatic :id to false:
(:id => false)
The way we’ll make the M:N association work is this:
- We’ll add a migration for the new join table
- We’ll update the movie and user models so that they reflect the updated many-to-many relationship
Adding the new join table migration
There are a few Rails naming conventions to follow when adding a join table:
first_table+_+second_table- plural table names
- tables are listed in alphabletical order
So, practically, we’ll have this table name:
movies_users
In cases where we have multi-word models, they are separated with underscores. For example, if we have a model called MovieGenres and another one called UserRoles, the join table will have this name:
movie_genres_user_roles
Now we’ll make a migration for this join table.
There’s no specific naming convention for migration naming, but it’s best to reflect what the migration does in the migration name:
rails generate migration AddTableMoviesUsers
ActiveRecord is invoked, and a new file is built; the file is titled: *_add_table_movies_users.rb.
Let’s press CTRL + p in VS Code to start file launcher, and then it’s enough to just type a part of the file name, for example: movies_users.
This will narrow down the list of files and make it easy to click the one that we need.
Once we’ve opened the new migration file, here’s what we got:
class AddTableMoviesUsers < ActiveRecord::Migration[6.0]
  def change
  end
end
We used the word AddTableMoviesUsers, and the above code is what we got.
Let’s try using the word Create instead, so now it will be CreateTableMoviesUsers, so that we can compare the output.
Thus, let’s run:
rails generate migration CreateTableMoviesUsers
The new migration file is now titled *_create_table_movies_users.
Let’s use the CTRL + p in VS Code again to find this newest migration file. This time, we’ll use the create_table as our search term.
Once open, the file looks like this:
class CreateTableMoviesUsers < ActiveRecord::Migration[6.0]
  def change
    create_table :table_movies_users do |t|
    end
  end
end
Here again, we can see Rails’ convention over configuration in practice. Just because we gave our migration the word Create as the first part of its name, Rails included this line in the migration file:
create_table :table_movies_users do |t|
We can now alter the symbol above, from :table_movies_users to just :movies_users:
create_table :movies_users do |t|
Let’s now split the change method into the up and down method:
class CreateTableMoviesUsers < ActiveRecord::Migration[6.0]
  def up
    create_table :movies_users do |t|
    end
  end

  def down
    drop_table :movies_users
  end

end
Let’s also remove the previous migration, the one we called AddTableMoviesUsers.
Before we do that, let’s see the current status of our files with git status.
Here’s the output:
On branch master
Your branch is up to date with 'origin/master'.

Untracked files:
  (use "git add <file>..." to include in what will be committed)

        db/migrate/20191230085830_add_table_movies_users.rb
        db/migrate/20191230090419_create_table_movies_users.rb
Let’s now destroy the AddTableMovieUsers migration:
rails destroy migration AddTableMovieUsers
Here’s the output:

Now let’s go back to the remaining new migration file and extend the newly added up and down methods:
class CreateTableMoviesUsers < ActiveRecord::Migration[6.0]
  def up
    create_table :movies_users, :id => false do |t|
      t.integer "movie_id"
      t.integer "user_id"
    end
    add_index("movies_users", ["user_id", "movie_id"])
  end

  def down
    drop_table :movies_users

  end
end
We won’t be auto-incrementing this join table, ever. So we’ve specifically set the :id symbol to false.
We’ve added a singular user_id and movie_id``, not plural, because it's going to be a single id each time; we also needed to add indexes on both of them. The first parameter of theadd_index``` method is the target table, and the second parameter is an array of strings, where each string is a column in the target table.
Once we’re happy with the saved updates to the *_create_table_movies file, we can run the rails db:migrate command:
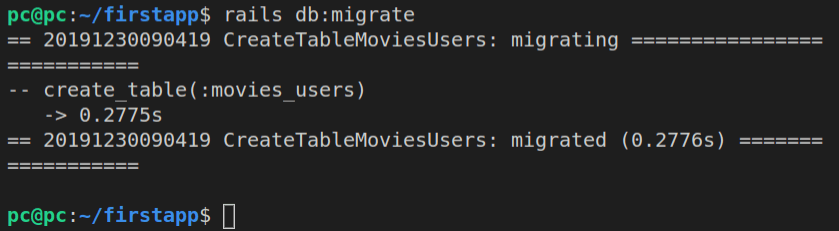
Now that our migration ran successfully, our database looks like this:
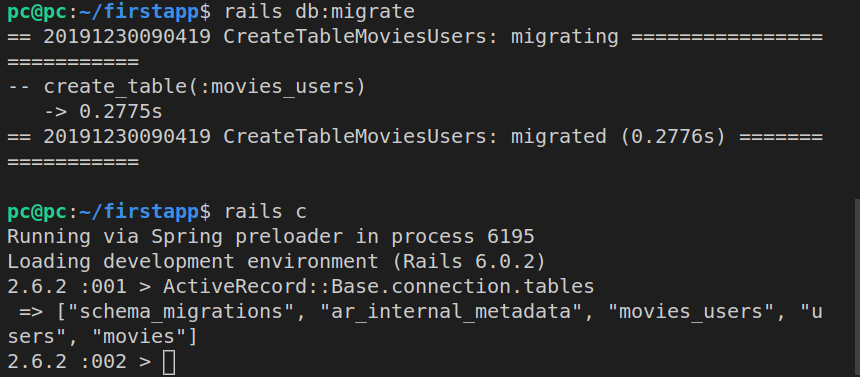
There are now 2 “system” tables in our Rails app:
schema_migrations, andar_internal_metadata
There are also 3 tables we added ourselves:
moviesusersmovies_users
The third table in the above list was added in the newest database migration.
However, we still need to update our models to reflect this change.
Here’s the updated user.rb model file:
class User < ApplicationRecord
  has_and_belongs_to_many :movies
end
And here’s the updated movie.rb model file:
class Movie < ApplicationRecord
    has_and_belongs_to_many :users
end
If we weren’t using the Rails table naming convention, we’d have to specify the join table using this syntax:
has_and_belongs_to_many :users,
  :join_table => 'whatever_table'
…but since we’re using the conventions, we don’t even have to specify it and Rails will find it anyway.
Now we can run some datanase queries using ActiveRecord, with our Rails console:
rails c
Movie.all
If we now run Movie.all, we’d get all the current movies. Similarly, running User.all will show all the current users.
Now we can do m = Movie.find(1):
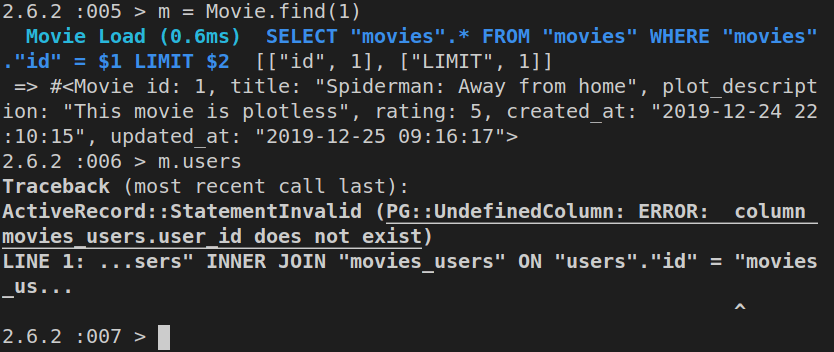
As we can see, we get back an error from our database:
UndefinedColumn: ERROR: column movies_users.user_id does not exist
Why is that?
Let’s inspect the movies_users column:
ActiveRecord::Base.connection.columns('movies_users').map(&:name)
Indeed, we only have the id column:

That’s because while writing this tutorial, I never updated the *_create_table_movies_users.rb. It still looks like this:
class CreateTableMoviesUsers < ActiveRecord::Migration[6.0]
  def up
    create_table :movies_users do |t|
    end
  end

  def down
    drop_table :movies_users
  end
end
Instead, it should have been updated to this:
class CreateTableMoviesUsers < ActiveRecord::Migration[6.0]
  def up
    create_table :movies_users, :id => false do |t|
      t.integer "movie_id"
      t.integer "user_id"
    end
    add_index("movies_users", ["user_id", "movie_id"])
  end

  def down
    drop_table :movies_users

  end
end
So once I’ve updated the migration file and saved it, I’m ready to run it again - i.e, to redo the migration:
rails db:migrate:redo
Now we can see that the movies_users has been updated:
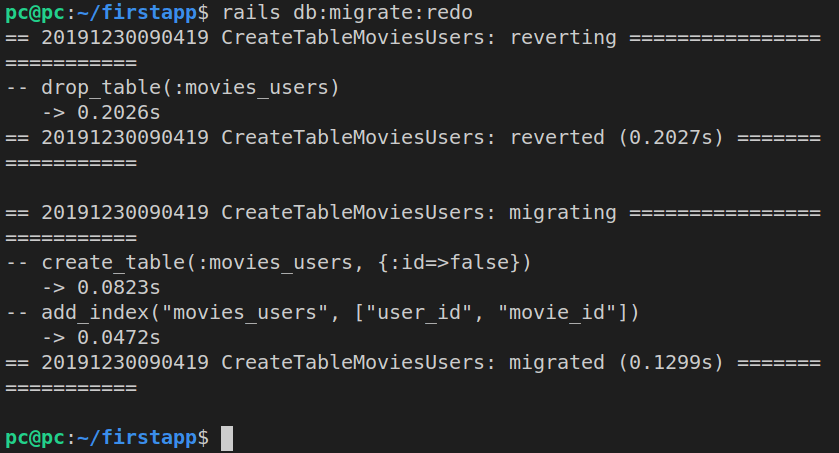
Let’s redo m = Movie.find(1), and follow it up with m.users.
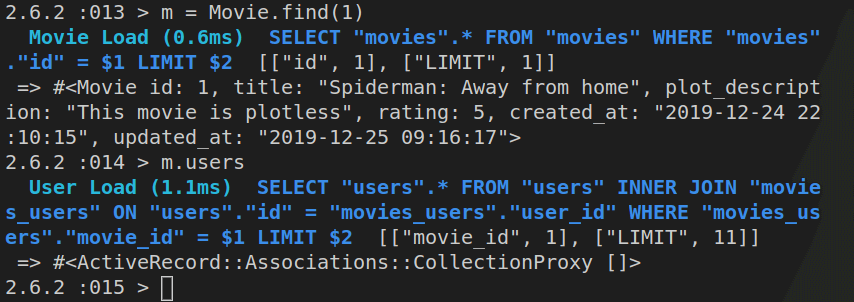
Calling m.users now returns an empty array, but it doesn’t throw errors.
Let’s inspect the executed query.
SELECT "users".*
FROM "users"
INNER JOIN "movies_users"
ON "users"."id" = "movies_users"."user_id"
WHERE "movies_users"."movie_id" = $1 LIMIT $2
[["movie_id", 1], ["LIMIT", 11]]
ActiveRecord used INNER JOIN on movies_users, so that it can find what users belong to the m movie object.
Now we can append a movie to a user using INNER JOIN:
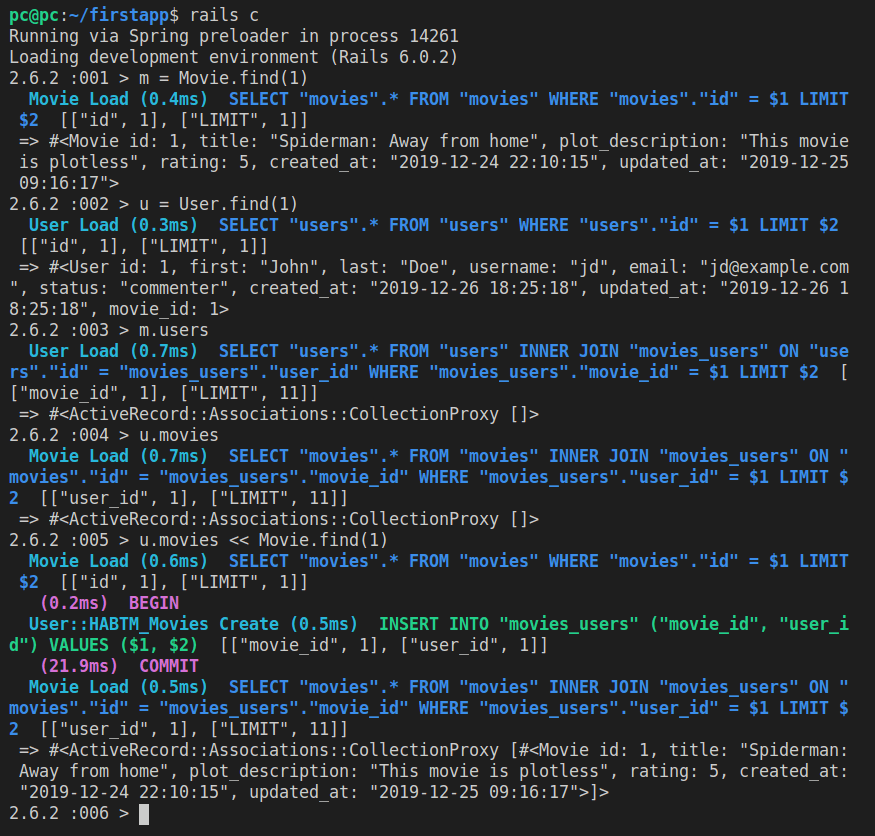
Additionally, we can check the size of the u.movies and m.users arrays, as well as check if they are empty:
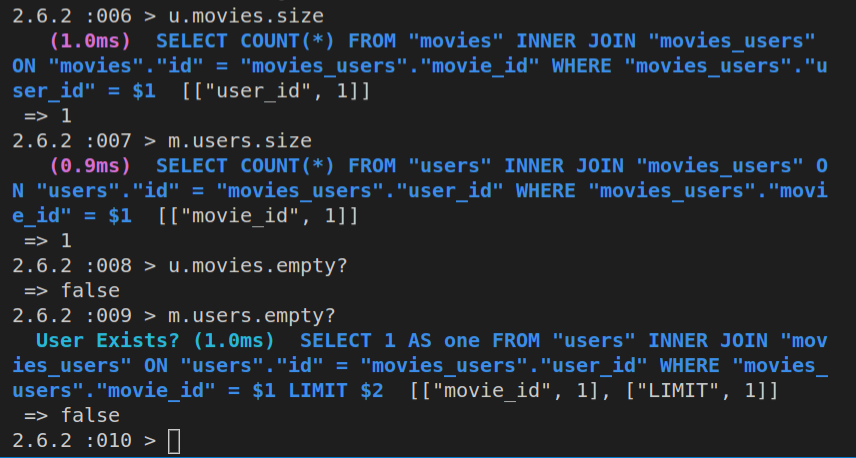
The important piece of syntax to remember here is how to add a user to the m.users collection, which is:
u.movies << Movie.find(1)
Complex M:N associations
Sometimes we need to keep track of more than just the id numbers of tables we’re joining in a many-to-many relationship.
This is not hard to do: we just need to add a model for the join table.
Basically, the biggest difference between a simple M:N association and a complex one is this:
- in a simple M:N, Rails is in control of updating the associated models (after we specify the relationships)
- in a complex M:N, we have a model of our join table, and we are responsible for updates to the join table’s model
- as a consequence, it’s not as easy to query a complex M:N association, but it’s not difficult either, once you know how it works
Since our join table now has it’s own separate model, we need to add it an id column which will hold the primary key. Having a primary key will allow us to perform all the CRUD operations like we can on any model.
Contrary to the basic, simple M:N associations, we don’t need to follow any specific naming convention here.
We’ll again be joining the users and movies tables in a complex M:N association.
For example, let’s say that we want to allow multiple users to write the description of the plot of the movie. Let’s also imagine that they’ll be able to contribute different parts of the plot, overwrite the existing parts, and so on. Thus, we’ll need to track more than just the id numbers of the joined tables.
We’ll also be tracking the time of the update and a description of the update.
So let’s name our join table movie_plot_updates.
This is how it works from the User model side:
- User has_many :movie_plot_updates
- MoviePlotUpdate belongs_to :user
And this is how it works from the Movie model side:
- Movie has_many :movie_plot_updates
- MoviePlotUpdate belongs_to :movie
So let’s generate the movie_plot_update model:
rails generate model MoviePlotUpdate
Here’s the output of the above command, followed up by git status:
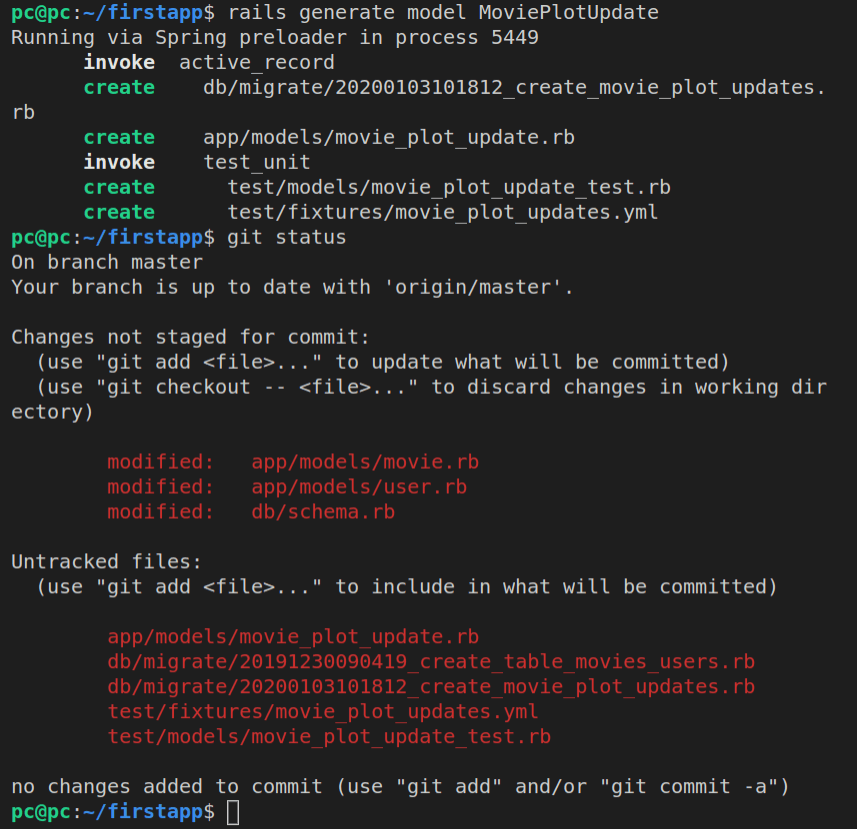
Let’s now scroll to the bottom of the db/migrate folder to find our newly added migration file, *_create_movie_plot_updates.rb:
class CreateMoviePlotUpdates < ActiveRecord::Migration[6.0]
  def change
    create_table :movie_plot_updates do |t|

      t.timestamps
    end
  end
end
Let’s now update the migration by first splitting the change method into up and down methods.
We’ll also add the two foreign keys inside the up method, and we’ll add indexes on each:
class CreateMoviePlotUpdates < ActiveRecord::Migration[6.0]
  def up
    create_table :movie_plot_updates do |t|
        t.integer "user_id"
        t.integer "movie_id"
      t.timestamps
    end
    add_index("movie_plot_updates", ["user_id", "movie_id"])
  end

  def down
    drop_table :movie_plot_updates
  end
end
As seen before, we’re storing the foreign keys inside an array - which we pass as the second argument to the add_index method.
Additionally, we can now store more complex information. Thus, a complex M:N association can hold more than just the references to the id columns of the joined tables:
class CreateMoviePlotUpdates < ActiveRecord::Migration[6.0]
  def up
    create_table :movie_plot_updates do |t|
      t.integer "user_id"
      t.integer "movie_id"
      t.string "description"
      t.timestamps
    end
    add_index("movie_plot_updates", ["user_id", "movie_id"])
  end

  def down
    drop_table :movie_plot_updates
  end
end
Now we can run the migration:
rails db:migrate
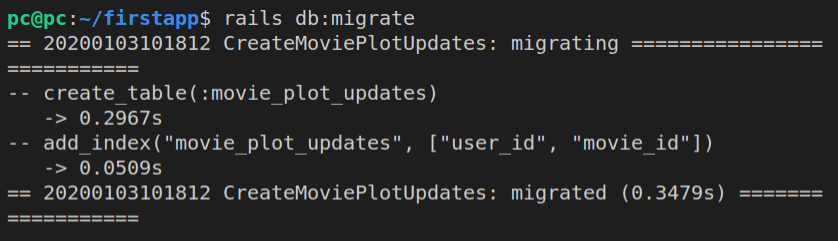
Now we can inspect the updates with:
rails c
ActiveRecord::Base.connection.tables
And the output will be:
=> ["schema_migrations", "ar_internal_metadata", "movies_users", "movie_plot_updates", "users", "movies"]
Now we can inspect the contents of the newly migrated table in our database:
ActiveRecord::Base.connection.columns('movie_plot_updates').map(&:name)
The above command shows the expected columns:
=> ["id", "user_id", "movie_id", "description", "created_at", "updated_at"]
Now we can finally update our associations inside the model files. We’ll start with user.rb:
class User < ApplicationRecord
    has_and_belongs_to_many :movies
    has_many :movie_plot_updates
end
Now, inside the movie_plot_update.rb:
class MoviePlotUpdate < ApplicationRecord

  belongs_to :user

end
We’ve taken care of the User model side of our join table. We’ve stated that a User has_many :movie_plot_updates. Now, we can update the Movie model, i.e the movie.rb file:
class Movie < ApplicationRecord
    has_and_belongs_to_many :users
    has_many :movie_plot_updates
end
Back in the MoviePlotUpdate model:
class MoviePlotUpdate < ApplicationRecord

  belongs_to :user
  belongs_to :movie

end
Now let’s run rails console again, and then:
u = User.find(1)
Once we have a User object, u, let’s see if it has any movie_plot_updates:
u.movie_plot_updates
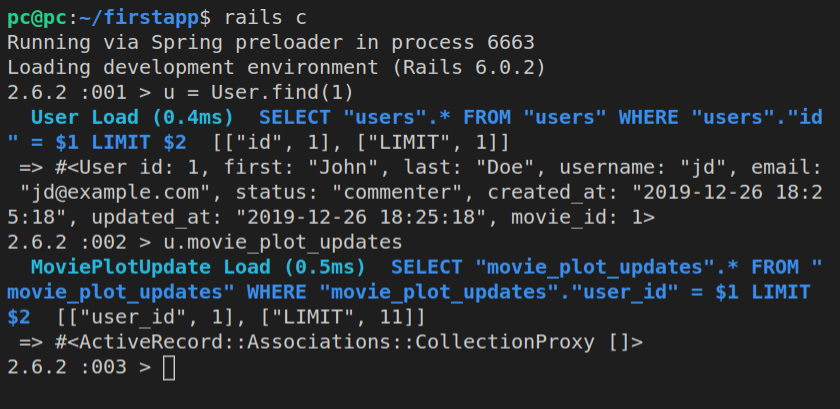
OK, so we see an empty collection for the above association.
If we look at it from the other side, from the Movie model, we’ll see a similar result:
m = Movie.find(1)
m.movie_plot_updates
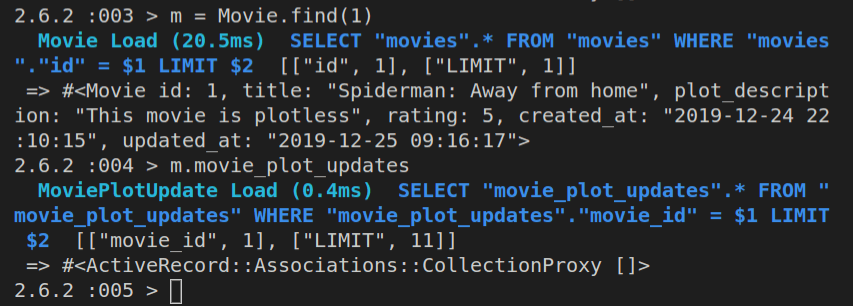
Now let’s build an instance of the MoviePlotUpdate class in the Rails console:
mpu = MoviePLotUpdate.new

Let’s now append the mpu object to m object’s movie_plot_updates association:
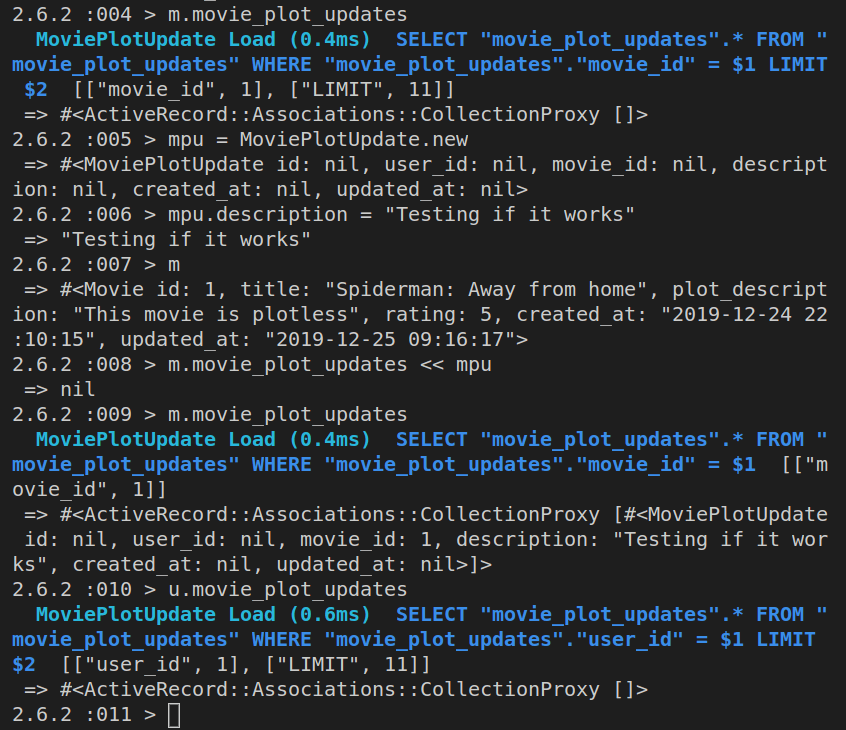
As we can see above, the u object’s side is still empty, so let’s update it too:
u.movie_plot_updates << mpu
Here’s the update:
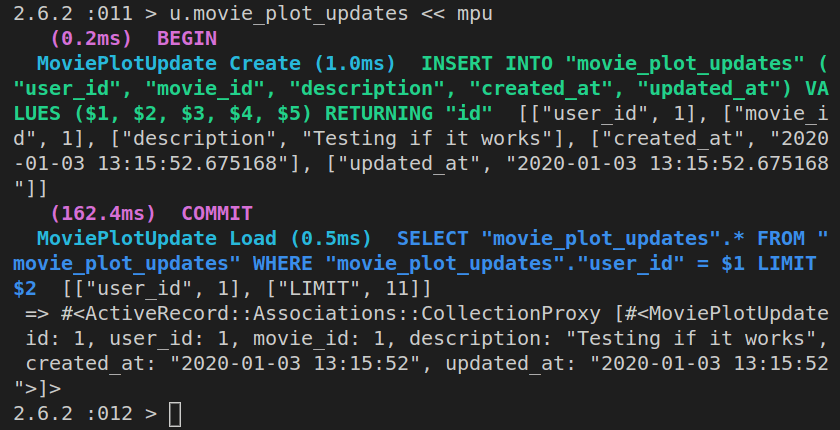
Now we can check both sides of the M:N association, both on the u and the m objects:
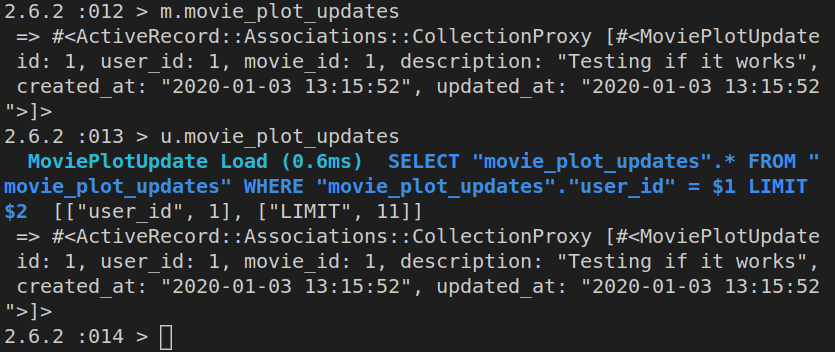
Viewing all the movie_plot_updates
Let’s add another movie_plot_update, we’ll call it mpu2:
rails c
mpu2 = MoviePlotUpdate.new
mpu2.user_id = 2
mpu2.movie_id = 2
mpu2.description = "Just another test"
m.movie_plot_updates << mpu2
u.movie_plot_updates << mpu2
Now we can inspect all the movie_plot_updates, like this:
m.movie_plot_updates
u.movie_plot_updates
The most recent updates have been saved in the commit message titled “Complete updates”.
Using controllers to manipulate models
In this section, we’ll be using controllers to manipulate models.
Now that we’ve seen how we can use the Rails console to control our models, which in turn control the database, we’ll now see how controllers do the same thing.
We’ve already performed CRUD operations on our database:
- we’ve Created new records
- we’ve Read existing records
- we’ve Updated existing records
- we’ve Deleted some records
We’ll now use controllers and routing to ultimately allow our users to perform the listed operations using our web app’s user interface, that is, our app’s views.
Most of the operations we’ll perform will be using forms.
Specifically, we’ll use forms to Create, Update, and Delete rows in the database.
Only the Read operation will not require the use of forms. It will simply show the visitor the current data from our database.
The Read operation will do two things:
- Show all rows from the database (the
indexaction) - Show a sinlge row from the database (the
showaction)
The Create operation will:
- Show a form to add a new row in the database (the
newaction) - Process a filled out, submitted form (the
createaction)
The Update operat ion will:
- Show a form to edit an existing row in the database (the
editaction) - Process a submitted edit form (the
updateaction)
The Delete operation will:
- Show a form to delete an existing row in the database (the
deleteaction) - Process a submitted delete form (the
destroyaction)
In total, there are 8 actions in the CRUD. Note the appropriate example URLs (inside round brackets):
- new (/movies/new)
- create (/movies/create)
- index (/movies)
- show (/movies/show/:id)
- edit (/movies/edit/:id)
- update (/movies/update/:id)
- delete (/movies/delete/:id)
- destroy (/movies/destroy/:id)
Only the first three actions above do not need an id:
- The
newaction is new, and thus still pending an id to be assigned - The
createaction is similar to thenewaction, due to the fact the it’s simply an addition of a new row to the database - The
indexaction lists all the rows from the database (and thus the query will simply return all the existing id’s)
The other five actions above (show, edit, update, delete, and destroy) - need an actual id parameter to be passed, so that the database can update the correct row, recognized by the id.
Here’s an important rule to remember:
- Each model has a controller
Thus, we’ll have:
- MoviesController
- UsersController
- etc.
Controllers have pluralized model name, and the word Controller at the end.
When we add a controller, we use the following example syntax:
rails generate controller Movies
Besides the Movies controller, we can also have Rails generate coresponding views, by listing them as space-separated values. As we’ve seen above, we’re going to need 8 different views, so we’re splitting the one-liner command below onto two lines:
rails generate controller Movies
new index show edit delete
You’ve probably noticed that we’ve only listed 5 views, although there are 8 actions in the Movies controller.
Why did we do it like this?
We did it because the create, update, and destroy actions don’t need to have views, because they are the three processing actions, meaning, actions that process forms once they’re submitted.
Once we run the generate controller command, this is the output:
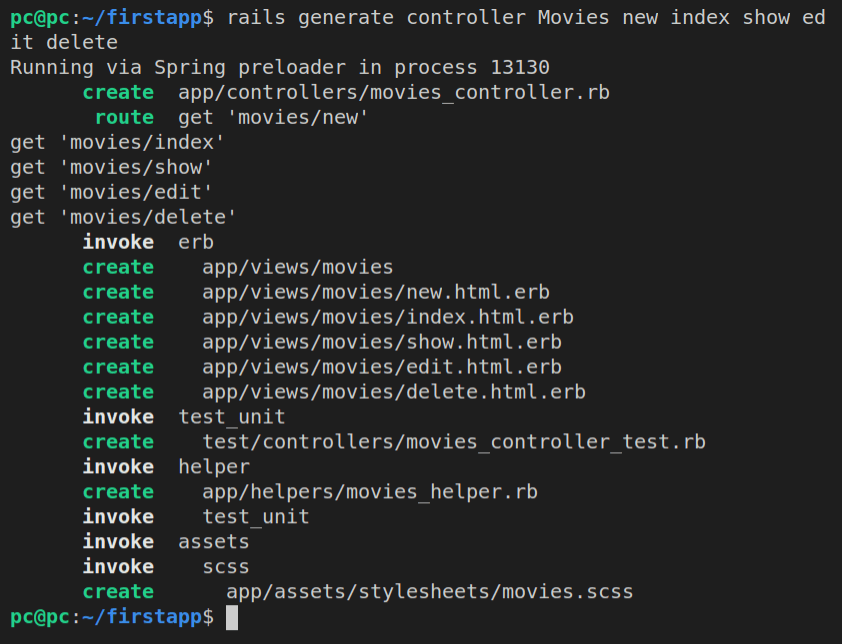
Let’s run git status for good measure.
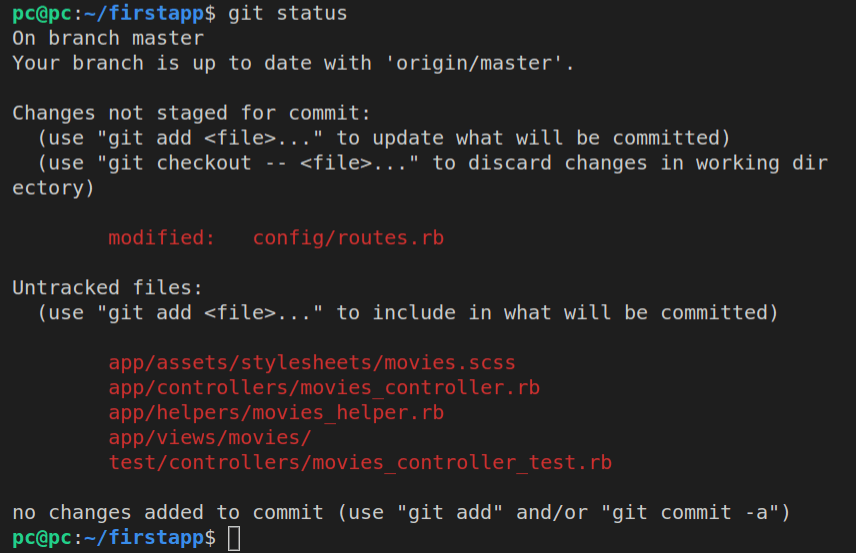
If we ran git diff --stat, it will show us changes added to the existing files, with one line per listed file, followed by a pipe, and then the number of additions (green plus signs), and deletions (red minus signs).
In our case, only config/routes.rb has been updated, so we can run just the git diff command, to see all the 5 lines that have been added by the generate command:
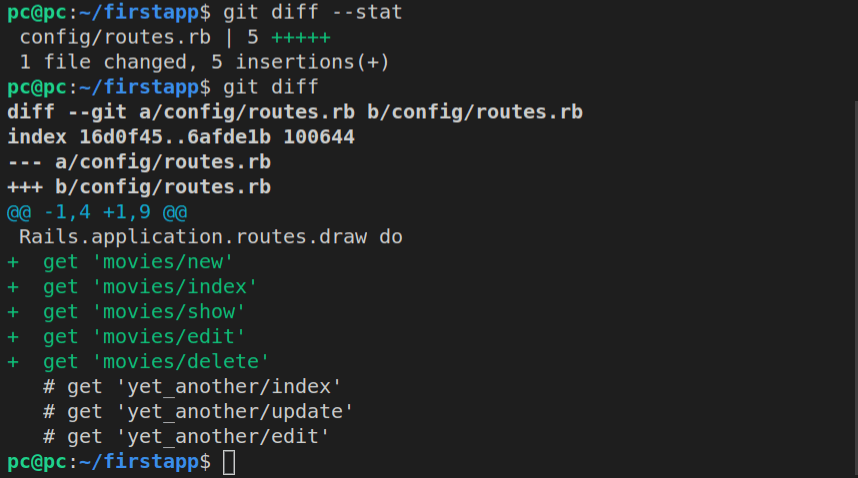
Besides this modified file, we also have the brand new MoviesController file, movies_controller.rb:
class MoviesController < ApplicationController
  def new
  end

  def index
  end

  def show
  end

  def edit
  end

  def delete
  end
end
Notice that in the above MoviesController class, we have only the five actions we specified when we were generating the controller. We are now going to add the three additional barebones methods:
- create
- update
- delete
Our movies_controller.rb file should now look like this:
class MoviesController < ApplicationController
  # CREATE
  def new
  end

  def create
  end

  # READ
  def index
  end

  def show
  end

  # UPDATE
  def edit
  end

  def update
  end

  # DELETE
  def delete
  end

  def destroy
  end
end
Inside the views folder, there’s now a new movies folder, with five files inside:
delete.html.erbedit.html.erbindex.html.erbnew.html.erbshow.html.erb
Our changes are saved with commit titled “Add Movies Controller”.

