Quickstart Elm 0.19, part 10
Building a Bootstrap 4 pricing layout in Elm 0.19
By: Ajdin Imsirovic 29 October 2019
You can consider all the previous article in this series as the warm up for this article. Here we’ll build a real Elm project the right way.

Note: Examples in this article use Elm 0.19.
Starting new Elm 0.19 project locally
Open your favorite editor - I’m using VS Code here.
Add new folder for your Elm project - I’ve called mine my-second-elm-app.
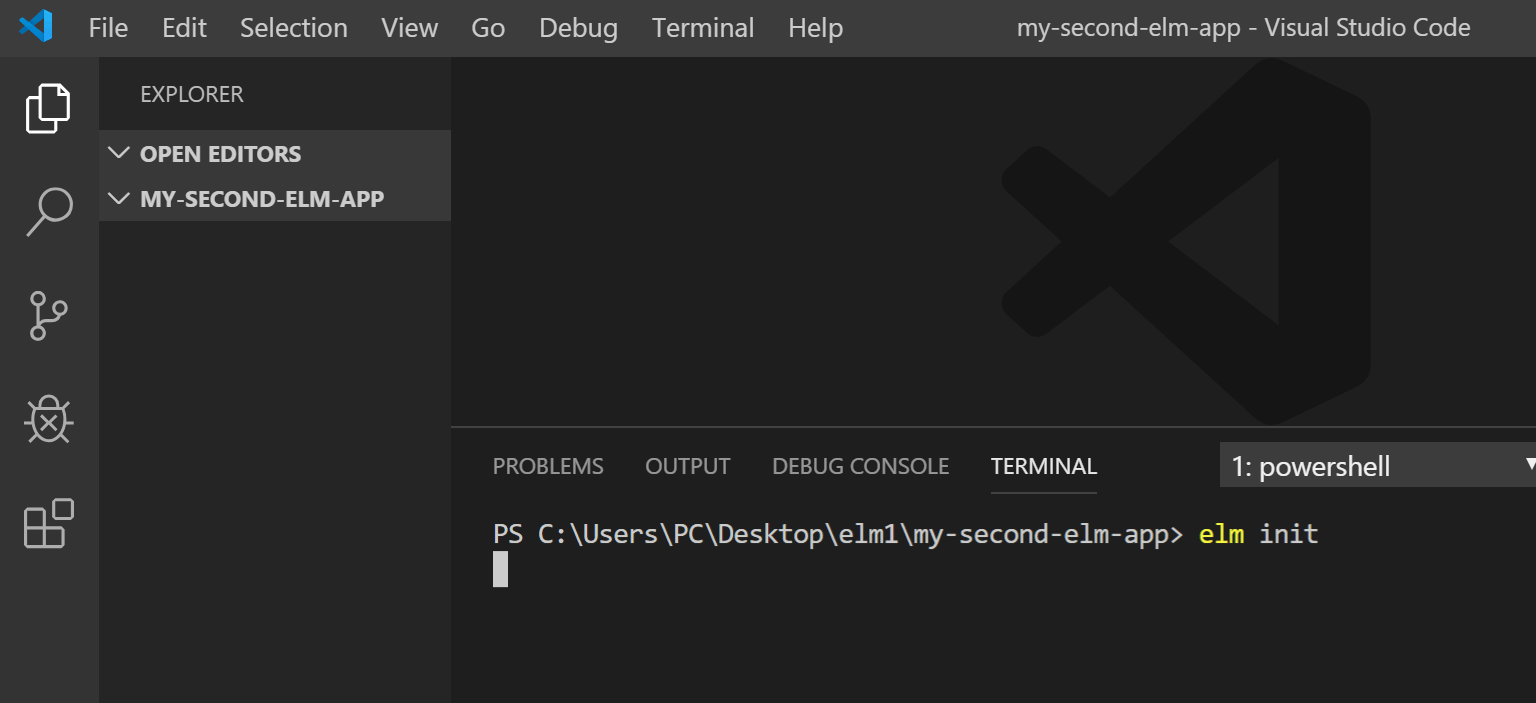
In VS Code, press the CTRL backtick keyboard combination to open the built-in console. Alternatively, on the main menu, click View, then Terminal.
Sometimes in VS Code, the console doesn’t show any content - just press the ENTER key and it will “wake up”.
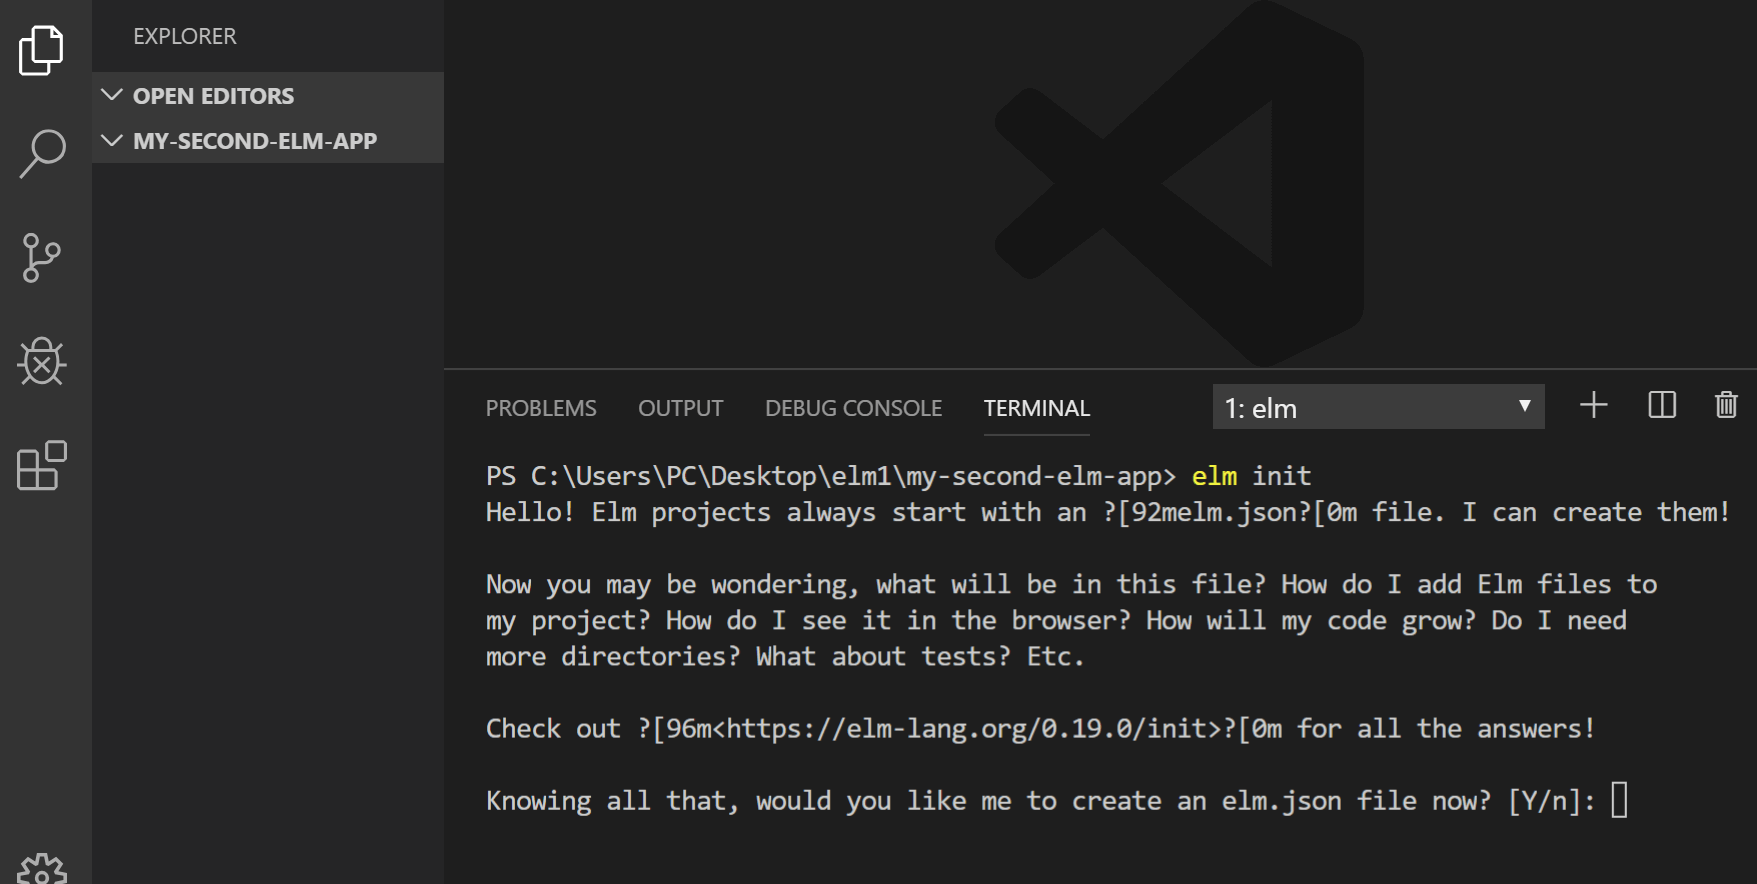
Type the elm init command inside the console window and press ENTER. If things don’t work as expected, make sure your console is pointing to your new folder.
This will initialize your Elm project, and a new elm-package.json file will be added to it.
The elm init command initializes your Elm project.
Before it does, you’ll need to confirm you want to do it by pressing the y key in the console when prompted by Elm.
Now Elm will add the elm.json file to the root of our folder. This file holds the relative information about our project, including a list of dependencies.
It will also add an empty src folder.
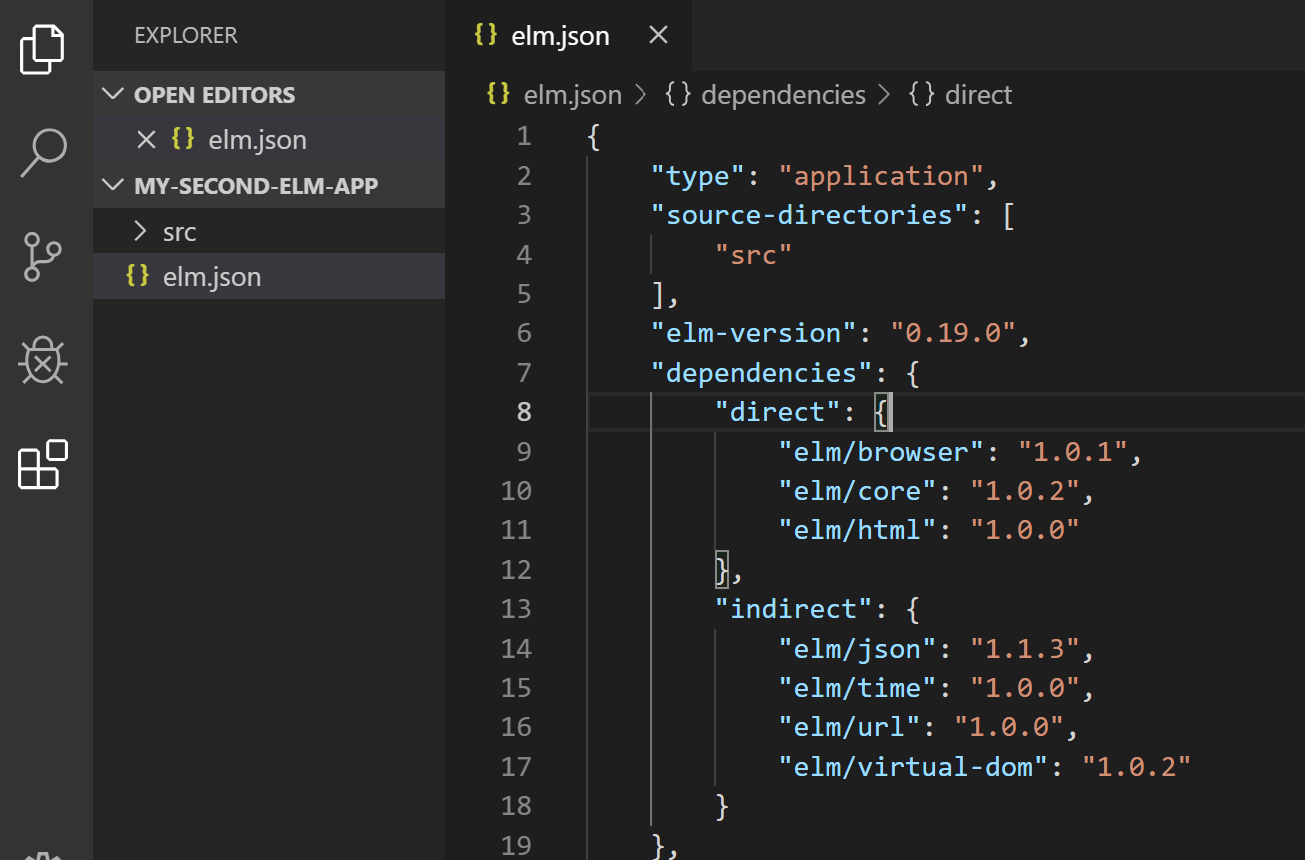
Here’s the full contents of the elm.json file:
{
    "type": "application",
    "source-directories": [
        "src"
    ],
    "elm-version": "0.19.0",
    "dependencies": {
        "direct": {
            "elm/browser": "1.0.1",
            "elm/core": "1.0.2",
            "elm/html": "1.0.0"
        },
        "indirect": {
            "elm/json": "1.1.3",
            "elm/time": "1.0.0",
            "elm/url": "1.0.0",
            "elm/virtual-dom": "1.0.2"
        }
    },
    "test-dependencies": {
        "direct": {},
        "indirect": {}
    }
}
Now that we’ve started our Elm 0.19 project, let’s add the first file, Main.elm.
Adding Main.elm
Let’s make a new file. We’ll call it Main.elm.
We’ll begin working on our new Main.elm file by importing everything from the Html module:
import Html exposing (..)
In Elm, the (..) means “everything in the module”. The Html is obviously the module name. Pretty straightforward, right?
Alternatively, I could have just done import Html exposing (div), if the div function was the only thing that I needed.
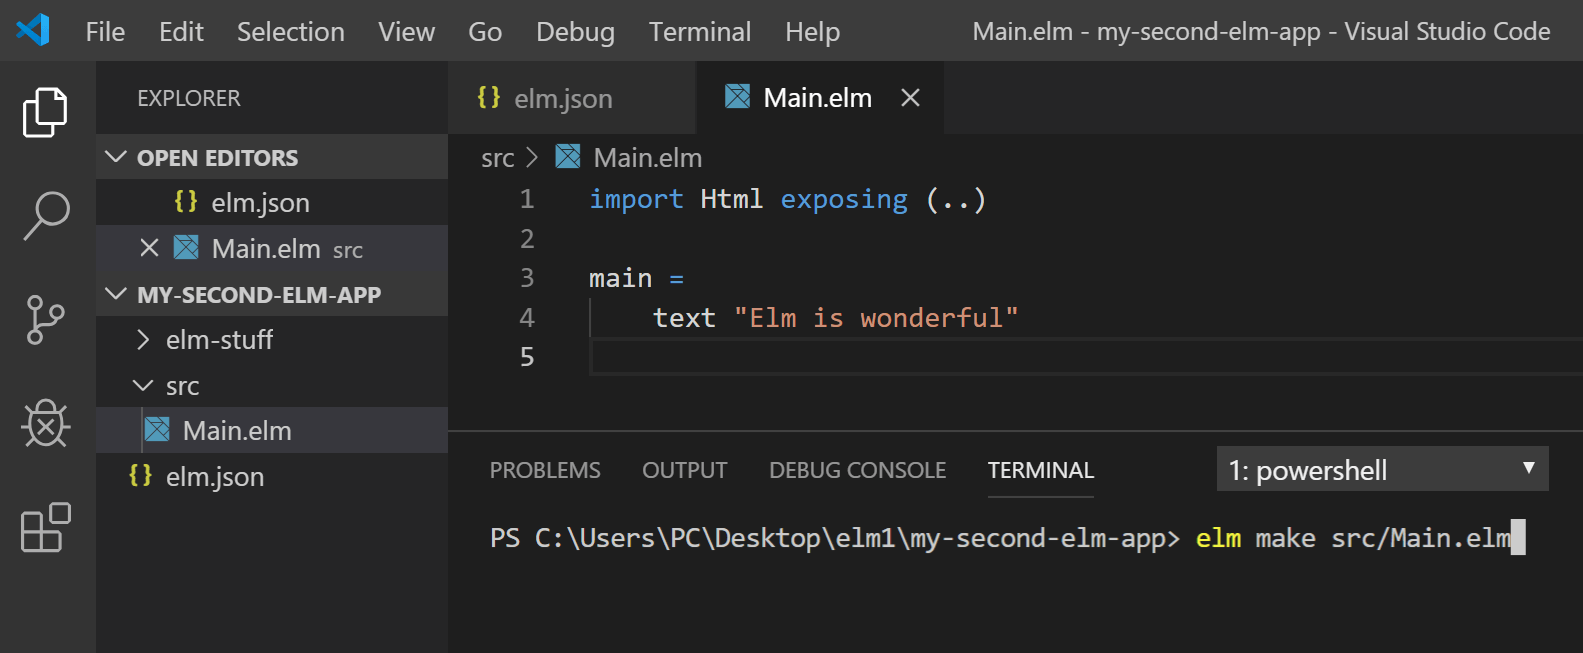
Now let’s add a text function to main:
main =
    text "Elm is wonderful"
The text function comes from the Html module; it’s avaiable because we exposed everything.
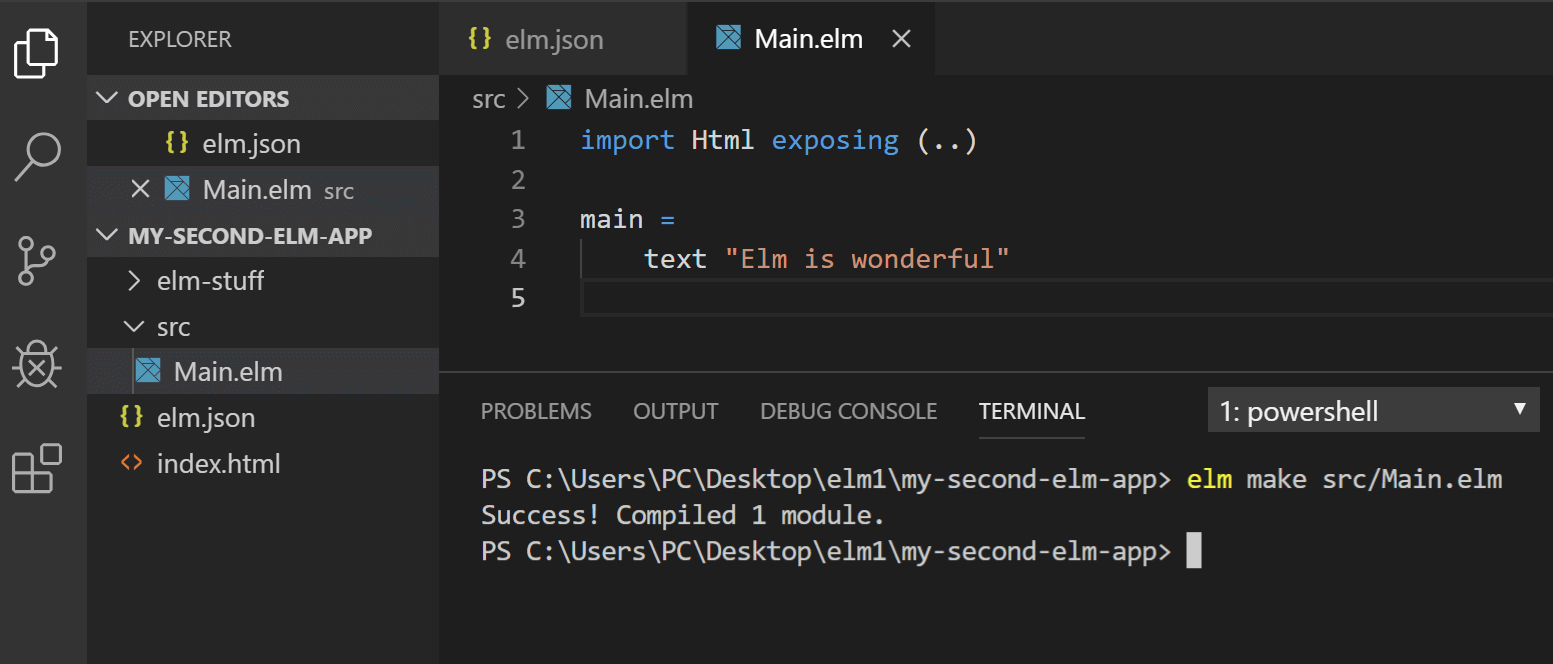
Now let’s run the elm make command in our console. Here’s the output:
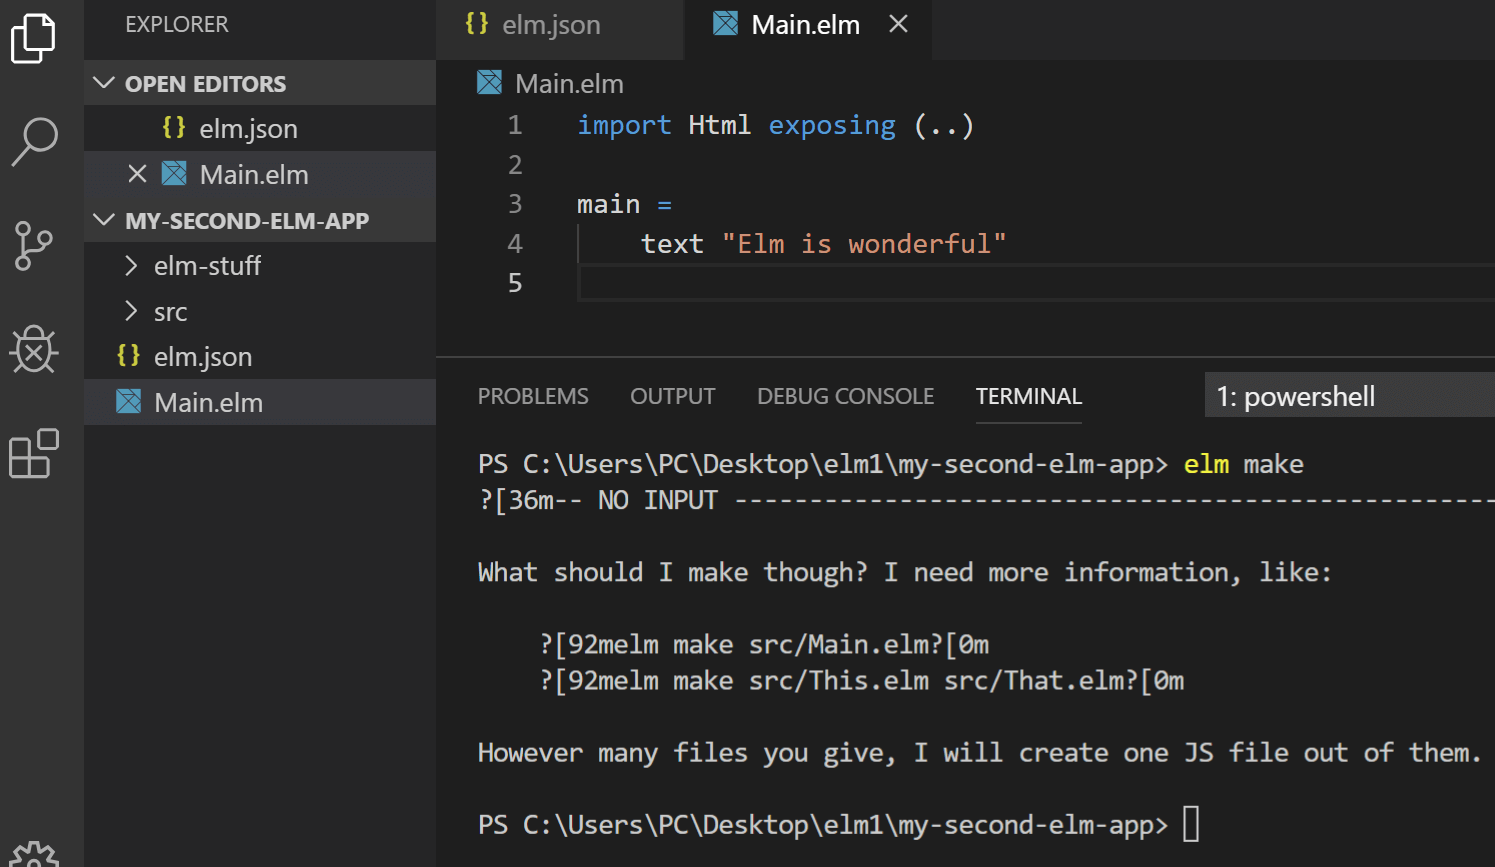
The error messages in Elm are known to be super-friendly.
Here it’s instructing us we need to add the file to run. It’s also saying that our Main.elm file should reside in the src folder.
So let’s fix this and move the Main.elm file inside the src folder, and then run elm make src/Main.elm.
We’ll see the success message, as well as the newly-compiled index.html in the file explorer sidebar in VS Code.
If you opened and inspected the contents of the index.html file, you might be surprised to see that it has over 4000 lines of code. That’s a lot of JavaScript!
The reason for this is that Elm compiled it’s entire VDOM and the Main module into JavaScript, so browsers can understand it and work with it.
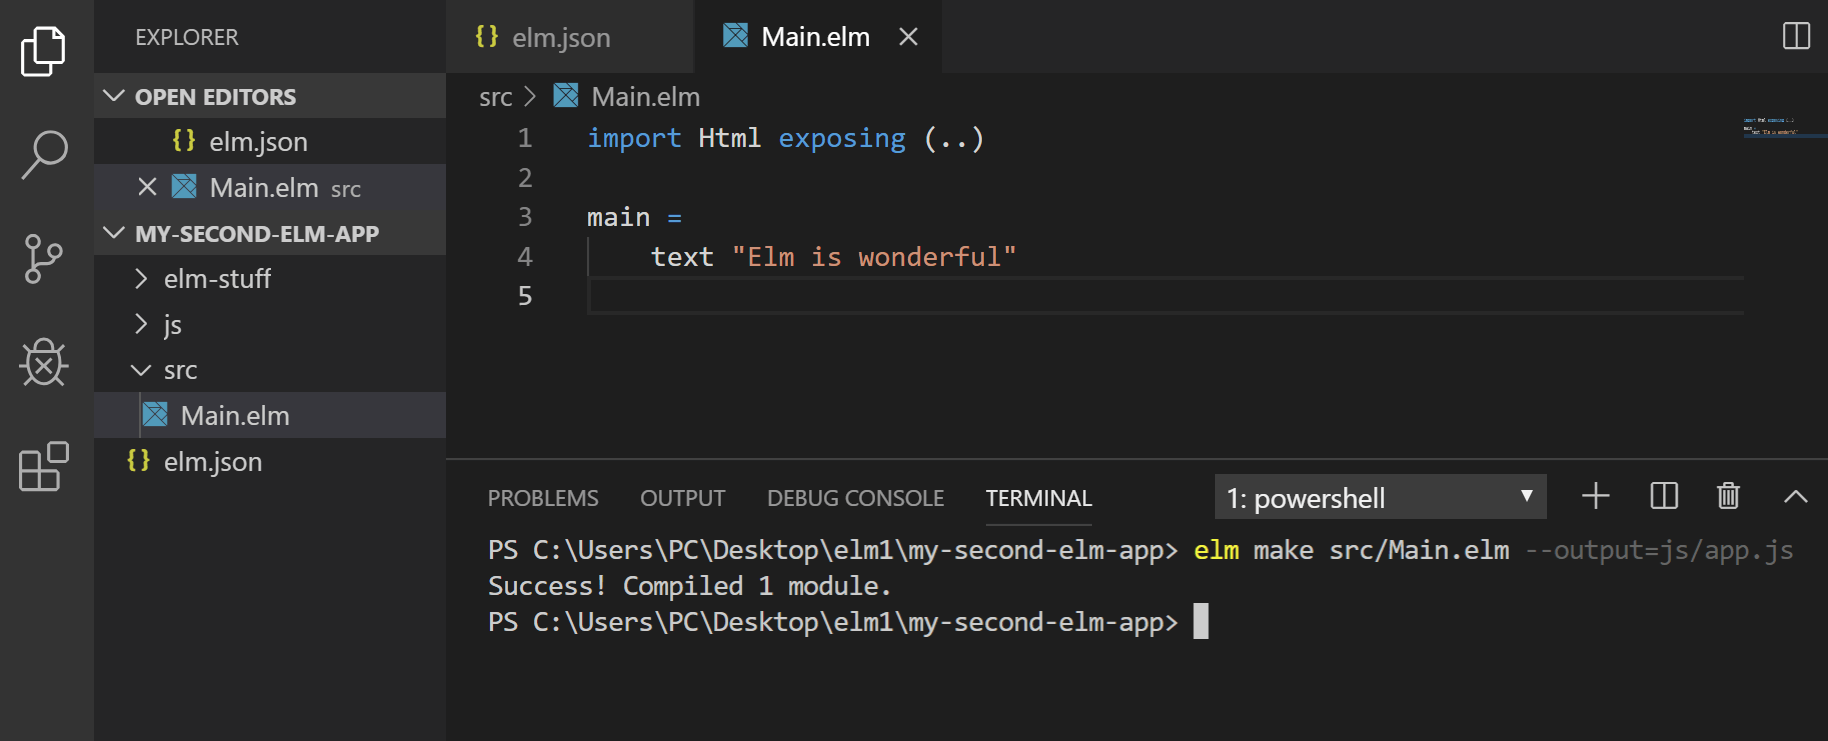
Let’s now see how to compile Main.elm module into a separate JavaScript file.
First, let’s delete the index.html file.
Next, let’s run this command:
elm make src/Main.elm --output=js/app.js
This time the Main module is compiled into a separate JavaScript file, inside the js folder.
Of course, to serve it, we need an HTML file, so let’s add one ourselves, with the following contents:
<!DOCTYPE html>
<html lang="en">
    <head>
        <meta charset="UTF-8">
    <meta name="viewport" content="width=device-width, initial-scale=1.0">
    <meta http-equiv="X-UA-Compatible" content="ie=edge">
    <title>My 2nd Elm App</title>
</head>
<body>
    <div id="app"></div>
    <script src="js/app.js"></script>
    <script>
      Elm.Main.init({
        node: document.getElementById("app")
      });
    </script>
  </body>
</html>
Now we can view our index.html file in the browser by right-clicking on it in the file explorer sidebar inside VS Code, then clicking the Open in Default Browser command.
We should see the “Elm is wonderful” text node in the viewport, and the “My 2nd Elm App” title in the browser tab - both these things are signs we’ve successfully compiled and served our Elm app in the browser.
Letting Elm 0.19 compile and serve our app for us
Alternatively, we can just let Elm 0.19 do everything for us; we just need to type this command inside the console:
elm reactor
We’ll get back the following message:
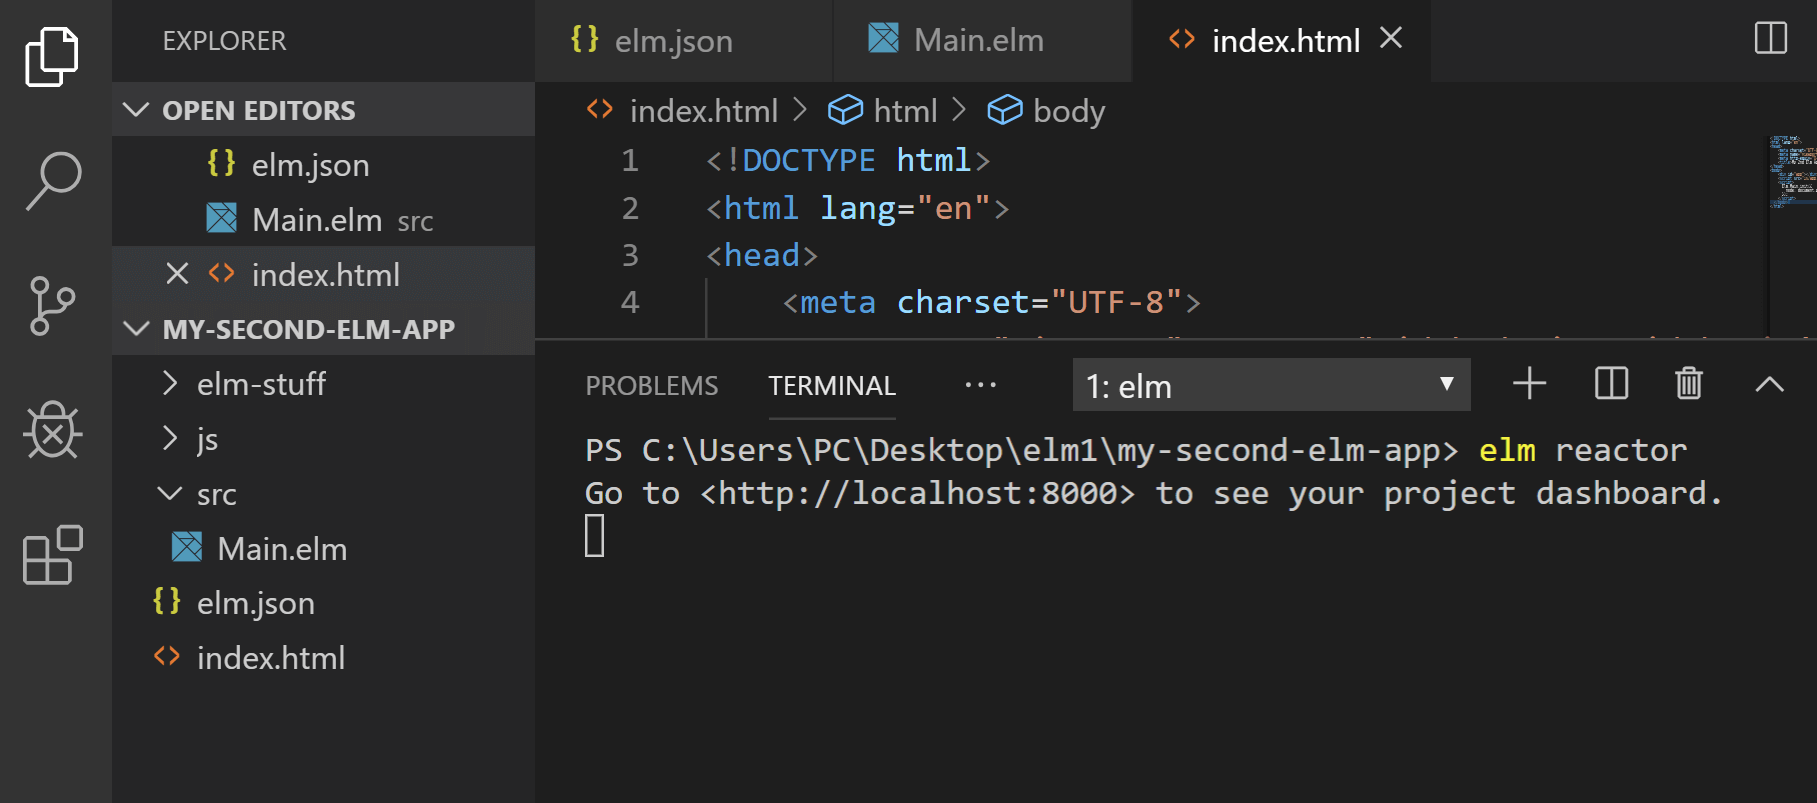
So let’s now open localhost:8000 in our browser and we’ll see this:
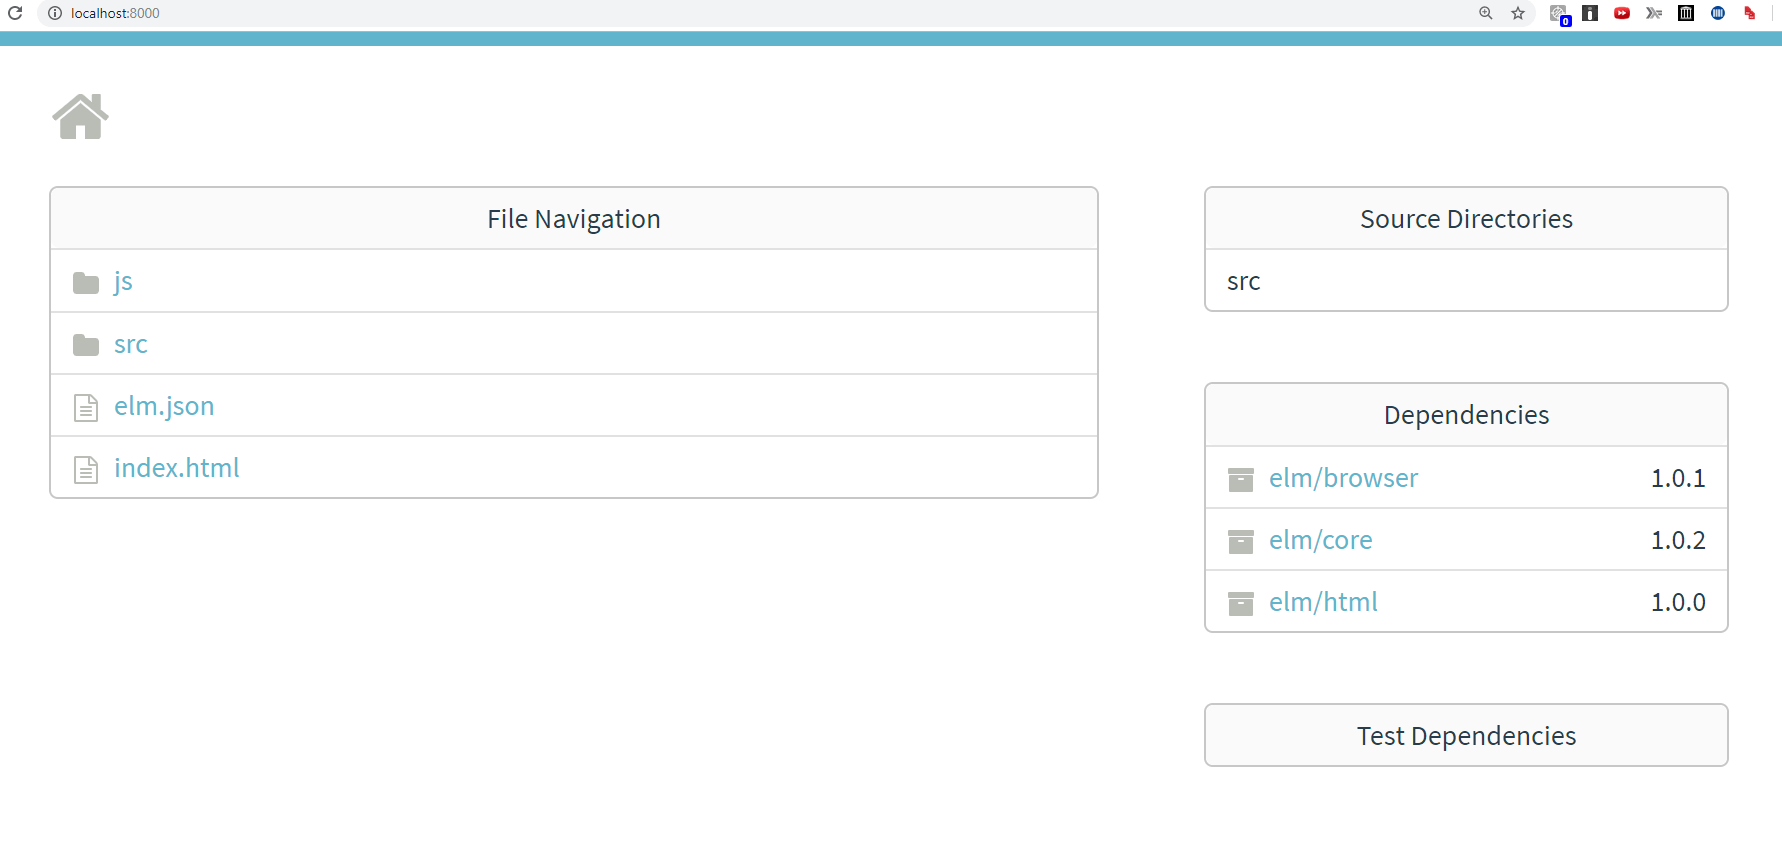
Now we can simply click on index.html - it’s the file at the bottom of the File Navigation card. Clicking on it will open index.html in the browser, with the text Elm is Wonderful obligingly displaying.
Let’s now see what happens when we change the contents of our Main.elm, with elm reactor running.
Let’s just update the string we’re passing to the text function:
main =
    text "I like Elm"
Let’s save all the changes, go back to the browser, and click on index.html again on localhost:8000.
Aaaaand…. nothing happens!
Actually, something does happen: We see the text node “Elm is wonderful” again.
The reason for this is that elm reactor was built just for very simple compilation, not for watch tasks and other shenanigans.
To overcome this minor issue, we can use webpack or bash, or maybe even a third approach. However, that’s an article in itself, so for now we’ll skip this setup.
TL; DR; if you want to see the change quickly, just recompile the app.
Alternatively, for simple apps and quick experiments, we can just use the Ellie app, like we did in the first 9 articles in this article series.
For now, it seems we’ll need to simply run the elm make command manually whenever needed:
elm make src/Main.elm --output=js/app.js
And this is perfectly fine.
Adding Bootstrap 4 to our Elm app
To add Bootstrap 4, let’s just add a link to Bootstrap 4 CDN, inside our index.html file:
<!DOCTYPE html>
<html lang="en">
    <head>
        <meta charset="UTF-8">
    <meta name="viewport" content="width=device-width, initial-scale=1.0">
    <meta http-equiv="X-UA-Compatible" content="ie=edge">
    <title>My 2nd Elm App</title>
    <link
        rel="stylesheet"
        href="https://stackpath.bootstrapcdn.com/bootstrap/4.3.1/css/bootstrap.min.css">
</head>
<body>
    <div id="app"></div>
    <script src="js/app.js"></script>
    <script>
        Elm.Main.init({
            node: document.getElementById("app")
      });
    </script>
  </body>
</html>
Now we can run the elm make command again and open our index.html file in the browser to see the updated font styling on our one line of text.
Next, we’ll build a static HTML page, just like the one we built in the Bootstrap series of articles here.
We’ll use the online HTML to ELM converter to quickly convert the HTML, section by section.
Converting the pricing Bootstrap 4 layout from HTML to Elm
Using the online converter is pretty easy.
There’s just one thing to keep in mind: There needs to be a single wrapping element around all your HTML code for the code to be transpiled into HTML using the online HTML to Elm converter.
You can find the fully converted layout as it is on Ellie app.
Here’s the embedded preview:
Making our code more modular
Right now, the entire layout lives inside one large chunk of Elm code. Let’s split it so it is easier to work with and think about.
First, we’ll take out the navigation and put it into a separate function.
Adding the navigation function
We’ll cut the following code from main:
div [ class "d-flex flex-column flex-md-row align-items-center p-3 px-md-4 mb-3 bg-white border-bottom shadow-sm mb-0" ]
        [ h5 [ class "my-0 mr-md-auto font-weight-normal" ]
            [ text "Company name" ]
        , nav [ class "my-2 my-md-0 mr-md-3" ]
            [ a [ class "p-2 text-dark", href "https://getbootstrap.com/docs/4.3/examples/pricing/#" ]
                [ text "Features" ]
            , a [ class "p-2 text-dark", href "https://getbootstrap.com/docs/4.3/examples/pricing/#" ]
                [ text "Enterprise" ]
            , a [ class "p-2 text-dark", href "https://getbootstrap.com/docs/4.3/examples/pricing/#" ]
                [ text "Support" ]
            , a [ class "p-2 text-dark", href "https://getbootstrap.com/docs/4.3/examples/pricing/#" ]
                [ text "Pricing" ]
            ]
        , a [ class "btn btn-outline-secondary", href "https://getbootstrap.com/docs/4.3/examples/pricing/#" ]
            [ text "Sign up" ]
        ]
In its place, let’s just add a single word: navigation.
Now we’ll add the navigation function, as follows:
navigation =
    div [ class "d-flex flex-column flex-md-row align-items-center p-3 px-md-4 mb-3 bg-white border-bottom shadow-sm mb-0" ]
        [ h5 [ class "my-0 mr-md-auto font-weight-normal" ]
            [ text "Company name" ]
        , nav [ class "my-2 my-md-0 mr-md-3" ]
            [ a [ class "p-2 text-dark", href "https://getbootstrap.com/docs/4.3/examples/pricing/#" ]
                [ text "Features" ]
            , a [ class "p-2 text-dark", href "https://getbootstrap.com/docs/4.3/examples/pricing/#" ]
                [ text "Enterprise" ]
            , a [ class "p-2 text-dark", href "https://getbootstrap.com/docs/4.3/examples/pricing/#" ]
                [ text "Support" ]
            , a [ class "p-2 text-dark", href "https://getbootstrap.com/docs/4.3/examples/pricing/#" ]
                [ text "Pricing" ]
            ]
        , a [ class "btn btn-outline-secondary", href "https://getbootstrap.com/docs/4.3/examples/pricing/#" ]
            [ text "Sign up" ]
        ]
You can find this update in a new Ellie app.
Here’s the embedded app:
As we can see, the app looks exactly the same.
However, abstracting away sections of our layout will make it easier to reason about our app.
Next, we’ll update other sections similarly, starting with the pricing header.
Abstracting away the pricingHeader function
We’ll cut out another section of code and move it from the main function into its own, pricingHeader function:
pricingHeader =
    div [ class "pricing-header px-3 py-3 pt-md-5 pb-md-4 mx-auto text-center bg-secondary text-light", attribute "style" "position: relative;    top: -20px;    min-height: 650px;    max-height: 350px;    background-image: url(https://images.unsplash.com/photo-1511988617509-a57c8a288659?ixlib=rb-1.2.1&ixid=eyJhcHBfaWQiOjEyMDd9&auto=format&fit=crop&w=1951&q=80); background-position: -20px 1040px;   box-shadow: inset 0 0 0 1000px rgba(0, 121, 255, 0.4);" ]
        [ div [ class "container-narrow" ]
            [ h1 [ class "display-4" ]
                [ text "Pricing" ]
            , p [ class "lead" ]
                [ text "Quickly build an effective pricing table for your potential customers with this Bootstrap example. It’s built with default Bootstrap components and utilities with little customization." ]
            ]
        ]
And here’s the call to the pricingHeader function inside main:
main =
    div []
    [ navigation
    , pricingHeader
    , div [ class "container" ]
When abstracting away sections of code like this, the technique to follow is always the same: you just cut out the code string from one , to the next , character.
Once done, run elm make again:
elm make src/Main.elm --output=js/app.js
This way you can verify that everything runs smoothly.
Note that you don’t even have to look at the end result in the browser; most of the time it’s enough to see the successful compilation message in the console:
Success! Compiled 1 module.
Next, we’ll see how to easily abstract away the entire container section.
Abstracting away long sections of Elm code
After the navigation and pricing header, there is a section of code wrapped in a container div; this section is about 160 lines of code long. It goes almost to the end of the main function!
Let’s see how to cut it out from main and into its own function easily.
First, we’ll click next to the line number where the next , character starts: this is the delimiter that shows where our next section of code begins.
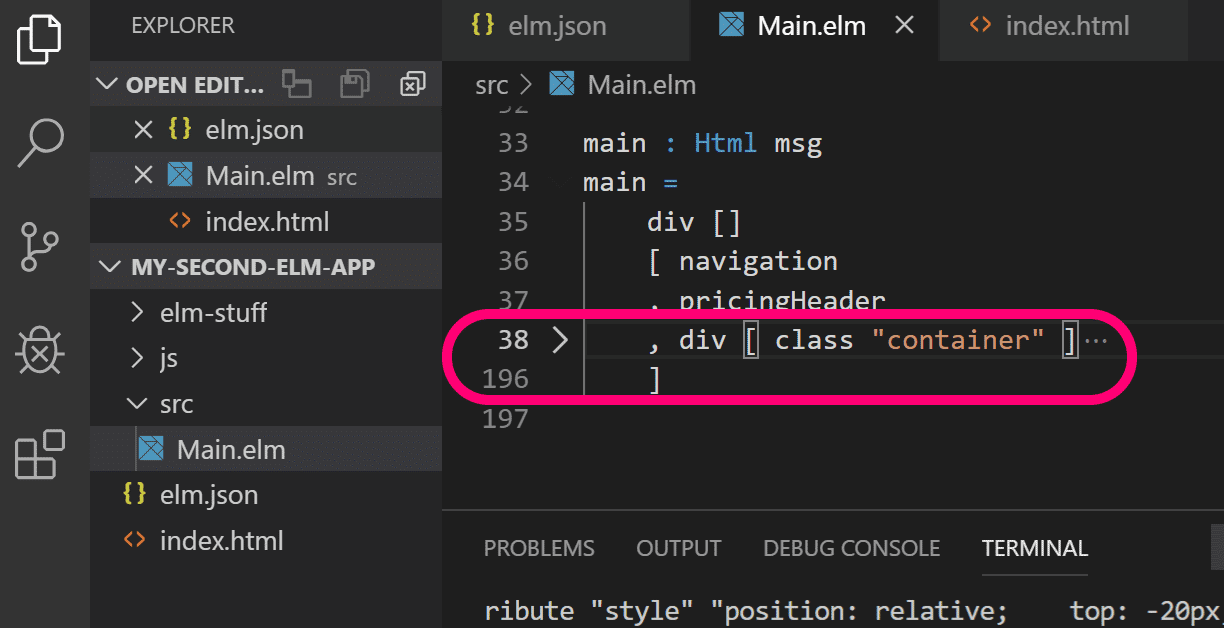
What this means is that we need to copy all the code from lines 38 to 195; in other words: copy all the code from line 38 to the very end, except the closing square bracket on line 196.
Once copied, we’ll save it as a new function called wrappingContainer, and then we’ll just reference it in the main function like this:
main : Html msg
main =
    div []
    [ navigation
    , pricingHeader
    , wrappingContainer
    ]
To see this layout live, we’ve saved it in another Ellie app instance.
Like before, our layout is the same and the only thing actually changing is the code that is used to compile it.
At this point, we can choose to abstract away sections from the wrappingContainer function into its own separate building-block functions.
Just to demonstrate how that works, let’s add only one.
We’ll take the free card - the first of three pricing cards - and we’ll save it into the freeCard function:
freeCard =
    , div [ class "card-body" ]
        [ h1 [ class "card-title pricing-card-title" ]
            [ text "$0 "
            , small [ class "text-muted" ]
                [ text "/ mo" ]
            ]
        , ul [ class "list-unstyled mt-3 mb-4" ]
            [ li []
                [ text "10 users included" ]
            , li []
                [ text "2 GB of storage" ]
            , li []
                [ text "Email support" ]
            , li []
                [ text "Help center access" ]
            ]
        , button [ class "btn btn-sm mt-5 btn-block btn-outline-secondary", type_ "button" ]
            [ text "Sign up for free" ]
        ]
This update is saved in Ellie too.
Here’s the embedded view of the Ellie app above:
In this article, we’ve worked with some static HTML in Elm 0.19 to separate our app into more manageable chunks.
This makes it a lot easier to make our app modular and easy to reuse.
In part 11 of this article series, we’ll see how to add a dynamic input in Elm 0.19.

