Quickstart Elm 0.19, part 2
Get started quickly with the Elm language, version 0.19
By: Ajdin Imsirovic 20 October 2019
In this article series, we’ll look into learning Elm quickly.

Note: Examples in this article use Elm 0.19.
Let’s build an app
In this article, we will discuss immutable data structures and the basics of the elm architecture. To make things more practical, we will build a very simple app.
Immutable data structures
Elm is a functional programming language. One of the tenets of functional programming languages is that data structures are immutable. Once created, they cannot be changed. In practice, this means that functions in Elm will take in a data structure as its argument, and then return an entirely new data structure.
If you think about it, it makes perfect sense. If all the data structures are immutable, how do we deal with change? More specifically, how do we deal with changes that Elm functions introduce on the existing data? The only obvious answer is to create entirely new data.
How does Elm apply this in practice?
Let’s say that we want to build an app in the health niche. The app is a simple countdown app that displays only a button and a number. The app starts with the number 5. The idea of the app is for a user to press a button whenever they have eaten a healthy snack, say, a piece of fruit. That way, a user will improve their healthy habits by making sure that they have eaten five pieces of fruit a day.
The Elm architecture
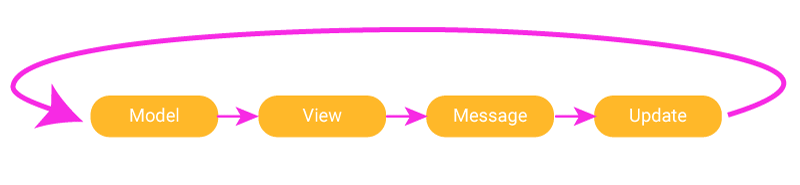
The very minimum that we need to understand about the Elm architecture is that it is made up of four things:
- Model,
- View,
- Message, and
- Update
It is important to note that the architecture is usually described as being made up of only three things: Model, View, and Update.
However, for the sake of clarity and easier learning, at this point of our journey into Elm, we can think of the Message as an equal building block of the Elm architecture.
Thus, for the sake of having a clear mental model of all the things that are in play here, we will think of the Elm architecture as having four constituent pieces, rather than three.
The Model
The Model holds our app state.
In our Fruit Counter app, the Model holds, as its one and only data structure, an integer.
When we first run our app, the Model holds the value of 5.
Since it is represented in terms of data structures, and since data structures in Elm are immutable, our model will have to be updated as a copy of the previous data plus changes made to it.
The model is updated whenever a function operates on it.
When will a function operate on the model?
Since we are building a very simple app, the only time a function will operate on the model is when the user clicks the one button in our app. Clicking this one button will decrement the current value in the model by 1. Since data in Elm is immutable, a function will have to return a new copy of the model, with updates taken into account.
The View
The View can be thought of as the way to see the Model on our screen.
The View is a function, and we pass the Model to it.
The Model is a parameter of the View function.
Thus, the View takes in the Model as its parameter, and returns HTML, which will be rendered in the browser.
Another way to think of the View is this: The View is a way to allow the user to interact with the Model.
The View is sort of like a visual API for the Model. It is a way for the user to manipulate the Model in a structured way.
When a user interacts with the View, they manipulate the Model by changing its state. Since our app is very simple, the only way to change the state is to press that one button in our app, which will decrement the current value that our model holds.
This one button press will make the View send a Message to the Update.
The Message
After the user has interacted with the View (pressed the button), the notification of this action will be sent to the Update function in the form of a Message. Since there is only one possible action that can happen, that Message is simply: decrement.
Of course, in any realistic app, the Message will have to have a lot more logic, but for the sake of simplicity, let’s leave it at decrement.
The Update
The Update function receives the Message.
Next, the Update function determines how to update the state of our app, that is, how to update the Model, based on the Message received. Once the update is made, a new Model is created and it renders the View. The user then interacts with the View which results in the Message being sent again. The Update receives the Message and updates the Model, and the cycle continues.
Unidirectional data flows
An interesting way of looking at our app is as flows of data. The reason to have this concept and use it in our discussions is because it is a helpful way of looking at the changing of state in our Elm app.
Since Elm is built on a lot of restrictions, it only makes sense to have this idea of restrictions applied to its architecture as well.
If you look at what is happening in our simple app, you will notice that the data always moves in only one direction: From Model to View to Message to Update to Model. That’s what unidirectional data flow basically is.
This approach allows us to be able to track state changes with ease, and it also makes it a lot less difficult to reason about these changes.
Building the Fruit Counter app
Let’s begin with our app skeleton in Main.elm:
module Main exposing (main)

import HTML exposing (HTML, text)


main : HTML msg
main =
    text "Hello, World!"
Let’s look at what the above code does.
Exposing everything we need
We’ll update module Main by adding two dots inside parentheses, which will expose everything in this Main module.
We will do the same for the imported Html module, since we want do be able to use all the available HTML functions. Specifically, we need access to the h1, p, and button functions.
Next, the line that reads main : HTML msg is an optional type annotation, so to demonstrate that we can work without it, we’ll comment it out by placing two hyphens and a space at the beginning of this line.
Including type annotations is considered a best practice, and we have commented it out only to show that our app will still run without a type annotation (as well as to demonstrate how to add one-line comments in Elm).
Our app now looks like this:
module Main exposing (..)

import HTML exposing (..)


-- main : HTML msg
main =
    text "Hello, World!"
To preview the app at this stage, simply compile it with elm make src/Main.elm.
The Model
Let’s add our model:
-- MODEL

type alias Model =
    Int
Our Model is just a simple integer type.
For now, we’ll ignore what this type alias signifies, as it will only distract us from understanding fundamental concepts at the moment. We will return to types later on in the book.
The View
Our View function will receive the current model and will return the following HTML:
-- VIEW

view model =
    div [] [ h1 [] [ text ("Fruit to eat: " ++ (toString model)) ] ]
Note that the view function takes in the model parameter. In Elm, parameters are listed after the function name, separated from it by the space character.
Let’s now examine what HTML will be rendered from the code above.
The code that we are assigning to the view function is located to the right of the equals sign (Elm’s assignment operator). In this code to the right of the assignment operator, we are running the div function.
Like all other HTML functions in Elm, the div function has two pairs of square brackets. The first pair of square brackets optionally lists the HTML attributes for the div function, and the second one lists the content of the actual div.
We have left the first pair of square brackets empty, which means we have not given any HTML attributes to our div function. Then, inside the second pair of square brackets of the div function, we have passed in the h1 function.
Like all other HTML functions, the h1 function also has two pairs of square brackets. In the preceding example, our h1 function has no attributes specified (as the first pair of brackets is empty - just like we did with the div, its parent function/element). Inside the second pair of brackets of the h1 function, we call the text function.
The text function will render a text node. The text to be output inside the text node is surrounded by parentheses. Inside the parentheses, we are using a string literal and we are concatenating to it the value of the model, converted to a string (using the toString function).
We’ve just learned about one of Elm’s operators, the ++ operator. In Elm, ++ is the string concatenation operator, used to join together two separate strings.
Since we will initialize our model with the value of 5, the preceding code for the view function will initially return the following HTML code:
<div>
    <h1>Fruit to eat: 5</h1>
</div>
Our view function is now ready at the most rudimentary level. Next, we’ll deal with the Message section.
The Message
Let’s now look at the Message section, where we’ll declare a new type, and we’ll call it Msg:
-- MESSAGE

type Msg =
    Decrement
As explained earlier in this article, we will not deal with explaining types at this time.
The Update
It’s time to add our update. In the previous step, we have declared our special type of Msg. We’ll pass it to the update function:
-- UPDATE

update msg model =
    model - 1
By now, it should be easy for you to guess what the update function will do: it will receive a msg and a model, and it will return a copy of the model, decremented by 1.
All we have to do now is make the Model, View, and Update work together, and for that, we’ll use the Browser.sandbox function.
Adding the Browser.sandbox function
It’s time to add the Browser.sandbox function, which we will assign to the main function.
Our main function currently looks like this:
-- main : HTML msg
main =
    text "Hello, World!"
Let’s add our updated main function, which will now have the Browser.sandbox function assigned to it:
-- main : HTML msg
main =
  Browser.sandbox { model = 5, view = view, update = update }
As you can see, we just call the Browser.sandbox function. Then, we pass it the model, view, and update functions, and assign each of them a value.
We initialize the model with the value of 5. For the update, we assign it to the value of the update function. The view is similarly set to the value of the view function.
After we made these changes to our main function, the full code of our app now looks like this:
module Main exposing (main)

import Browser
import Html exposing (Html, button, div, text, h1)
import Html.Events exposing (onClick)


-- MODEL
type alias Model =
    Int

-- INITIAL MODEL
initialModel =
    5

-- VIEW
view model =
    div [] [ h1 [] [ text ("Fruit to eat: " ++ (String.fromInt model)) ] ]

-- MESSAGE
type Msg =
    Decrement

-- UPDATE
update msg model =
    model - 1

-- main : HTML msg
main =
  Browser.sandbox { init = initialModel, view = view, update = update }
If we ran our app at this point, everything would work, and we would get the following output on our screen: Fruit to eat: 5.
Even though our app is really basic, it’s great that everything works and that we are not getting any compiler errors at this time. However, there is one thing we did not do, and that is that we have not added the button, the one entry point to initiate the changing of our app’s current state.
Before we do add this button, feel free to look at the preceding code and think a bit about a perfectly stateless app. Currently, our app’s model will never change, as the update section of our code will never be run.
Let’s rectify that by adding a button.
Views, buttons, and events
Let’s begin by simply adding a static button to our app. We’ll do that by updating the view function with the following code:
-- VIEW
view model =
    div []
        [ h1 [] [ text ("Fruit to eat: " ++ (String.fromInt model)) ]
        , button [ onClick Decrement ] [ text "Eat fruit" ]
        ]
Now let’s save all our changes and compiling our Elm app again.
Next, we’ll open the compiled index.html in the browser, and we’ll see this:
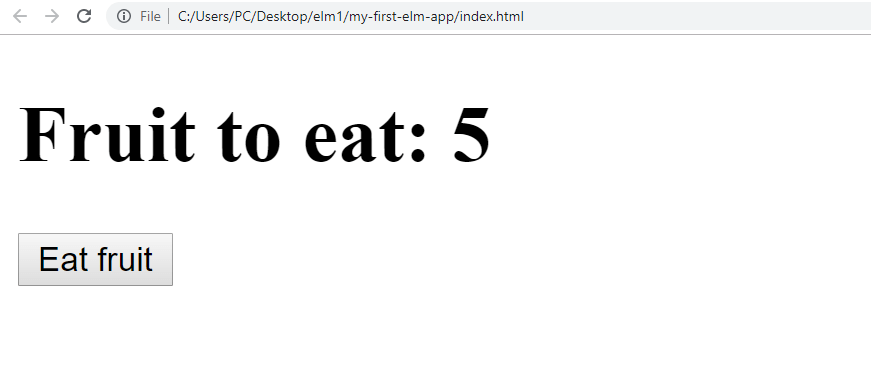
Whenever you click the Eat fruit button, the decrement message will be sent to the update function, the update function will receive both the decrement message and the current immutable model and return a completely new model - 1, and the cycle will continue as explained earlier.
Running our app now gives us a simple, rudimentary, but working app built with Elm!
When you click the Eat fruit button, the view function hits the first pair of square brackets on the button function, and it watches for the click event. We have provided the onClick function with the Msg to be sent once the button is clicked. Since there is only one possible message in our app, once the click event is triggered, the view function will send the Decrement message to the update function.
Once the update function has received the message, it will return a new model, and the new model gets rendered by the view function.
However, there is an issue. If we keep clicking the button, our app will ultimately move into counting negative numbers, and that’s just impossible. A user should not have negative 2 fruits left to eat.
Let’s fix this issue next.
Constraining the Decrement message
In order to constrain the Decrement message, let’s begin by looking at the current update function:
-- UPDATE
update msg model =
    model - 1
Now, let’s introduce an if-else expression to cater for different possible scenarios:
-- UPDATE
update msg model =
    if model > 0 then model - 1 else model == 5
Unfortunately, the preceding code does not produce the desired results. Instead, we get this compiler message:
TYPE MISMATCH - The 2nd branch of this `if` does not match all the previous branches:

29|     if model > 0 then model - 1 else model == 5
                                         #^^^^^^^^^^#
The 2nd branch is:

    #Bool#

But all the previous branches result in:

    #number#

#Hint#: All branches in an `if` must produce the same type of values. This way, no
matter which branch we take, the result is always a consistent shape. Read
<https://elm-lang.org/0.19.0/union-types> to learn how to “mix” types.

#Hint#: Only #Int# and #Float# values work as numbers.
The preceding issue is a great example of Elm constraints in practice. Because of the way Elm is set up, each branch must return the same data type. In our case, we can either return Booleans for either branch of the if-else expression, or return numbers, but we can not have them mixed up.
So, how do we rectify this? To keep things simple and still use an if-else expression we started with, let’s think of a terse way to avoid type mismatch. Our counter value should never go under zero, so we can simply do this:
-- UPDATE
update msg model =
    if model > 0 then model - 1 else model + 5
Using the preceding code, our if-else logic will always return a number. The update function’s message value will be incremented by 1 as long as it’s greater than zero. Otherwise (in case it is zero), it will be increased by 5.
Let’s look at the full completed app as it is now:
module Main exposing (..)

import Browser
import Html exposing (..)
import Html.Events exposing (onClick)


-- MODEL
type alias Model =
    Int

-- VIEW
view model =
    div []
        [ h1 [] [ text ("Fruit to eat: " ++ (String.fromInt model)) ]
        , button [ onClick Decrement ] [ text "Eat fruit" ]
        ]

-- MESSAGE
type Msg =
    Decrement

-- UPDATE
update msg model =
    if model > 0 then model - 1 else model + 5

-- main : Html msg
main = Browser.sandbox
    { init = 5
    , update = update
    , view = view
    }
Sometimes you might see initialModel referenced as the value of init passed to Browser.sandbox.
Here’s the code of our app using that approach:
module Main exposing (main)

import Browser
import Html exposing (Html, button, div, text, h1)
import Html.Events exposing (onClick)


-- MODEL
type alias Model =
    Int

initialModel =
    5

-- VIEW
view model =
    div []
        [ h1 [] [ text ("Fruit to eat: " ++ (String.fromInt model)) ]
        , button [ onClick Decrement ] [ text "Eat fruit" ]
        ]

-- MESSAGE
type Msg =
    Decrement


-- UPDATE
update msg model =
    if model > 0 then model - 1 else model + 5

-- main : HTML msg
main =
  Browser.sandbox { init = initialModel, view = view, update = update }
Regardless of which way you choose for your starter app, the resulting behavior is exactly the same.
In the next article, we’ll build a simple FizzBuzz app in Elm.

