Build a Simple Movie Reviews Website in Rails 6, part 2
A full website, from installation to deployment
By: Ajdin Imsirovic 15 December 2019
In the previous article, we’ve installed all the pre-requisites to start building our site.
Let’s get right into it!
 Image by CodingExercises
First, let’s commit the new Rails app
To commit the newly-made Rails app, let’s run the following commands:
git add --all
git status
git commit -m "Initialize a new Rails project"
git log --oneline
Now that we are sure that git is tracking our app, we can run our first migration.
Running our First Migration
To run our first migration, let’s open the console and type:
rails db:migrate
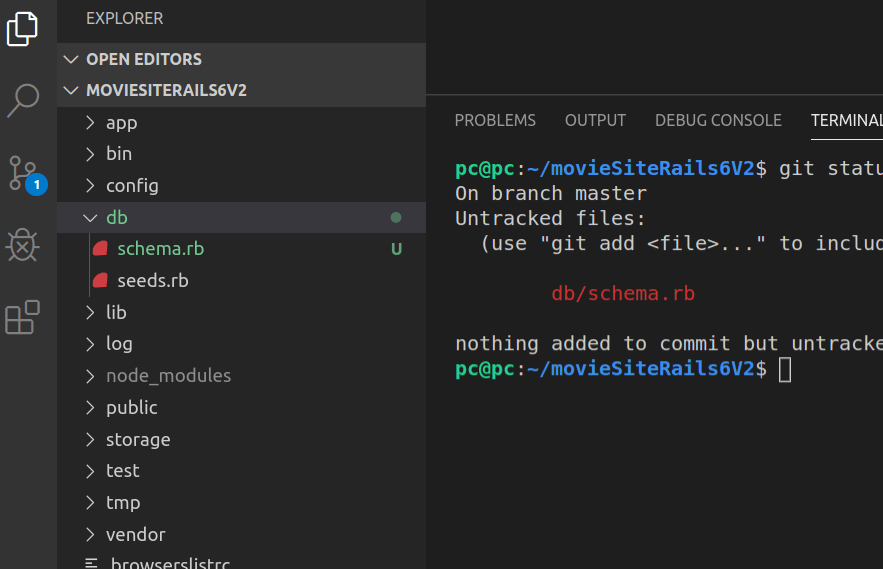
This will add a new file to our app; the file is called schema.rb, and it’s located in the db folder.
We can also run the git status command to verify a new file has been added.
Now we’ll commit the changes:
git add --all
git commit -m "Run the first 'rails db:migrate' command"
Let’s verify that our app still works by visiting http://localhost:3000. Of course, for this to work, the rails s command has to already be running in a console on our machine.
Now we can also push the app to remote, i.e to GitHub.
Pushing the local app to GitHub
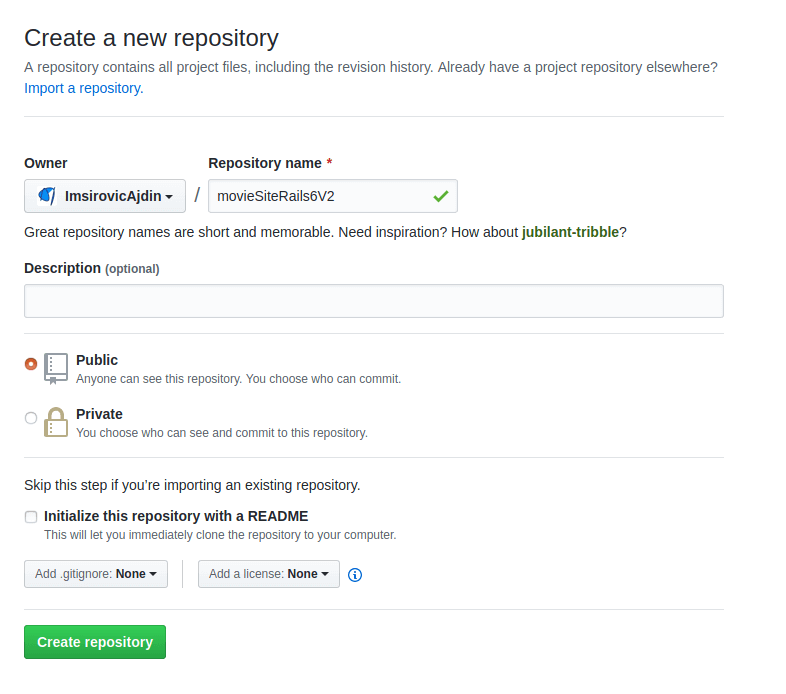
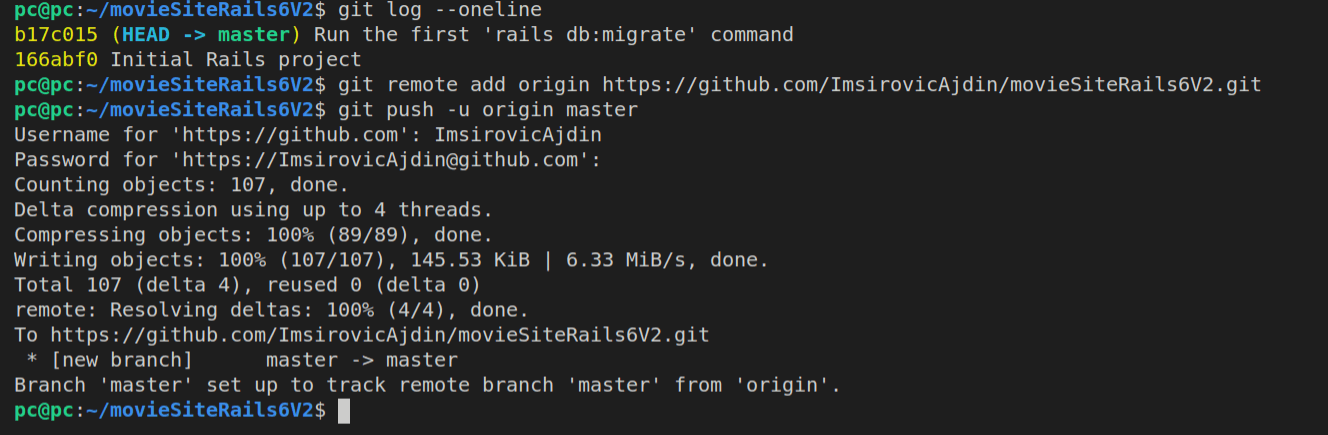
Let’s make a new repository in GitHub.
Now we’ll push the existing local repository.
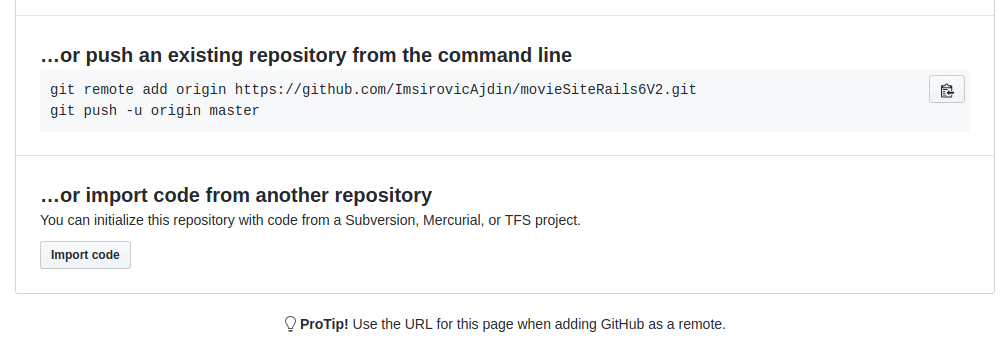
As the screenshot shows, we’ll run these two commands from the command line:
git remote add origin https://github.com/ImsirovicAjdin/movieSiteRails6V2.git
git push -u origin master
Here’s the result of running these two commands in the console:
Now, back on GitHub, you can click on the repository name to see the commits that have been pushed.

Next we’ll install a front-end framework.
This time, it’s gonna be Bulma.
Install Bulma Framework in Rails 6
To do this, we’ll press the keyboard shortcut of CTRL + p in VS Code.
This shortcut will open the file launcher; now we’ll click the name of the file we’re looking for.
This time, we want to locate the file called Gemfile.
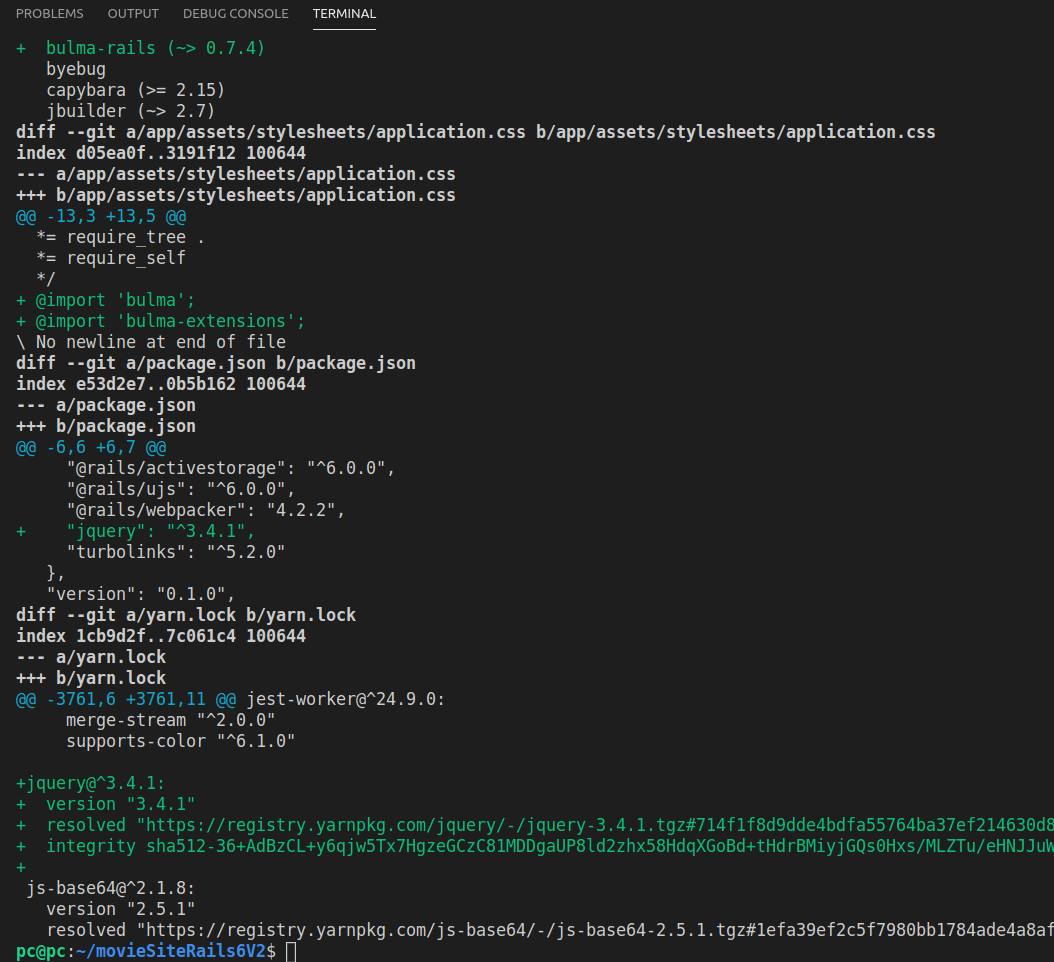
Once we’ve located and opened the Gemfile, let’s add Bulma gems:
gem 'bulma-rails', '~> 0.7.4'
gem 'bulma-extensions-rails', '~> 1.0.30'
Now that we’ve added the gems, we’ll need to use them in our application.css file, inside the app/assets/stylesheets folder.
@import 'bulma';
@import 'bulma-extensions';
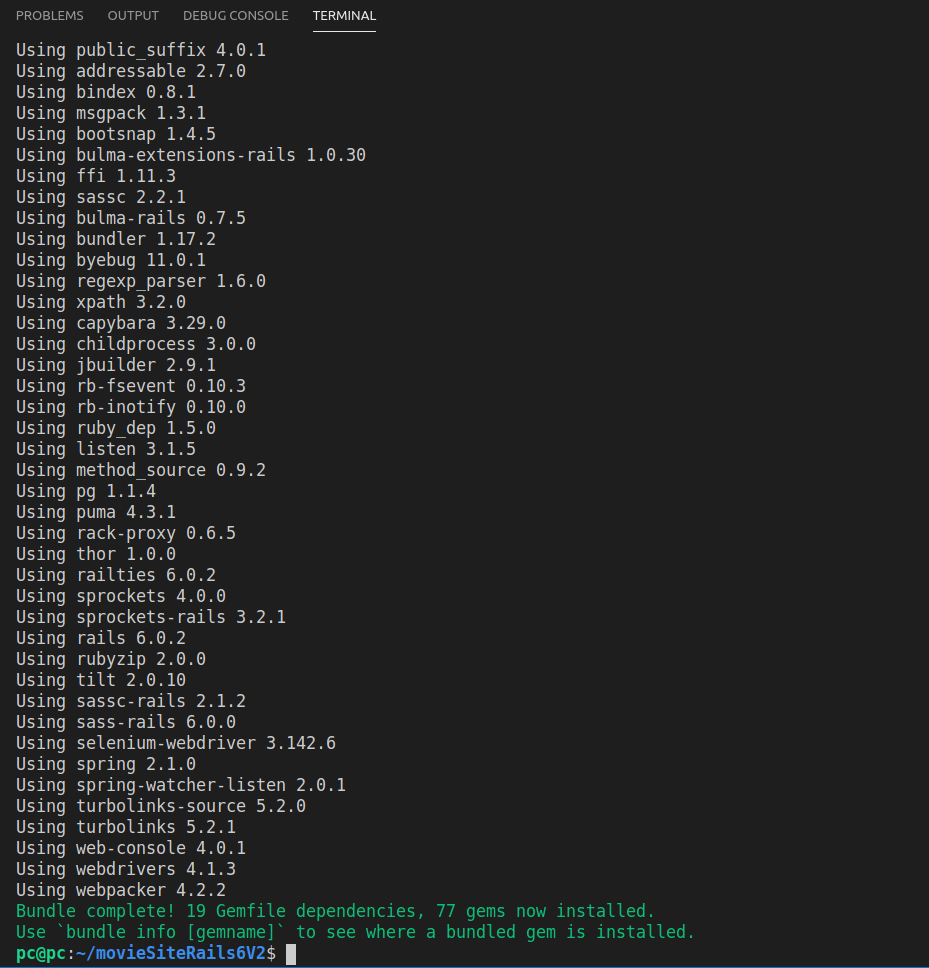
Save all the changes, and inside the console, run:
bundle
This is the result of running the above command.
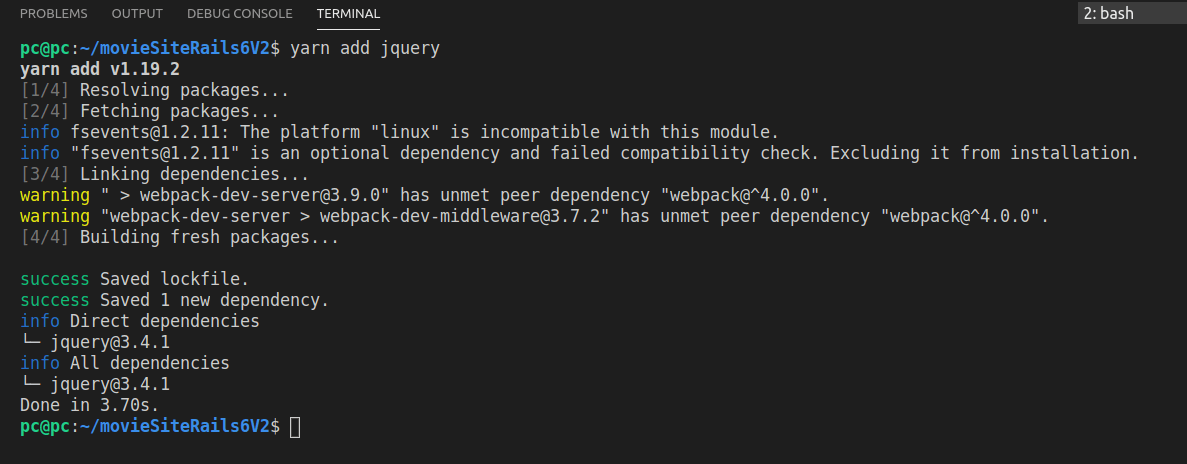
Next, we’ll be adding jQuery.
Add jQuery to Rails 6
Since we’re using Yarn, adding jQuery is easy:
yarn add jquery
In the image below, you can see the output of the command:
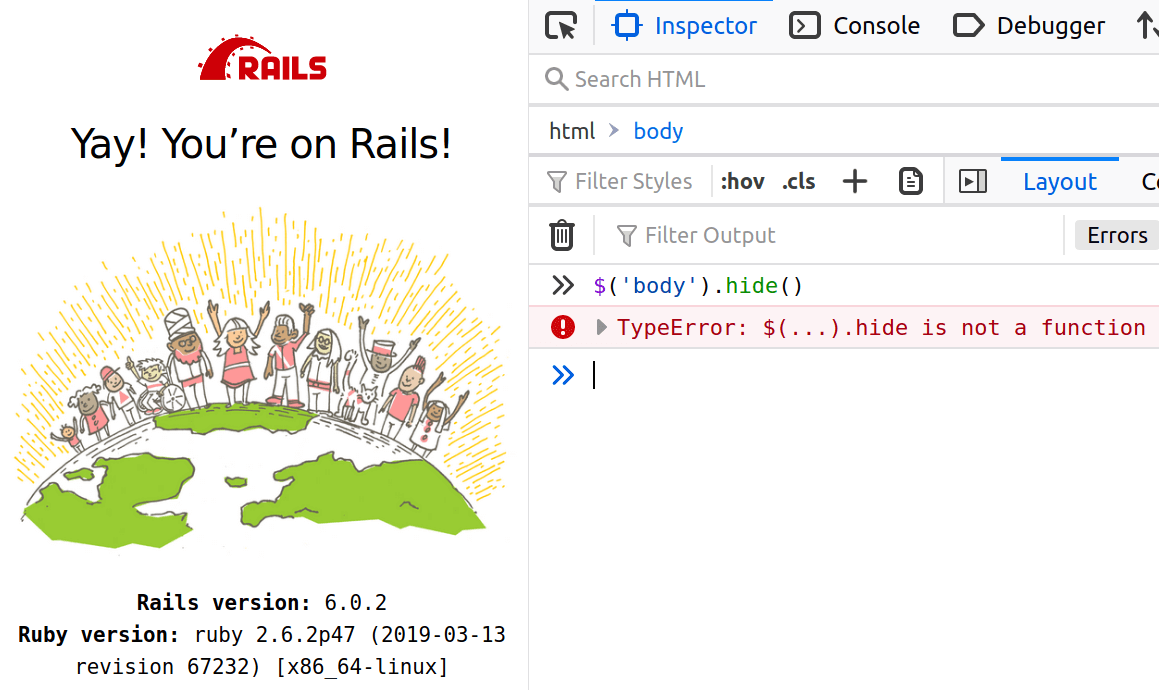
Now we can try running a simple jQuery command inside browser devtools with the localhost:3000 homepage open.
$('body').hide();
This will throw an error:
Alternatively, we can run the git diff command, to see all the changes that have taken place.
Obviously, jQuery should be available in our app.
If we inspect our app’s Gemfile, we can find the jQuery dependency has been added. We also saw that earlier, yarn add command reported a successful addition of jQuery. So why doesn’t it work?
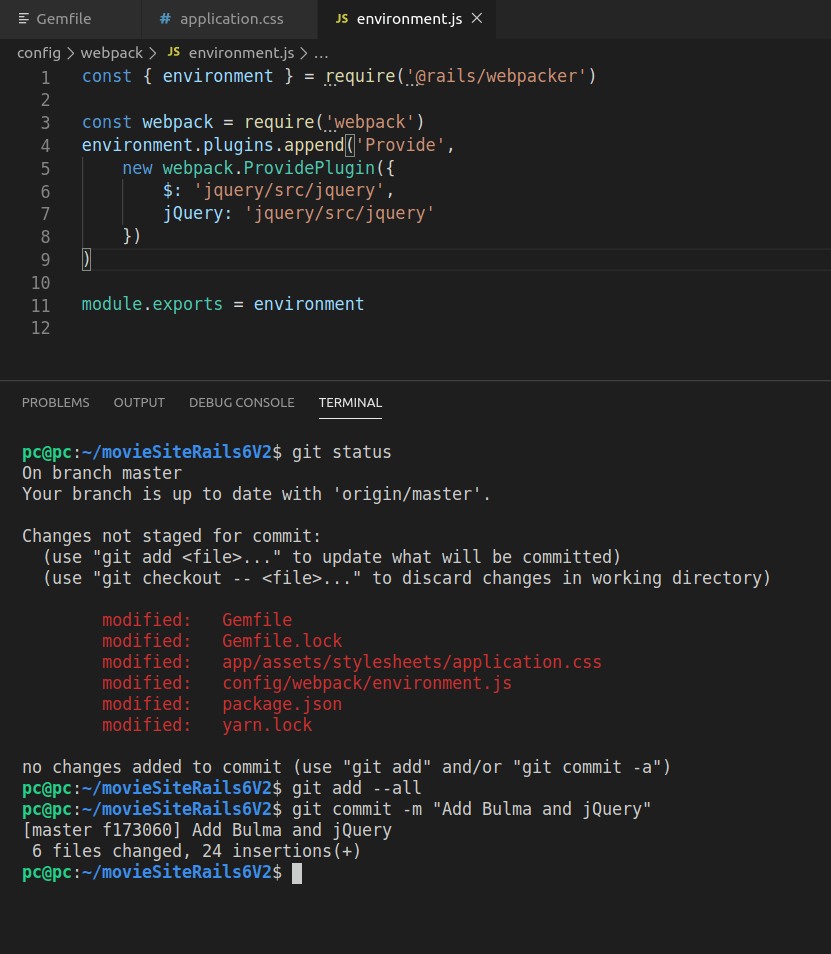
The reason is: we need to add it to webpacker, by expanding the environment.js file with additional code.
We need to locate the file called environment.js, inside the config/webpack folder.
The quickest way to do this is to run the file launcher in VS Code using the above mentioned keyboard combo of CTRL + p.
Once we’ve located the file, we need to add:
const webpack = require('webpack')
environment.plugins.append('Provide',
    new webpack.ProvidePlugin({
        $: 'jquery/src/jquery',
        jQuery: 'jquery/src/jquery'
    })
)
Why did we do this? We added this code to make jQuery globally available in our app, in each of its files.
This is a good time to commit our changes:
Next, we’ll add our first static page in Rails.
Add a Static Page in Rails 6
To add a static page, we’ll run a generate command, in its short version, which is just g.
rails g controller Pages home
Pages is the controller name, and home is the Pages controller’s action.
It’s possible you’ll see a “FATAL” error at this point:
FATAL: Listen error: unable to monitor directories for changes.
Visit https://github.com/guard/listen/wiki/Increasing-the-amount-of-inotify-watchers for info on how to fix this.
The fix is to run this command:
echo fs.inotify.max_user_watches=524288 | sudo tee -a /etc/sysctl.conf && sudo sysctl -p
Now our rails g command should run just fine, and generate the following output in console:
create  app/controllers/pages_controller.rb
route  get 'pages/home'
invoke  erb
create    app/views/pages
create    app/views/pages/home.html.erb
invoke  test_unit
create    test/controllers/pages_controller_test.rb
invoke  helper
create    app/helpers/pages_helper.rb
invoke    test_unit
invoke  assets
invoke    scss
create      app/assets/stylesheets/pages.scss
Let’s also inspect the changes with git, by running git status or git diff --stat.
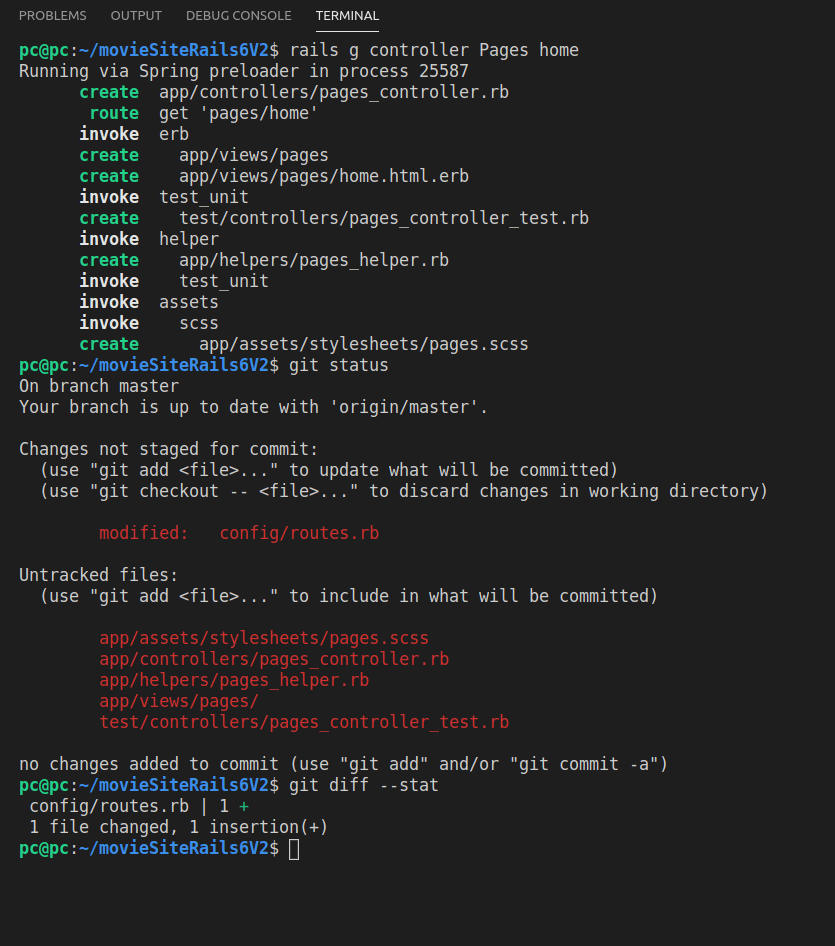
As shown in the image above, running the git status command shows both the existing, modified files, as well as the newly added files.
Running git diff --stat just shows one-liners for each modified file that was already tracked by git, but it doesn’t show new files.
Regardless of how we inspect the changes, here’s the list of files that the rails g command produced:
app/assets/stylesheets/pages.scss
app/controllers/pages_controller.rb
app/helpers/pages_helper.rb
app/views/pages/
test/controllers/pages_controller_test.rb
We can now look at the contents of the above-referenced app/views/pages/ folder, inside VS Code, by running the file launcher.
Expectedly, home.html.erb is the only file that gets filtered as we type app/views/pages inside the launcher.
Let’s inspect it:
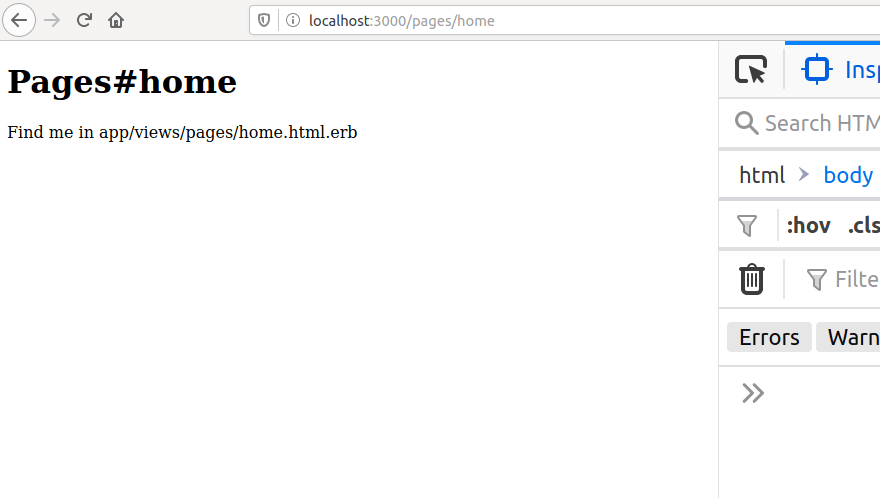
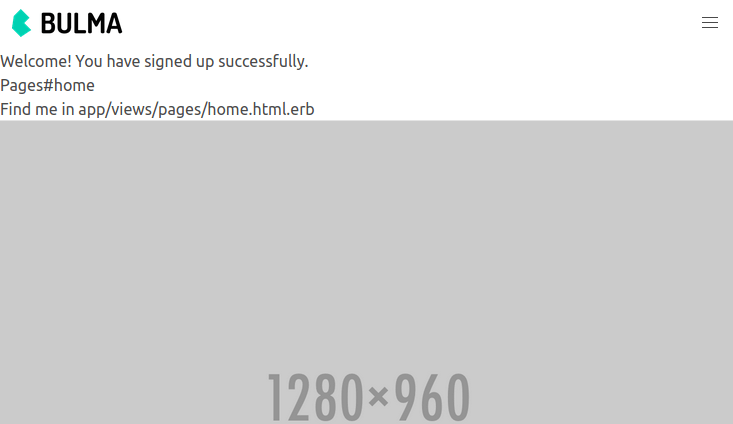
<h1>Pages#home</h1>
<p>Find me in app/views/pages/home.html.erb</p>
If we navigate to localhost:3000/pages/home, this will be the output of the above code:
Next, let’s update the above page with some Bulma code.
This code is just to test-drive Bulma. It can be anything really. It’s just some temporary code.
So let’s copy a Bulma card example.
Here’s the code:
<div class="card">
  <div class="card-image">
    <figure class="image is-4by3">
      <img src="https://bulma.io/images/placeholders/1280x960.png" alt="Placeholder image">
    </figure>
  </div>
  <div class="card-content">
    <div class="media">
      <div class="media-left">
        <figure class="image is-48x48">
          <img src="https://bulma.io/images/placeholders/96x96.png" alt="Placeholder image">
        </figure>
      </div>
      <div class="media-content">
        <p class="title is-4">John Smith</p>
        <p class="subtitle is-6">@johnsmith</p>
      </div>
    </div>

    <div class="content">
      Lorem ipsum dolor sit amet, consectetur adipiscing elit.
      Phasellus nec iaculis mauris. <a>@bulmaio</a>.
      <a href="#">#css</a> <a href="#">#responsive</a>
      <br>
      <time datetime="2016-1-1">11:09 PM - 1 Jan 2016</time>
    </div>
  </div>
</div>
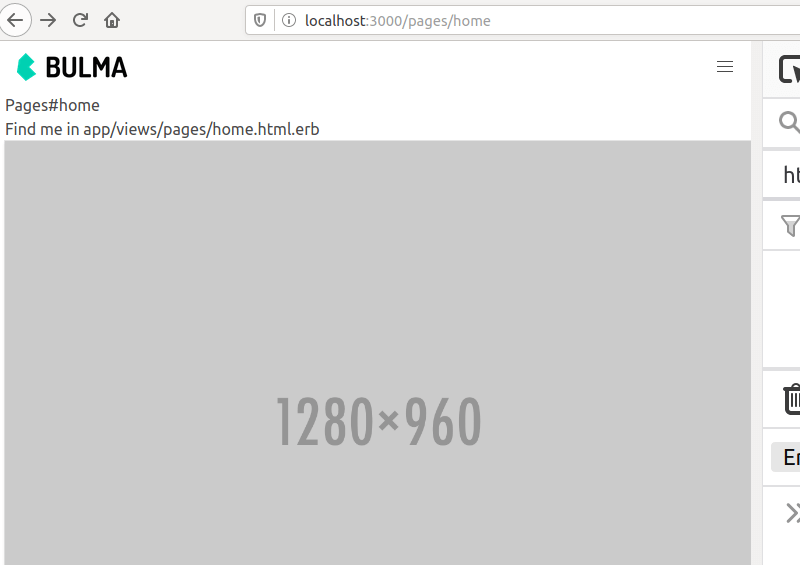
And here’s the result of copy-pasting the above code and refreshing localhost:3000/pages/home.
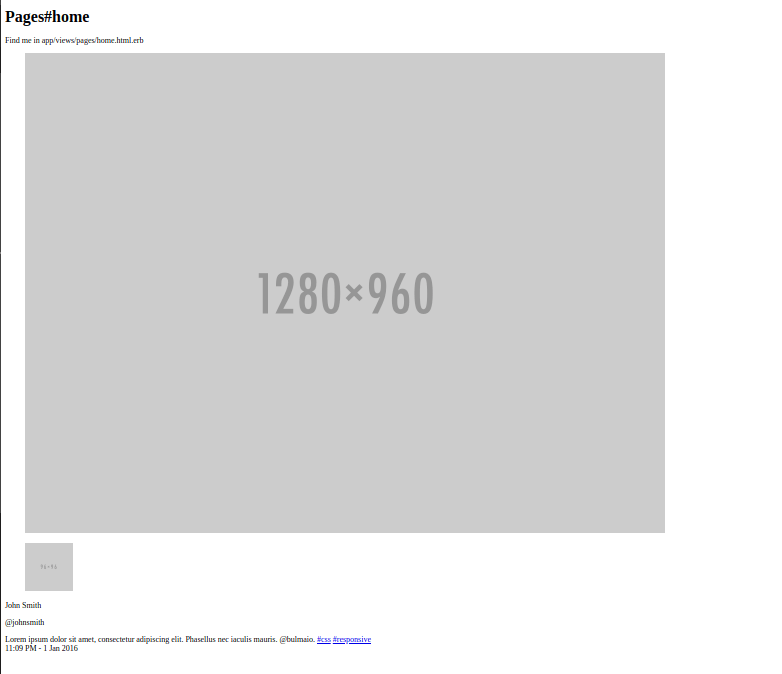
As we can see, our Bulma styles are obviously not loading.
If we inspect the application.css file in Chrome, we’ll see the following:
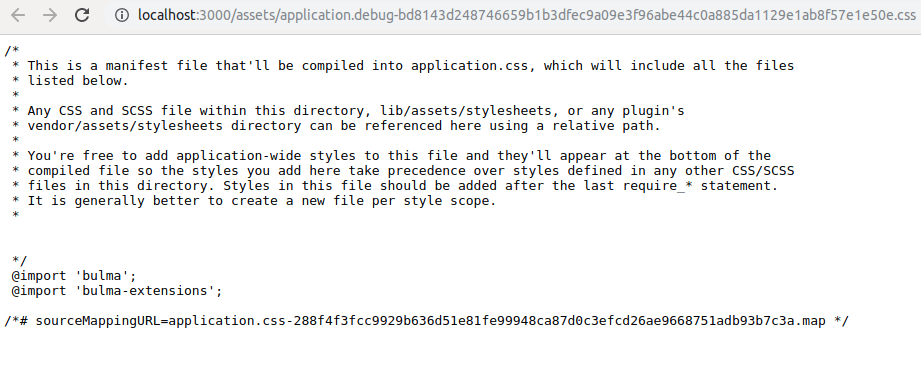
Sidenote: Notice the bunch of additional letters and numbers in the application.css file’s name? These are there for cache-busting.
Importing Bulma into application.html.erb
Why doesn’t our current import work?
Because of this error:
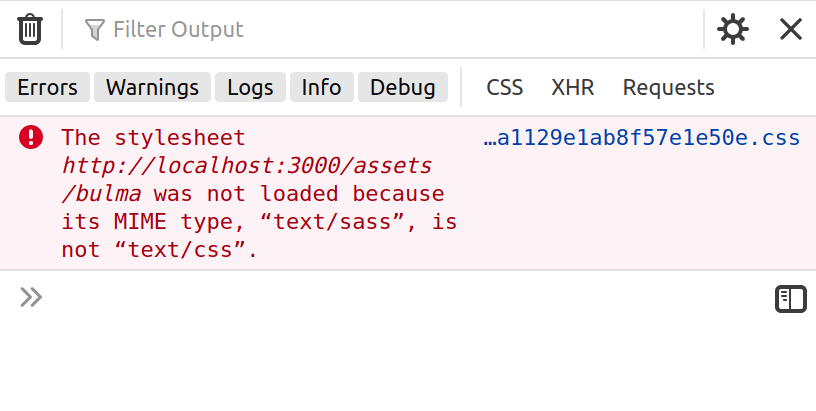
This is the first version of this error: The stylesheet was not loaded because its MIME type, “text/sass”, is not “text/css”.
An alternative version of this error is: “Resource interpreted as Stylesheet but transferred with MIME type text/sass:”.
So how do we fix this?
Actually, the fix is very easy. We’ll just rename the application.css file into application.scss file.
Why does this work?
The explanation can be found in the beginning lines of the multi-line comment inside the existing application.css file itself:
/*
 * This is a manifest file that'll be compiled into application.css, which will include all the files
 * listed below.
 *
 * Any CSS and SCSS file within this directory, lib/assets/stylesheets, or any plugin's
 * vendor/assets/stylesheets directory can be referenced here using a relative path.
The heavy lifting is done by webpack in the background.
This is a good time to save our changes.
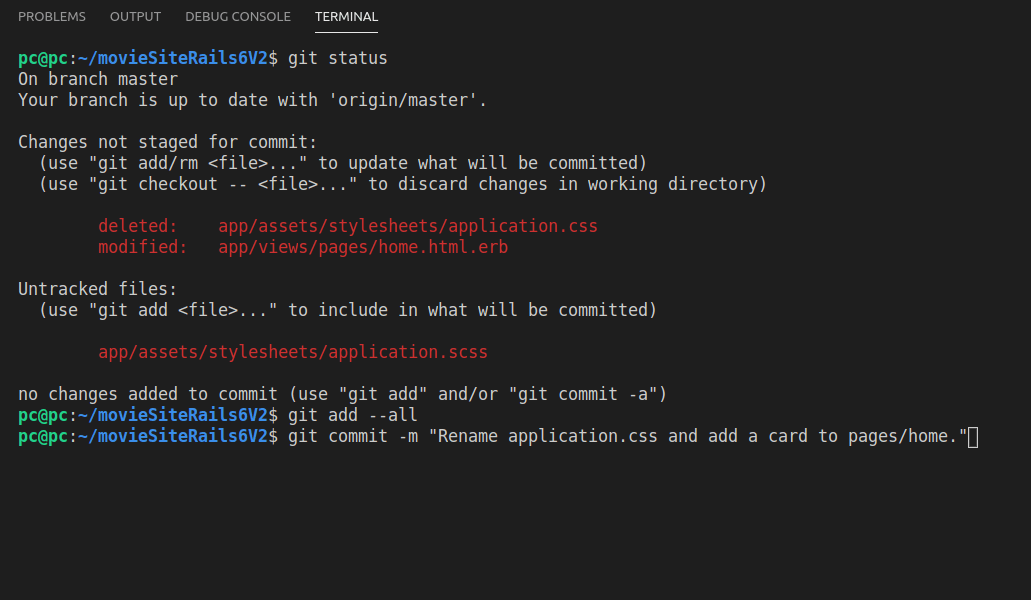
First, let’s make sure we’ve saved all changes in VS Code.
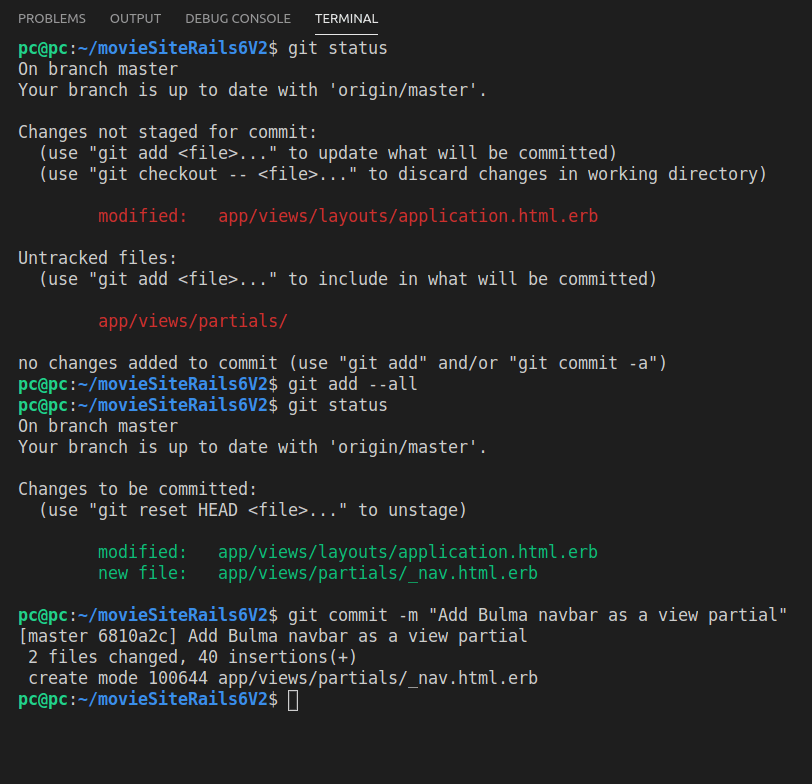
Next, let’s see our git status. Then we’ll add all our changes and commit them as: “Rename application.css to application.scss and add a card to pages/home”.
Next, we’ll add the navbar to our code.
Add Main Nav to our Application
The navbar will appear on every page of our application, thus we’ll need to add it as a partial view file, and then we’ll import that partial into application.html.erb file.
Let’s add a new folder to hold the partial files. In app/views, run:
mkdir partials
Thus, we have a new folder called app/views/partials.
Next, let’s add a new partial file. Partial files, by convention, begin with an underscore, so:
touch _nav.html.erb
Now let’s copy-paste the navbar from Bulma, and remove the redundant code.
Here’s what we end up with:
<nav class="navbar" role="navigation" aria-label="main navigation">
  <div class="navbar-brand">
    <a class="navbar-item" href="https://bulma.io">
      <img src="https://bulma.io/images/bulma-logo.png" width="112" height="28">
    </a>

    <a role="button" class="navbar-burger burger" aria-label="menu" aria-expanded="false" data-target="navbarBasicExample">
      <span aria-hidden="true"></span>
      <span aria-hidden="true"></span>
      <span aria-hidden="true"></span>
    </a>
  </div><!-- /navbar-brand -->

  <div id="navbarBasicExample" class="navbar-menu">

    <div class="navbar-start">

      <!-- <a class="navbar-item">
        Home
      </a> -->

    </div><!-- /navbar-start -->

    <div class="navbar-end">
      <div class="navbar-item">
        <div class="buttons">
          <a class="button is-primary">
            <strong>Sign up</strong>
          </a>
          <a class="button is-light">
            Log in
          </a>
        </div><!-- /buttons -->
      </div><!-- /navbar-item -->
    </div><!-- /navbar-end -->

  </div><!-- /navbar-menu -->

</nav>
Finally, we’ll need to add call the render function to call the _nav.html.erb file from the partials folder.
We’ll make this call to render function from inside the application.html.erb file, as follows:
<%= render "partials/nav" %>
Note: Rails is smart enough to understand what file we’re referring to.
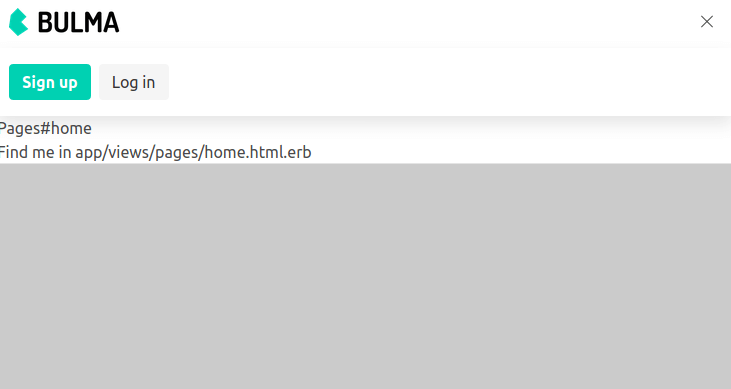
Now that we’ve added the navbar, on narrow screens, it will look like this:
As we can see, on small widths, our navbar’s links are hidden behind a toggleable button (commonly known as the “burger” button).
However, clicking on the button toggle will not work, because Bulma is a CSS-only framework, and for the toggle to work, we need to add some jQuery.
Before we do, let’s commit our changes:
Making the toggle button work
To make the toggle button work, navigate to navbar-menu section of the navbar page on Bulma docs.
At the bottom of the JavaScript toggle card, you’ll find the jQuery code to add:
$(document).ready(function() {

  // Check for click events on the navbar burger icon
  $(".navbar-burger").click(function() {

      // Toggle the "is-active" class on both the "navbar-burger" and the "navbar-menu"
      $(".navbar-burger").toggleClass("is-active");
      $(".navbar-menu").toggleClass("is-active");

  });
});
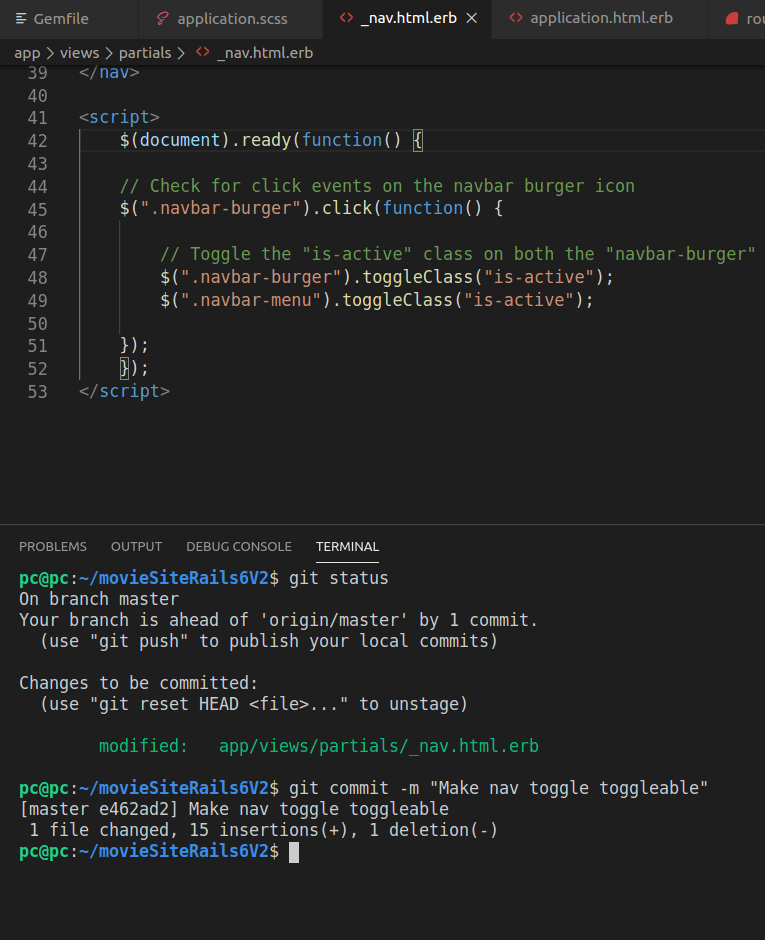
Now we’ll add the above code into _nav.html.erb, at the very bottom, inside a pair of opening and closing script tags:
<script>
$(document).ready(function() {

  // Check for click events on the navbar burger icon
  $(".navbar-burger").click(function() {

      // Toggle the "is-active" class on both the "navbar-burger" and the "navbar-menu"
      $(".navbar-burger").toggleClass("is-active");
      $(".navbar-menu").toggleClass("is-active");

  });
});
</script>
If we now click the toggle button, this is the result:
Let’s commit our changes again:
Next, we’ll add authentication with the devise gem.
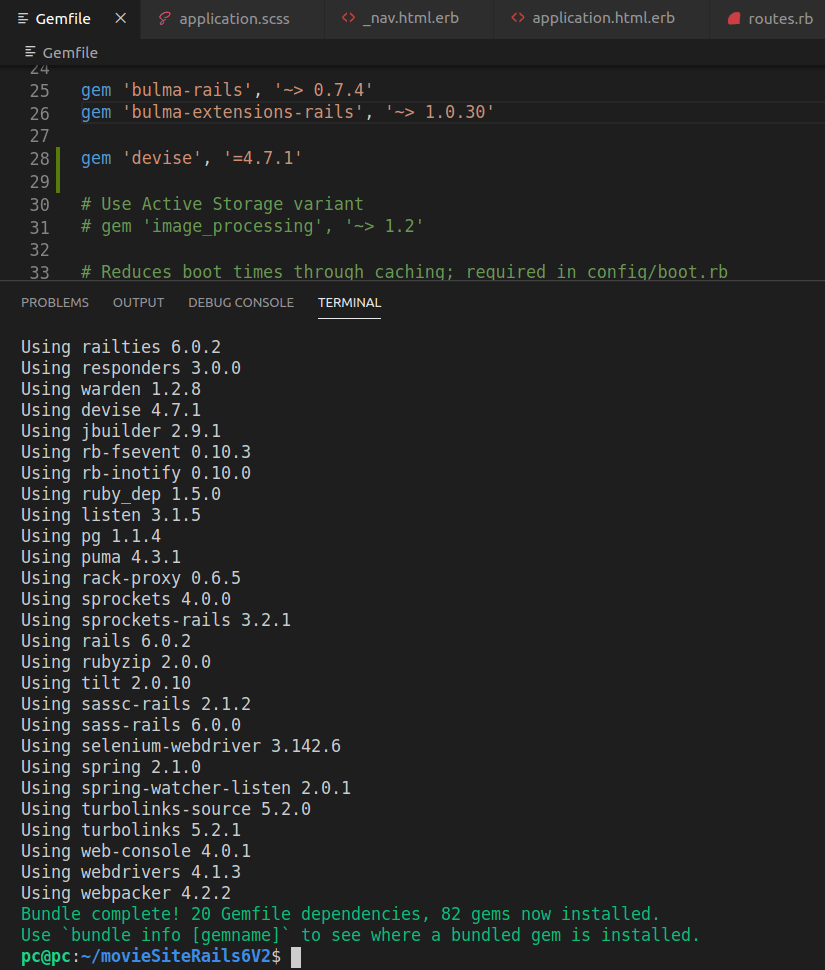
Adding the Devise Gem
To have our users log in and out of our application, we’ll use the devise gem.
We’ll add it to our app like this:
gem install devise
Here’s the bash output:
Successfully installed devise-4.7.1
1 gem installed

Now we’ll add it to our Gemfile, and specify the version:
gem 'devise' '=4.7.1'
Now we’ll install it using bundler:
bundle
Next we’ll run rails g devise:install. This will install the devise initializer.
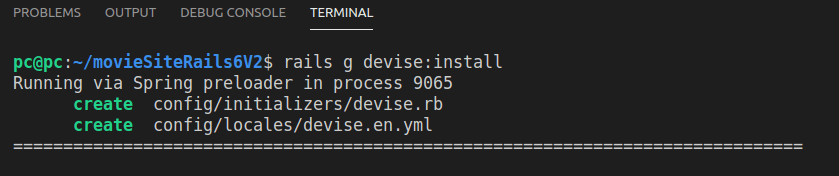
It will also print a lot of instructions to the console, which can be abbreviated to:
- Reminder to define default url options in the environment files
- Reminder to define root_url (which we haven’t yet done)
- Reminder to add flash messages in
application.html.erblayout file - Reminder to copy Devise views so that we can customize them
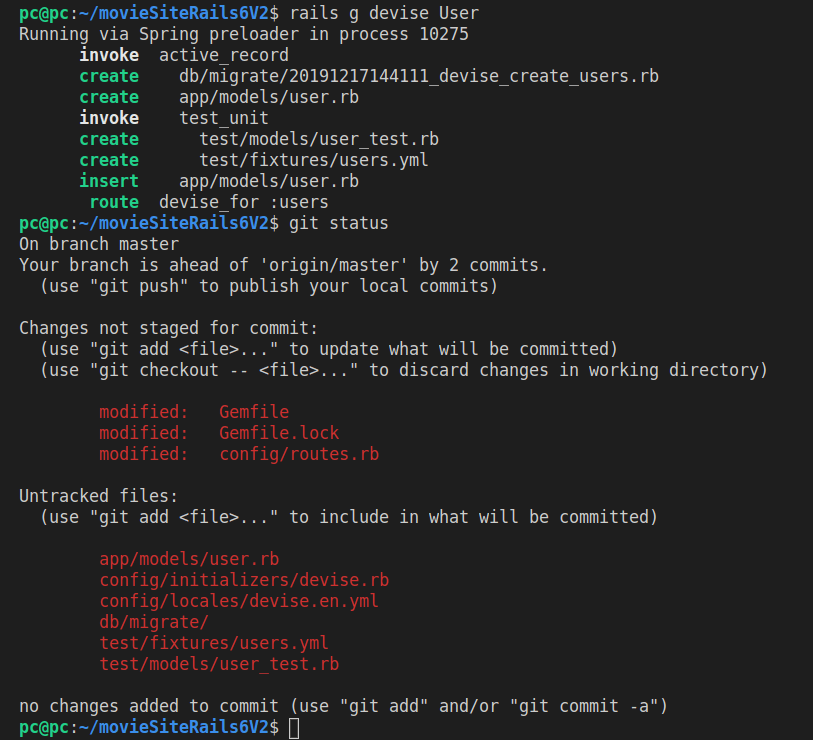
To use Devise, we’ll need to have a User, so let’s add a User model.
rails g devise User
Let’s also run git status to see the changes made.
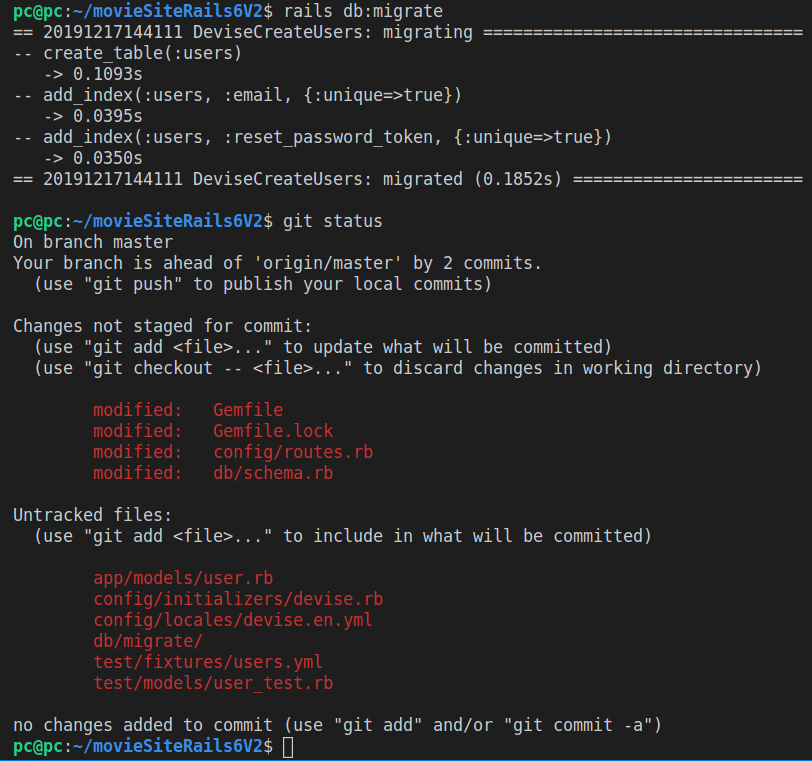
Now we’ll migrate the database:
rails db:migrate
Let’s do git status again.
If we run git add --all, then git status, we’ll see the list of all the staged files, ready to commit.
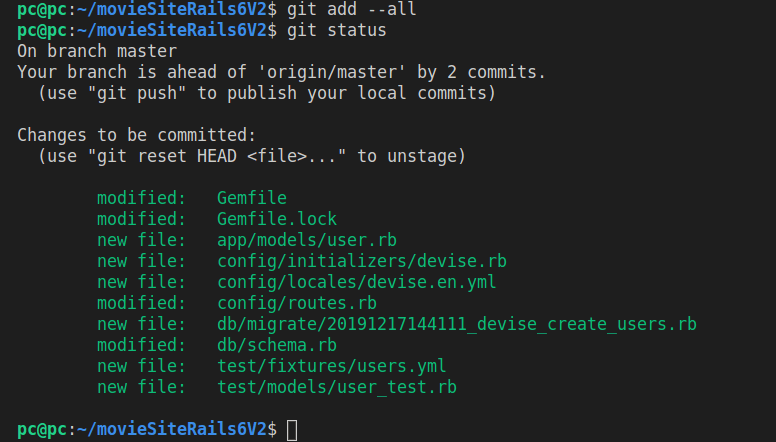
Now let’s run git commit:
git commit -m "Add the devise User model and run rails db:migrate"
Next, we can see the last five commits with git log --oneline -5.
Here’s the output:
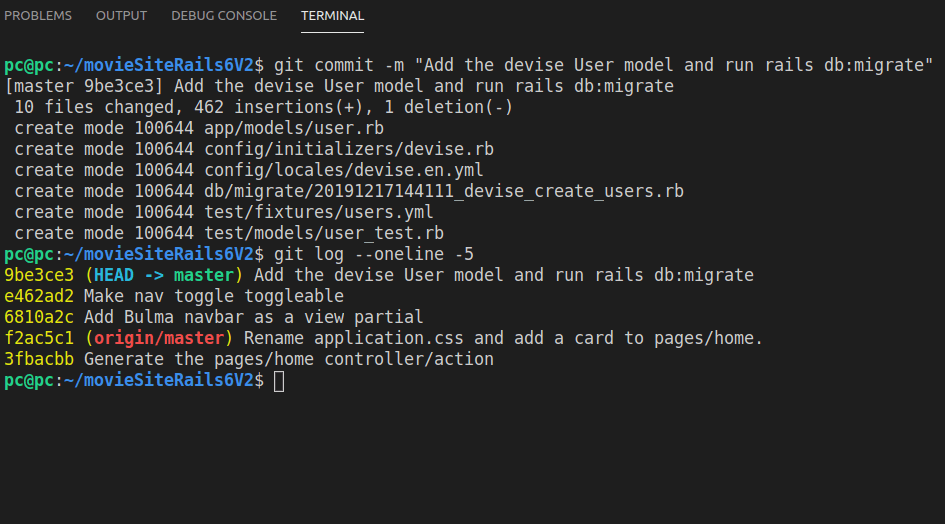
Now we can see the commits’ SHA hashes (random letters and numbers before the commit message). These hashes are 40 characters long, but for our convenience, they’re shortened to only 8 characters.
Thus, to see the changes on files between any commit, we can do, for example, this:
git diff <previous-commit> <current-commit> <filename>
In practice, we’re interested in db/migrate/20191217144111_devise_create_users.rb, so:
git diff e462ad2 9be3ce3 db/migrate/20191217144111_devise_create_users.rb
Here’s the output:
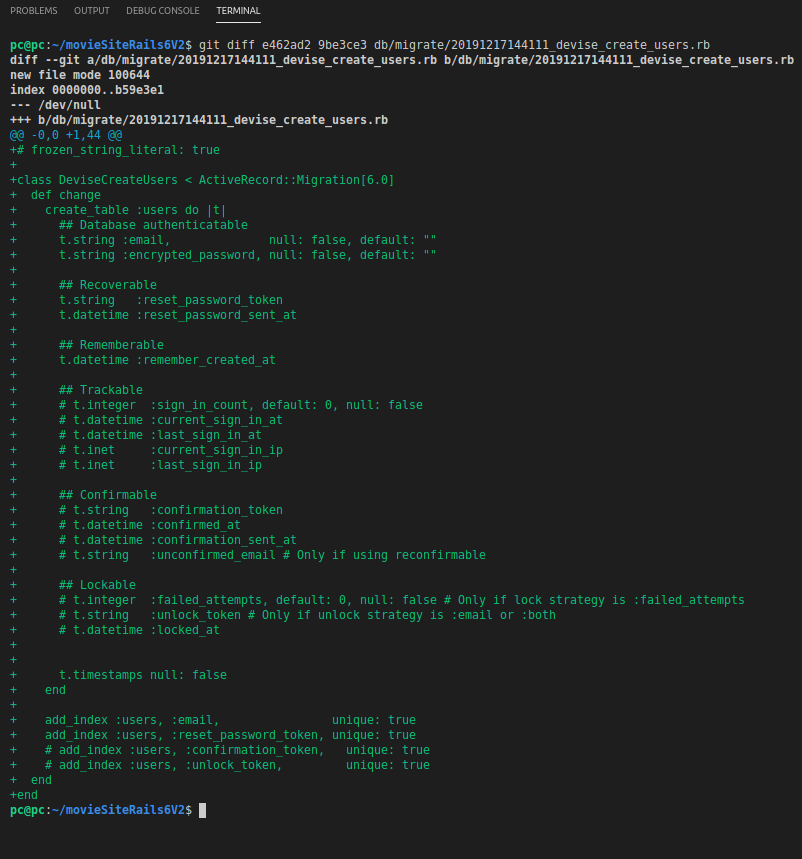
As we can see, the db migration file gets a sort of a timestamp that will identify it inside the db/migrate folder.
The code in the migration file shows the changes to the database that need to be performed in order to create the User model.
Thus, database migrations are syncing the changes made to our Rails application’s code.
Now let’s add the flash messages.
Adding the Flash Messages
Flash messages are simply notifications in our app.
We’ll paste them inside application.html.erb so that they show up everywhere.
<p class="notice"><%= notice %></p>
<p class="alert"><%= alert %></p>
Here’s the complete application.html.erb file:
<!DOCTYPE html>
<html>
  <head>
    <title>MovieSiteRails6V2</title>
    <%= csrf_meta_tags %>
    <%= csp_meta_tag %>

    <%= stylesheet_link_tag 'application', media: 'all', 'data-turbolinks-track': 'reload' %>
    <%= javascript_pack_tag 'application', 'data-turbolinks-track': 'reload' %>
  </head>

  <body>
    <%= render "partials/nav" %>

    <p class="notice"><%= notice %></p>
    <p class="alert"><%= alert %></p>

    <%= yield %>
  </body>
</html>
Let’s commit this update with message: “Add flash messages”.
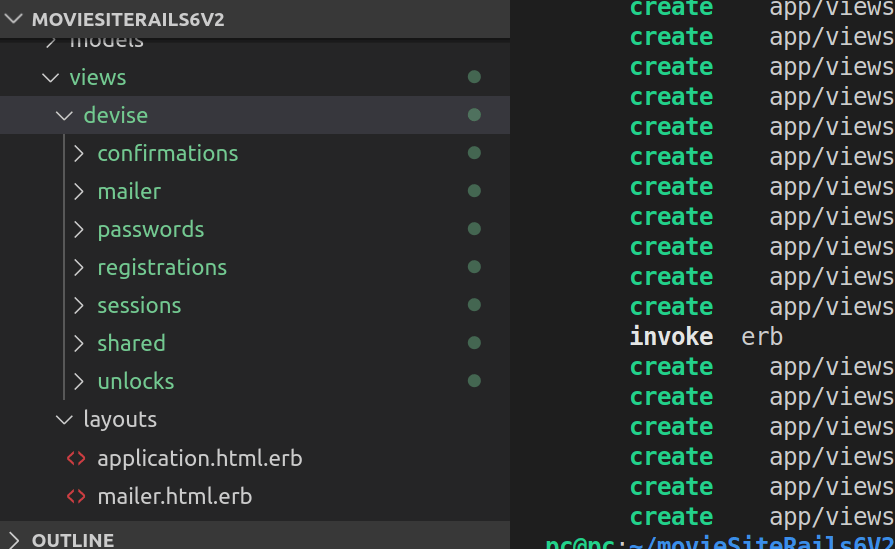
Generate Devise Views
Now we’ll generate a whole bunch of views with the help of the devise gem.
rails g devise:views
Here’s the output:
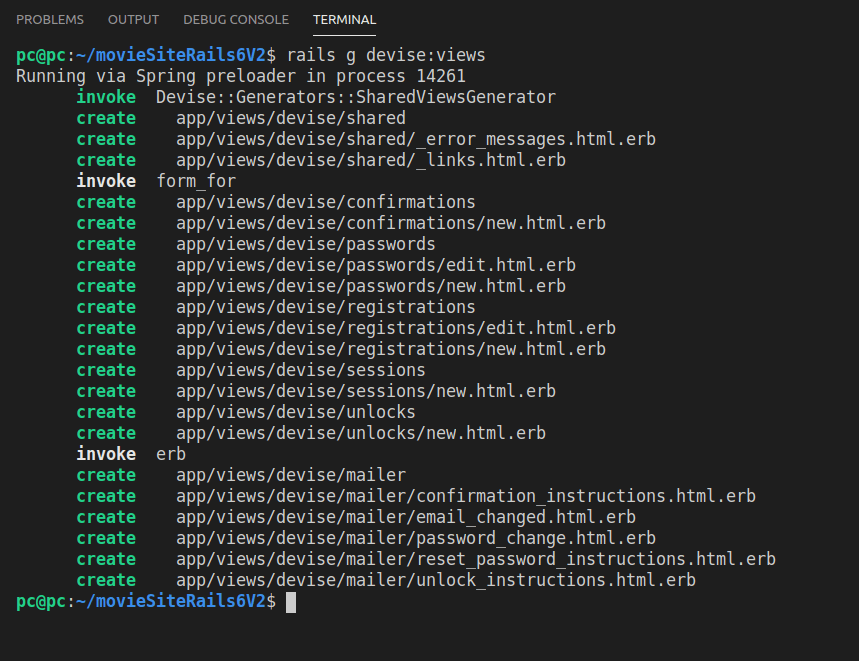
That’s a whole bunch of new files right there:
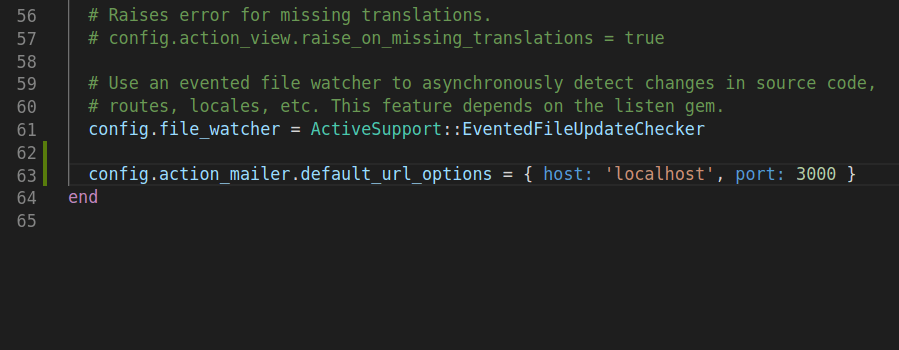
Earlier in the console, when we first added devise, the fourth step listed in the instructions included adding the following line:
config.action_mailer.default_url_options = { host: 'localhost', port: 3000 }
So let’s add this line to config/environments/development.rb, just above the closing end.
Here’s a screenshot of the updated file:
Finally, we need to add the root route in routes.rb.
Adding Root Route
We’ll point the root route to pages#home, inside config/routes.rb, like this:
Rails.application.routes.draw do
  root 'pages#home'

  devise_for :users
  #get 'pages/home'

  # For details on the DSL available within this file, see https://guides.rubyonrails.org/routing.html
end
Important: Notice we’ve “moved” the ‘pages#home’ from the bottom to right under the first line.
If we now visit localhost:3000, we’ll be taken to the ‘pages#home’ view. That’s our site’s root now.
Another important note: If for any reason you get an error when you visit the localhost:3000 url, simply stop and restart your rails server, and you should be fine.
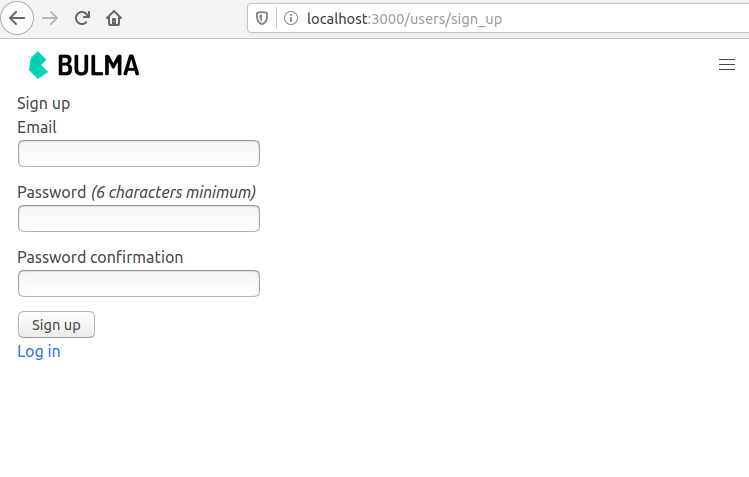
Having a Look at Users
Let’s now visit the users/sign_up page.
What we could do now is fix the styling for this site, using Bulma framework.
However, I’ll leave that up to you, and focus on the backend side of things.
For now, let’s take it one step at a time and click the login link at the bottom of the sign up form.
Here’s the users/sign_in page.

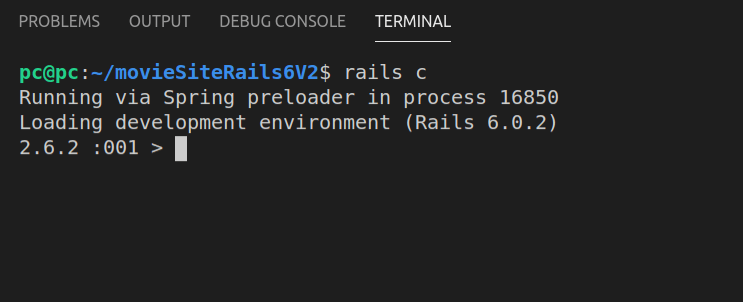
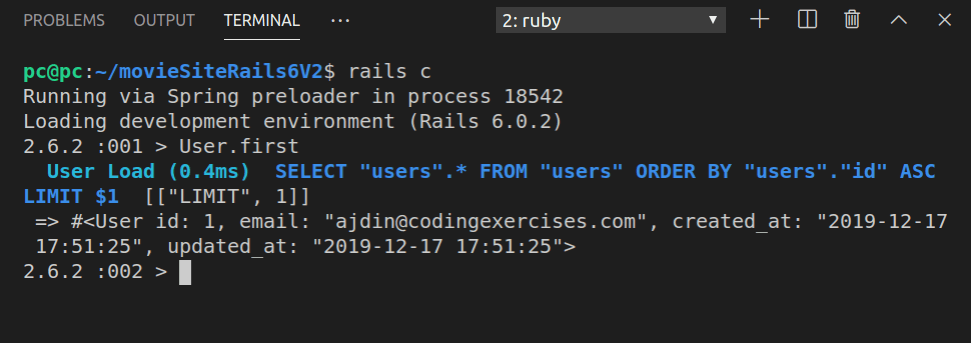
Next, we’ll look at our database using Rails console.
Inspecting the Database with Rails Console
Let’s start rails console inside VS code.
rails c
Here’s what it looks like:
We can type all kinds of commands here. For example:
User
This will be the output of running the above code:
=> User (call 'User.connection' to establish a connection)
Great, it works and it also suggests what we should do! So let’s try it:
User.connection
The Rails console is gonna throw a whole bunch of gibberish. Obviously, it’s an error because we don’t have a user yet.
Let’s make sure that that’s what’s really happening here:
User.first
This will return:
User Load (0.5ms) SELECT "users".* FROM "users" ORDER BY "users"."id" ASC LIMIT $1 [["LIMIT", 1]]
=> nil
Great, the nil that got returned from the above SQL query shows that there’s no records available.
But, how did we get this?
We got this using ActiveRecord, a Rails ORM (Object-Relational Mapper).
Let’s see what else we can do with it.
ActiveRecord::Base.connection.tables
You can read up on it in this Stackoverflow question.
Anyway, this is what running the above command will produce in our case:
=> ["schema_migrations", "ar_internal_metadata", "users"]
To see the contents of the users table, you can run this:
ActiveRecord::Base.connection.columns('users').map(&:name)
The returned output is:
=> [
    "id",
    "email",
    "encrypted_password",
    "reset_password_token",
    "reset_password_sent_at",
    "remember_created_at",
    "created_at",
    "updated_at"
   ]
Note: the formatting above is mine; the console will return it on a single line and wrap it if it goes to the end of the screen.
An easier alternative that still works is this:
ModelName.columns.map(&:name)
So we can run this:
User.columns.map(&:name)
The output is exactly the same as with the previous command:
=> [
    "id",
    "email",
    "encrypted_password",
    "reset_password_token",
    "reset_password_sent_at",
    "remember_created_at",
    "created_at",
    "updated_at"
   ]
Let’s now add a new user, by visiting users/sign_up, and filling in the data.
Once we’ve entered the details and submitted the form, this is what we’ll get:
Let’s now try looking at the list of users.
First we’ll run rails c to start the Rails console, then we’ll run:
User.first
This will now return our one record:
#<User id: 1, email: "ajdin@codingexercises.com", created_at: "2019-12-17 17:51:25", updated_at: "2019-12-17 17:51:25">
Here’s the screenshot of the full output:
Now that we’re logged in, we need to find a way to get logged out.
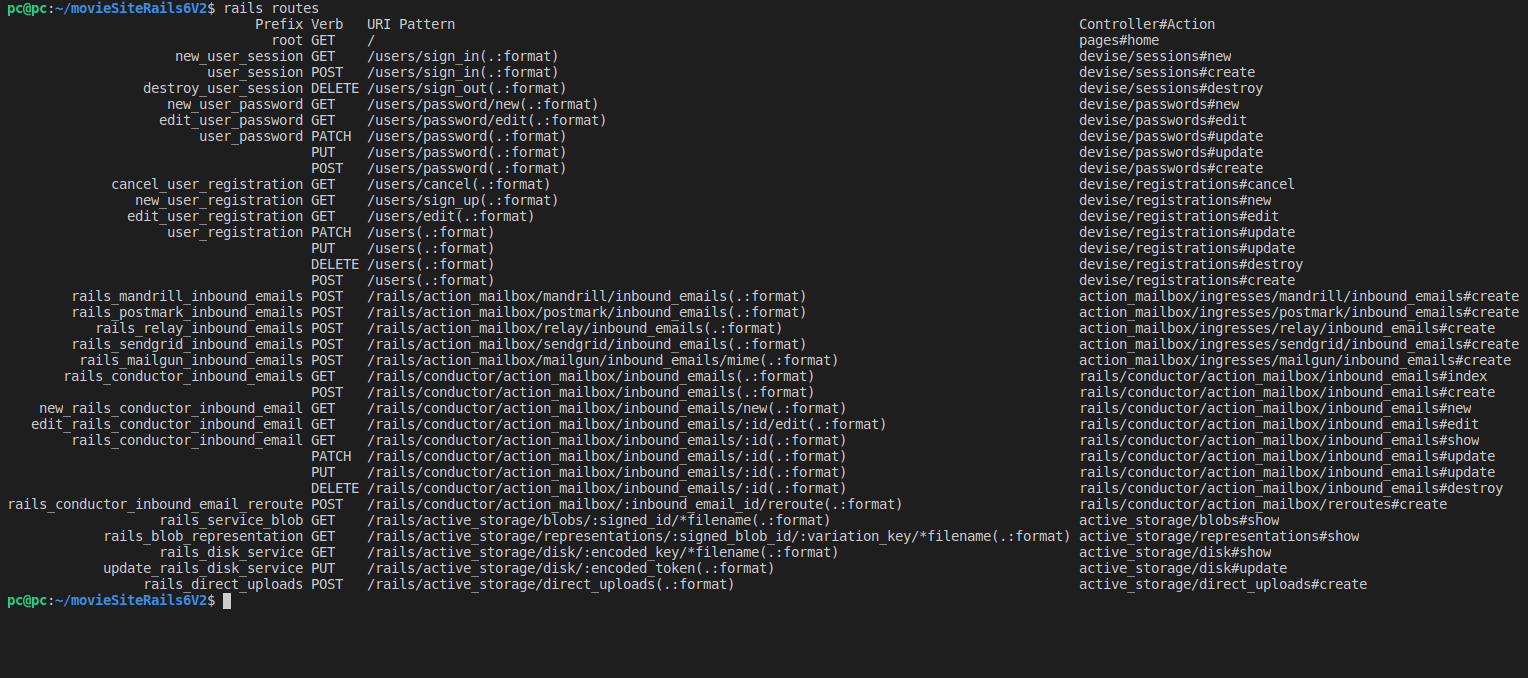
Luckily, we can run the rails routes command.
Running the Rails Routes Command
For starters, let’s just run the command without any options:
rails routes
This will give us a large output of all the routes in our web app.
It spans a couple of screens; below’s the screenshot of the entire output, zoomed out.
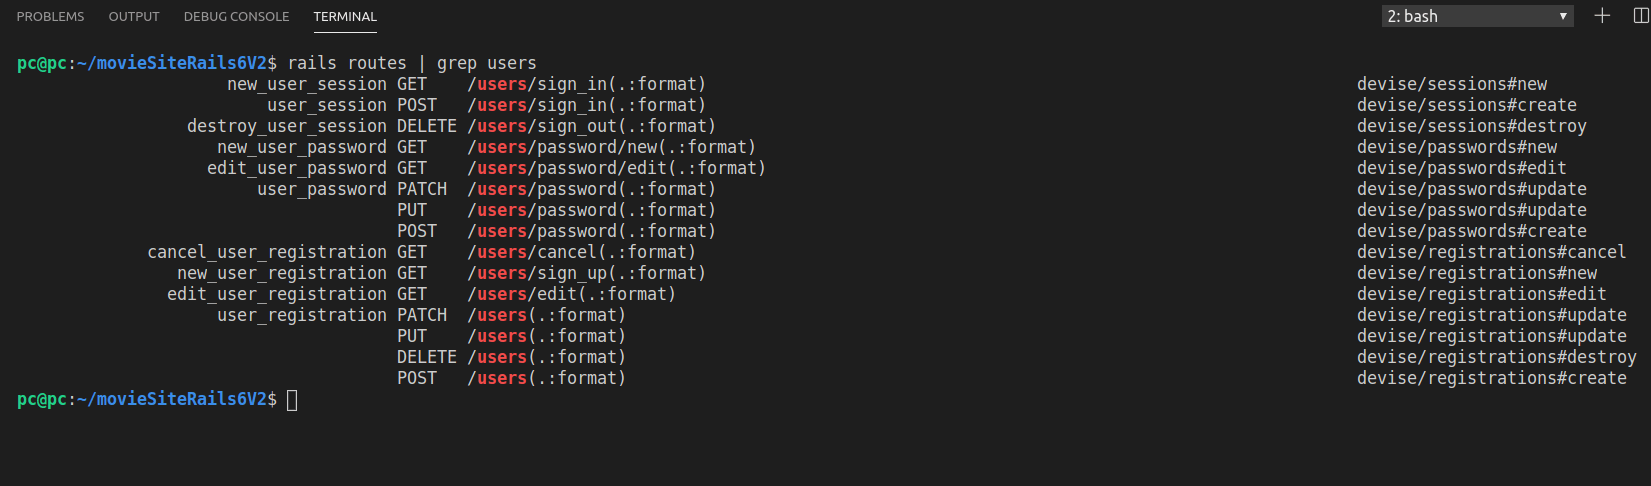
That’s sure a lot of routes, but we can filter them with the grep command.
So let’s try it:
rails routes | grep users
Now we’ll get filtered output:
The output always follows the same pattern:
- Prefix (such as
root, ornew_user_session, etc) - Verb (such as
GET,POST,PATCH, etc) - URI Pattern (such as
users/sign_in(.:format)) - Controller#Action (such as
pages#home)
Now that we understand the output of the rails routes command, we can locate the one that we need to look at.
We’re interested in user logging out or signing out, so let’s try this:
rails routes | grep sign
We can even see the sign_out route, so let’s filter it even further:
rails routes | grep sign_out
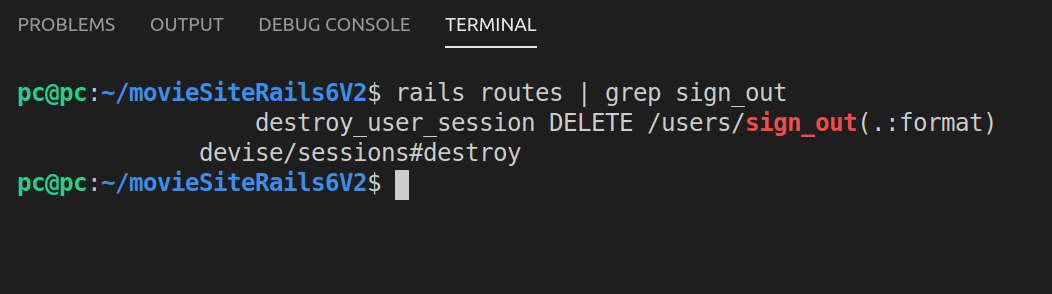
Now we can match each of the four parts of the output, using the above mentioned pattern:
- Prefix:
destroy_user_session - Verb:
DELETE - URI Pattern:
users/sign_out(.:format) - Controller#Action:
devise/sessions#destroy
Now we can add the destroy_user_session path to the log out button, which we’ll add next.
Add the Log Out Button
Let’s go to _nav.html.erb and add the log out button:
<a class="button is-light">
  Log out
</a>
Next. we’ll turn this static button into a dynamic one, by replacing the above code with the following:
<%= link_to "Log out",
    destroy_user_session_path,
    method: :delete,
    class: "button is-light"
%>

This newest update is committed with this message: “Add the log out button”.
Now we need to conditionally display the log in, sign up, and the log out buttons, based on whether the user is already logged in or not.
Conditionally Showing Navbar Buttons
Before we can conditionally show navbar buttons, we need to updated the remaining sign up and log in buttons to their dynamic versions.
Thus, let’s update the navbar-end section of the _nav.html.erb file to this:
    <div class="navbar-end">
      <div class="navbar-item">
        <div class="buttons">
          <%= link_to "Sign Up",
              new_user_registration_path,
              class: "button is-primary"
          %>
          <%= link_to "Login",
              new_user_session_path,
              class: "button is-light"
          %>
          <%= link_to "Log out",
              destroy_user_session_path,
              method: :delete,
              class: "button is-light"
          %>
        </div><!-- /buttons -->
      </div><!-- /navbar-item -->
    </div><!-- /navbar-end -->

  </div><!-- /navbar-menu -->
While we’re at it, we might as well save it with a new commit message: “Make navbar buttons dynamic”.
We’re now ready to add the buttons conditionally, with the help of this opening if statement:
<% if (!user_signed_in?) %>
We’ll follow it up with an else:
<% else %>
…and finally we’ll close the if-end statement like this:
<% end %>
Here are the updates made to the navbar-end section of the _nav.html.erb file:
<div class="navbar-end">
  <div class="navbar-item">
    <div class="buttons">
      <% if (!user_signed_in?) %>
        <%= link_to "Sign Up",
            new_user_registration_path,
            class: "button is-primary"
        %>
        <%= link_to "Login",
            new_user_session_path,
            class: "button is-light"
        %>
      <% else %>
        <%= link_to "Log out",
            destroy_user_session_path,
            method: :delete,
            class: "button is-light"
        %>
      <% end %>
    </div><!-- /buttons -->
  </div><!-- /navbar-item -->
</div><!-- /navbar-end -->
This commit is titled: “Display nav buttons conditionally based on whether user is logged in or not”.
An alternative approach to conditionally showing buttons based on user status could be this:
<% unless current_user.blank? %>
signed in
<% else %>
not signed in
<% end %>
Next, we’ll generate the base controller and the Movie model.
Generate the base controller
To generate the base controller, we’ll run:
rails g controller base
Here’s the output:
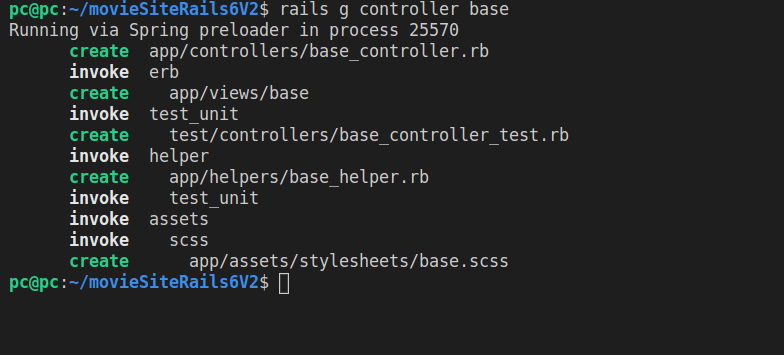
Running the git status will produce the following output:
app/assets/stylesheets/base.scss
app/controllers/base_controller.rb
app/helpers/base_helper.rb
test/controllers/base_controller_test.rb
If we open the base_controller.rb file, we’ll see this:
class BaseController < ApplicationController
end
Now we’ll add a line of code that looks like this:
before_action :authenticate_user!
This line of code will ensure that whatever action is called, we’ll make sure to authenticate the user first.
You can read more about it on official devise documentation.
Now let’s commit this change with this message: “Add base controller”.
Next, we’ll add the Movie model, and after that, the movie controller.
Once we add the movie controller, it will inherit from the BaseController we just added; this will ensure that whatever stuff is done inside the movie controller, the user needs to be logged in to access it.
However, first things first: let’s start by adding the Movie model.
Add the Movie Model
To add the Movie model, we’ll run the rails generate command again:
rails g model Movie title:string description:string img:string cover:string rate:float user:references
Here’s the output of running the above generate command:
invoke  active_record
create    db/migrate/20191217211500_create_movies.rb
create    app/models/movie.rb
invoke    test_unit
create      test/models/movie_test.rb
create      test/fixtures/movies.yml
Now let’s inspect it with git status:
On branch master
Your branch is up to date with 'origin/master'.

Untracked files:
  (use "git add <file>..." to include in what will be committed)

        app/models/movie.rb
        db/migrate/20191217211500_create_movies.rb
        test/fixtures/movies.yml
        test/models/movie_test.rb

nothing added to commit but untracked files present (use "git add" to track)
We can add and commit our changes, with this message: “Generate Movies model”.
Now we can run the migration:
rails db:migrate
Here’s the output:
== 20191217211500 CreateMovies: migrating =====================================
-- create_table(:movies)
   -> 0.1877s
== 20191217211500 CreateMovies: migrated (0.1878s) ============================
Let’s also inspect it with git diff:
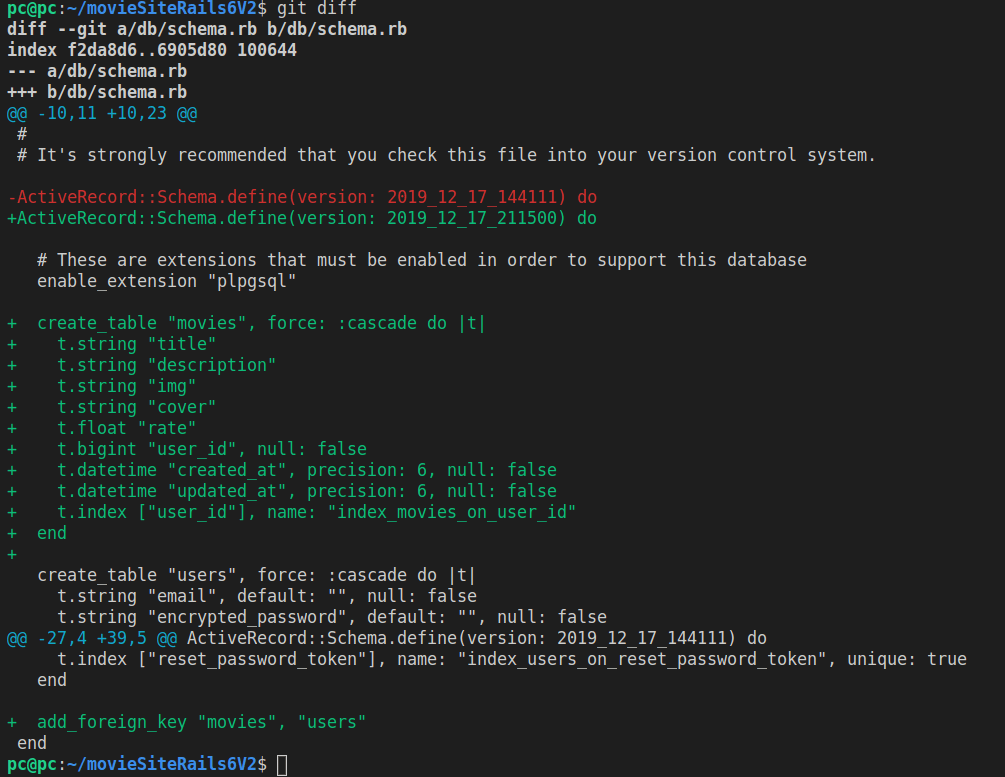
We’ll save this migration in commit titled: “Migrate the movies table”.
With this, we can wrap up the second part of our tutorial.
In part 3, we’ll see how to do the CRUD functionality for our simple movies site in Rails.

