Class-based components, functional components, and React hooks
What's the difference between class-based and functional components?
By: Ajdin Imsirovic 25 January 2022
This chapter is a bit less like a guided tour, and we’ll have a bit more theory. The reason for this is that we need to understand the bigger picture of the current state of React ecosystem in order to be able to make informed decisions on why we’ll be using certain features the certain way.
However, we’ll still cover a lot of practical examples towards the end of this chapter.
If you’re already familiar with the distinction between class components, funcitonal components, and React hooks, feel free to skip this chapter.
Table of contents
- Class components, functional components… what’s all the fuss about?
- Class components
- React Hooks
- The useState React Hook
- The useState syntax
- The persistance of variables declared with useState
- The useState hook accepts a single argument
- An example of updating text on a button click
- Update the count in a separate method
- Display text from an array on button click using useState in React
- Rendering li elements from an array of objects
- An example of updating a value from an input element using the
useStatehook
Class components, functional components… what’s all the fuss about?
There’s a lot of a bit older React code out there that uses class components.
Although using hooks is a preferred, newer way to write React code, we need to still understand how class components work, for at least three reasons:
- To be able to support legacy code
- To be able to migrate older, class-based syntax, to newer, hooks-based syntax
- To truly understand and appreciate the improvements that the hooks-based syntax brings to the table
Class components
Here’s a quick example of a class component in use:
1
2
3
4
5
6
7
8
9
10
11
12
13
import React from "react";

class Jumbotron2 extends React.Component {
    render() {
        return (
            <div className="p-5 mb-4 bg-dark rounded-3 text-warning">
                I come from the Jumbotron2 component!
            </div>
        )
    }
}

export default Jumbotron2;
We’ve added another “Jumbtron” component. Now we’ll import and use it in App.js:
1
2
3
4
5
6
7
8
9
10
11
12
13
14
15
16
17
18
19
20
21
22
23
24
25
26
27
28
29
30
31
32
33
34
35
36
import productData from './products';

import MainMenu from './MainMenu';
import Jumbotron from './Jumbotron';
import Footer from './Footer';
import Product from './Product';
import Jumbotron2 from './Jumbotron2';
import './App.css';

const App = () => {
  return (
    <div className="App">
      <MainMenu />
      <Jumbotron />
      <div className="container">
        <div className="row">
          {productData.map(prod =>
            (
              <div className="col">
                <Product
                  key={prod.name}
                  name={prod.name}
                  description={prod.description}
                />
              </div>
            )
          )}
        </div>
      </div>
      <Jumbotron2 />
      <Footer />
    </div>
  );
}

export default App;
As we can confirm, JSX syntax is accomodating: it doesn’t care if we’ve used a class component or a functional component.
The app still renders, as follows.
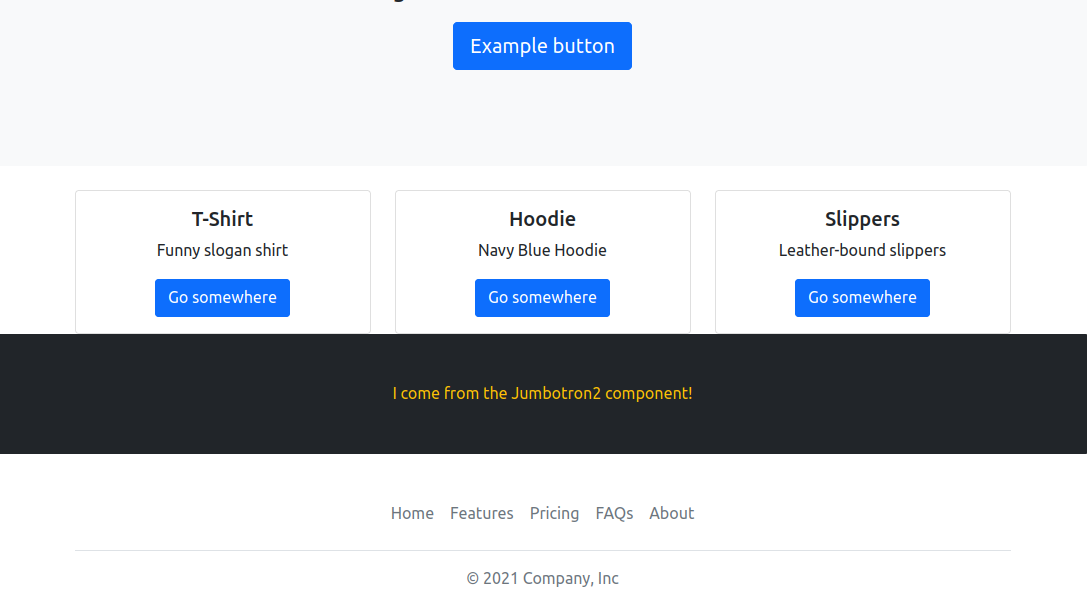
Although class components obviously work, they are a bit clunky: we had to import the React module at the very top of the file, and the class component’s syntax simply looks too convoluted.
Additionally, in class components, the way we access props is a bit different:
1
2
3
4
5
6
7
8
9
10
11
12
13
import React from "react";

class Jumbotron2 extends React.Component {
    render() {
        return (
            <div className="p-5 mb-4 bg-dark rounded-3 text-warning">
                {this.props.message}
            </div>
        )
    }
}

export default Jumbotron2;
We must use this.props.message.
Here’s the update in App.js:
<Jumbotron2 message="I really do come from J2!" />
Note the difference between the use of this.props.whateverPropName in class components and props.whateverPropName in function components.
There’s no this on props in function components.
React Hooks
Simply put, React hooks are JS functions. They were introduced in React 16.8.
With React Hooks, we can use state without writing classes. It thus follows that we can’t use them inside classes.
Here’s a list of some React Hooks:
useStateuseEffectuseRefuseCallbackuseMemouseContextuseReducer
In the chapters that follow, we’ll only use the useState, useEffect, and useCallback hooks. But at this point it’s good to know that there are more hooks to learn and use.
Soon, we’ll be discussing the useState hook, but we can’t really discuss it without talking about the concept of state itself.
The useState React Hook
Before we begin, let’s define state in general.
As a very broad definition, we might say that it’s all the data in the app at a given moment.
The concept of state is not specific to React. It’s a general concept that is used in many other frameworks. Even some programming paradigms’ differences partially revolve around how programs deal with state.
The useState hook makes it possible to work with state variables in function components.
There are a few simple things to know to work with useState effectively.
We need to understand the following:
- The
useStatesyntax - The persistance of state variables
- The
useStatehook accepts a single argument
The useState syntax
The way that it works is: we define a variable, and we define a way to update it:
const [count, setCount] = useState(0);
This above syntax is an example of array destructuring. The useState() hook returns an array with two members. It’s the same as if we wrote this:
const countState = useState(0);
const count = countState[0];
const setCount = useState[1];
The persistance of variables declared with useState
Normally, once a function in JS runs and gets popped off the stack, the variable associated with it is gone too.
However, variables declared with useState persist in our React apps.
The useState hook accepts a single argument
This argument can be a string, a number, an object, an array of objects… - the useState hook is really flexible.
The important thing to remember is: it needs to be a single argument. That single argument we pass it the initial state.
Now let’s examine the simplest possible example, taken straight from the React documentation - and simplified even further to make it as basic as possible.
1
2
3
4
5
6
7
8
9
10
11
12
const { useState } = React;

const App = () => {
  const [count, setCount] = useState(0);
  return (
    <button onClick={() => setCount(count + 1)}>
      Click me, {count}
    </button>
  );
};

ReactDOM.render(<App />, document.getElementById("app"));
The codepen of the above example is titled The simplest useful useState example.
In the above code snippet, we’re declaring:
- The
countvariable (the current state) - The
setCountmethod (the function that updates the state)
We’re also passing the initial state - zero - as the value of the count state variable.
In the onClick attribute, we’re calling the setCount() and passing it count + 1.
It’s as simple as that.
Next, let’s examine a few more examples, to get really familiar with how to use the useState() hook.
An example of updating text on a button click
This Codepen is titled Display text on button click using useState in React.
Here’s the code:
1
2
3
4
5
6
7
8
9
10
11
12
13
14
15
const { useState } = React;

const App = () => {
  const [message, setMessage] = useState("");
  return (
    <div>
      <button onClick={() => setMessage("Happy Birthday")}>
        Click me
      </button>
      <p>{message}</p>
    </div>
  );
};

ReactDOM.render(<App />, document.getElementById("app"));
Note that we needed to wrap all the returned code in a single div to avoid the “Adjacent elements need a wrapping…” JSX error.
Other than that, our code is really straightforward.
Update the count in a separate method
Here’s another easy demo for using React hooks.
1
2
3
4
5
6
7
8
9
10
11
12
13
14
15
const { useState } = React;

const App = () => {
  const clickHandler = () => {
    setCount(count + 1);
  }
  const [count, setCount] = useState(0);
  return (
    <button onClick={() => clickHandler()}>
      Click me, {count}
    </button>
  );
};

ReactDOM.render(<App />, document.getElementById("app"));
In the above code, we’re defining a clickHandler() function, which gets called whenever we click the button. It’s a simple demo showing how to “extract” a separate method rather then using the setCount() directly inside the anonymous function in the onClick attribute.
This codepen is named Update the count in a separate method.
Display text from an array on button click using useState in React
In this simple demo, we’ll use multiple strings stored in the message state variable.
We’ll control which one is displayed on the screen by using a count state variable.
We’ll have another state variable named starterText, which is the initial value of the paragraph to be displayed under the button with the “Click me” call-to-action.
Here’s the JSX code for this example:
1
2
3
4
5
6
7
8
9
10
11
12
13
14
15
16
17
18
19
20
21
22
23
24
25
26
27
28
29
30
const { useState } = React;

const App = () => {
  const clickHandler = () => {
    setCount(count + 1);
    if (count >= 1) {
      setCount(-1);
    }
  }

  const [count, setCount] = useState(-1);
  const [starterText, setStarterText] = useState('Please click the button');
  const [message, setMessage] = useState(["Happy Birthday", "Have fun!"]);

  return (
    <div>
      <button onClick={() => clickHandler()}>
        Click me
      </button>
      <>
        {
          count == -1 ?
          <p>{starterText}</p> : <p>{message[count]}</p>
        }
      </>
    </div>
  );
};

ReactDOM.render(<App />, document.getElementById("app"));
In this example, we’re combining all the things we’ve covered in the book so far, namely:
- Rendering elements conditionally using ternary statements
- Extracting the methods for click handlers
- Using
useStateReact hooks
This example is available as a Codepen titled Display text from an array on button click using useState in React.
Rendering li elements from an array of objects
In this example, we’ll be rendering some li elements using the following array of objects:
1
2
3
4
5
6
7
8
9
10
11
[
    {
      title: "Do something"
    },
    {
      title: "Do something else"
    },
    {
      title: "Etc..."
    }
]
This code structure is the basis of the todo app that we’ll build in chapter 10.
However, since it has to do with the useState() “plumbing”, we’re demoing it here as a separate code snippet, which will be the core logic of our larger todo app that we’ll build later on.
Here’s the full JSX code for this example:
1
2
3
4
5
6
7
8
9
10
11
12
13
14
15
16
17
18
19
20
21
22
23
24
25
26
27
28
29
30
31
32
33
34
35
const { useState } = React;

const Todo = (props) => {
  return (
    <li>{props.task.title}</li>
  )
}

const App = () => {
  const [tasks, setTasks] = useState([
    {
      title: "Do something"
    },
    {
      title: "Do something else"
    },
    {
      title: "Etc..."
    }
  ]);

  return (
    <ul>
      {tasks.map((task, index) => (
        <Todo
          task={task}
          index={index}
          key={index}
        />
      ))}
    </ul>
  );
};

ReactDOM.render(<App />, document.getElementById("app"));
This codepen is titled Render li elements from an array of objects using useState in React.
An example of updating a value from an input element using the useState hook
In this example, we’ll react to a user typing into the input form element. Whatever the user types in, we’ll show in the heading above.
Here’s our starting JSX code.
1
2
3
4
5
6
7
8
9
10
11
12
13
14
15
16
17
18
19
const { useState } = React;

const App = () => {
  const userData = () => {
    setEntered('You clicked the "update" button');
  }
  const [entry, setEntry] = useState("");
  const [entered, setEntered] = useState('Please type into the input');

  return (
    <div className="box">
      <h1>{entered}</h1>
      <input type="text" onChange={userData} />
      <button onClick={userData}>Update</button>
    </div>
  );
};

ReactDOM.render(<App />, document.getElementById("app"));
Here’s what’s happening in the code above:
- We have a
userDatamethod, which updates the value of theenteredstate variable. - We have two state variables:
entryandentered. The former is the new value that’s being submitted to the input, and the latter is the previous string. That’s why theentryis set to an empty string and theenteredis set to “Please type into the input”. - We’re returning some HTML where we have an input listening to an
onChangeevent triggering. Whenever this event happens, we’re running theuserData. - Similarly, we’re running the
userDatamethod whenever there’s a click on thebuttonelement.
That’s a pretty good start. What we need to do now is dynamically update the h1 element based on what the user has typed in.
That means we’ll need to update the userData method to this:
1
2
3
4
const userData = (event) => {
    event.preventDefault();
    setEntered(event.target.value);
}
Great, our h1 is getting dynamically updated to whatever the user is typing into the input!
However, if the user clicked the “Update” button, the h1 text becomes an empty string.
We need to fix this little bug as well.
It’s easy as pie:
1
2
3
4
5
6
const userData = (event) => {
    event.preventDefault();
    if(event.target.value != "") {
    setEntered(event.target.value);
    }
}
We’re checking for the value on the target of the event being an empty string. If it’s not an empty string, we’ll go ahead and update the h1 with the typed text. Otherwise, we won’t do anything.
Here’s the complete JSX code for this code snippet:
1
2
3
4
5
6
7
8
9
10
11
12
13
14
15
16
17
18
19
20
21
22
const { useState } = React;

const App = () => {
  const userData = (event) => {
      event.preventDefault();
      if(event.target.value != "") {
        setEntered(event.target.value);
      }
  }
  const [entry, setEntry] = useState("");
  const [entered, setEntered] = useState('Please type into the input');

  return (
    <div className="box">
      <h1>{entered}</h1>
      <input type="text" onChange={userData} />
      <button onClick={userData}>Update</button>
    </div>
  );
};

ReactDOM.render(<App />, document.getElementById("app"));
This codepen is titled Display the user-typed strings on the screen, using useState in React.
While there are more things we can do to improve the above snipet, it’s good enough for a very simple demo of how to do this in React, with the useState hook, in as simple a way as possible.
This snippet (and some other snippets from this chapter) will help us when we build the todo app in the next chapter.

