HTML and CSS Basics, part 10: CSS selectors and CSS targeting revisited
Understand the most commonly used selectors, and the place of CSS specificity in CSS targeting
By: Ajdin Imsirovic 17 September 2019
This series of posts is titled HTML and CSS Basics. If you’re just starting out with web development, it is crucial to read and understand this series of posts.
This is the tenth post in this series of articles.
In the previous post in this series, we looked at floats. In this post, we’ll cover the most common use cases of CSS selectors and understand CSS specificity in detail.
We’ll start with specificity.
CSS Specificity
CSS specificity is a way for the browser to determine which CSS declarations to apply when it comes across ambiguous syntax.
In other words, it’s a way for the browser to decide which styles to apply when there is more than a single CSS declaration for the same element(s) on the page.
Let’s see an example.
In this example, we have the following HTML structure:
1
2
3
4
5
6
7
8
9
10
11
<h1>h1: CSS selectors (CSS targeting) pt1 - simple targeting</h1>

<div>div: An HTML element.</div>
<div class="someClass">div.someClass: An HTML element with a class attribute.</div>
<div id="someId">div.someId: An HTML element with an ID attribute.</div>

<section>
  <div>section div: An HTML element.</div>
  <div class="someClass">section div.someClass: An HTML element with a class attribute.</div>
  <div id="someId">section div#someId: An HTML element with an ID attribute.</div>
</section>
As we can see above, we have an <h1>, followed by a plain <div>, then another <div> with a class attribute of someClass, then another <div> with an id attribute of someId, and then we have a similar structure repeated, sans the <h1> tag, only this time it is wrapped in a <section> element.
Here’s the CSS:
1
2
3
4
5
* { font-family: Arial }
div { color: red }
div.someClass { color: blue }
div#someId { color: green }
h1 { font-size: 20px }
The above code results in the following output:
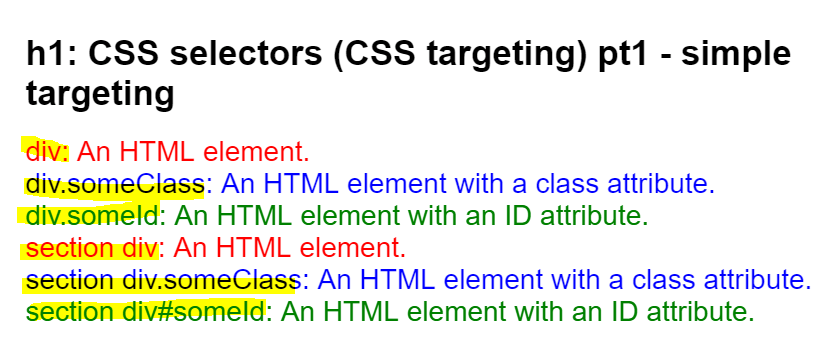
We’re also printing the selector right onto the page, so it’s easier to understand what CSS selector affects an element without having to refer to the code. Likewise, note that the yellow highlight does not come from CSS - we’ve added it to the image so it’s easier to see the selectors applied to each line.
Let’s now analyze the process by which the browser ended up with the above web page render.
CSS specificity rules
Looking at the code above, and its result in the browser, we can see the several rules in action:
- the universal selector,
*, applies when no other selector wants to apply the styles to an element; in our case, no other selector is applying the styles to thefont-familyCSS property - an element selector will apply on an element without the class or id attribute (the red text on the
div {...}selector) - a class selector will override an element selector (the blue text on the
div.someClassselector) - an id selector will override a class selector (the green text on the
div#someIdselector) - adding the
!importantflag on a style will override all the other styles. We say that!importanthas the greatest specificity
To better understand how the browser gives weight to each selector, we can assign “weight” to each one.
- the universal selector,
*, has the weight of 0-0-0 - an element selector has the weight of 0-0-1; thus, two elements, such as the
section divselector, will have the weight of 0-0-2 - a class selector is worth 0-1-0, and an id selector is worth 1-0-0
- the inline
styleHTML attibute is worth 1-0-0-0, and - the
!importantflag is worth 1-0-0-0-0-0
There is a great visual explanation of CSS specificity, using ocean life as a metaphor to illustrate the weights better. It’s called CSS SpeciFishity; feel free to check it out. It wouldn’t hurt even printing it out and sticking it on a wall close to your desktop computer.
Now that we understand the basics of CSS specificity, we still need to discuss the different kinds of selectors we have available.
There are lots of them!
To keep things practical, we’ll apply the 80-20 rule. We’ll cover only the 20% of all selectors that are used in over 80% of all layouts.
After all, this series of posts is titled “HTML and CSS basics”. It’s too early to talk about exotic animals such as this:
* + * {
    /*
    the above selector
    is lovingly called the
    "lobotomized owl"
    selector
    */
}
So, in this post we’ll cover only the most useful CSS selectors to get you up to speed quickly, and fully ready to build layouts.
In another post - not in this series of articles - we’ll cover all the CSS selectors.
The most commonly used CSS selectors
Here’s the list of the most commonly used CSS selectors:
- The universal (“wildcard”) selector:
* - The class selector (and the combined class selector)
- The descendant class selector (or less commonly, just the descendant selector)
- The element selector
- The id selector (not used as much as it used to be)
- The immediate child selector
- The
:hover-*pseudo-class - The
::beforeand::afterpseudo-elements
Let’s look at examples of each of these selectors.
The universal selector, *
We’ve already discussed the universal selector in this article. It’s best suited for setting up a style that’s gonna be used throughout a layout, such as what we saw in the earlier example when we used it to change the default font in the browser from “Times New Roman” to “Arial”.
* { font-family: Arial, sans-serif }
The class selector
The class selector is easy enough. Let’s say you have a <div> element with some text inside:
<div>Some text inside.</div>
To add a class selector, we first need to add a class HTML attribute to the above <div>. In other words, we’ll update the code above to this:
<div class="">Some text inside</div>
We’ve now set up our HTML class attribute, but we still haven’t added it a value. Let’s correct that mistake, and add our HTML class attribute the value of large-text:
<div class="large-text">Some text inside</div>
That’s it for the HTML! We’ve set it up, and now we can use the class selector in the CSS.
To begin, we add the ., and follow it up with the value we gave to our HTML class attribute, i.e this:
.large-text {

}
We can add any number of CSS property: value pairs inside the curly brackets.
However, the code should reflect the class name that holds it, so lets make it look like this:
.large-text {
  font-size: 30px;
}
This setup now works perfectly. Whenever the browser sees any HTML tag with the class of large-text, it will apply the CSS declaration of font-size: 30px; from the specified CSS class of .large-text. The only time when this code will not be applied is if there’s a competing CSS selector with greater specificity that will override the above code.
However, there’s an important caveat here: even if there is a selector with greater specificity, it will only override the font-size property and its value, if it is set inside the selector with this greater specificity.
Another important thing to note here: The HTML class attribute can hold more than one value. We’ll see how that works next.
Grouped class selectors
The grouped class selector is a scenario in which we have more than one class specified in the css.
To begin, let’s look at CSS code with 2 class selectors specified:
.box {
  width: 100px;
  height: 100px;
}
.important-text {
  font-size: 20px;
}
Next, let’s add a grouped css selector:
.box.important-text {
  background: orange;
}
What we’re doing above is this: we’re giving the background: orange CSS declaration to any HTML element that has both the box and the important-text classes applied at the same time, such as this:
<div class="box important-text">...</div>
As we can see above, to list more than one class value in HTML, we just separate class names with the space character.
The descendant class selector
The descendant class selector finds all the elements that are nested inside a specific element. Obviously, the nested elements also need to have the specified class.
Let’s say we have a wrapping <div> and inside of it we have three <p> tags. One of those <p> tags also has a class attribute with the value of red-border. Here’s the HTML code:
<div>
  <p>The first paragraph.</p>
  <p>The second paragraph.</p>
  <p class="red-border">The third paragraph.</p>
</div>
Here’s the CSS in which we’re using the descendant class selector:
div p.red-border {
  border: 1px solid red;
}
We can read the above CSS selector as follows: “Find all the <p> tags that have the class attribute of red-border, AND that are wrapped inside a <div> element”.
The immediate giveaway of a descendant selector is that it has a space character between elements or classes in the code. This space character can be read as “inside”.
Let’s look at how we’ll read these example descendant selectors:
div div {...}: targets anydivinside adivdiv.border-red div {...}: targets any div inside adiv(if that wrappingdivhas theclassofborder-red)div.border-red div.border-green {...}: targets all thedivelements that have theclassofborder-greenand that are wrapped by adivthat has theclassofborder-red.box .border-red {...}: targets all elements with theclassofborder-redthat are wrapped by any element with theboxclass.box .border-red .background-yellow {...}: targets all elements with theclassofbackground-yellowthat are wrapped by elements with theclassofborder-red, that are in turn, wrapped by elements with theclassofbox
Descendant selectors, and especially descendant class selectors, are very common in practice.
One thing that often trips up newbies, is that the descendant selector does not have to refer to the direct child of the wrapping parent element. It can be any element, regardless of how many levels deep it is, as long as it is wrapped by the specified parent element or class.
The element selector
The element selector refers to specific elements, such as, for example:
pin CSS for<p>in HTMLsectionin CSS for<section>in HTMLbuttonin CSS for<button>in HTML- …and so on
Interestingly, you can combine multiple element selectors (such as those listed above), with the descendant selector (the space character), and get a selector that looks, for example, like this:
body div p span {
  font-size: 14px;
}
The above CSS selector will target any <span> inside any <p> inside any <div> inside the <body> element, and set this <span> element’s property of font-size the value of 14px. Of course, that is the case only if another, more specific style does not override the font-size property on any of these matching <span> selectors, for example like this:
body div p span#someId {
  font-size: 16px;
}
The above CSS selector will, just like the previous one, select any <span>, inside any <p>, inside any <div>, inside the <body> element, with the condition that the <span> element must also have the HTML id attribute set to someId. If we’re correctly formatting our code, that should affect only a single <span> element since the HTML id attribute with a specific value should be given only to a single element on any one web page.
This brings us to the id selector.
The id selector
The id selector has pretty much already been described. Let’s reiterate to strenghten our understanding:
- There should be only one id selector of a certain value on the page
- In other words, you can have as many id selectors on the page as you like, as long as they are unique
- The id selector is much more specific than either the class selector, or the element selector
- Because of its uniqueness, the id selector was used as a JavaScript hook in earlier years; some people still do this - it’s a good thing to be aware of
The immediate child selector
Newbies often confuse the immediate child selector and the descendant selector.
Let’s first look at an example descendant selector for comparison’s sake:
body div {
  font-family: monospace;
}
The above descendant selector will match all the <div> elements that sit inside the <body> element, regardless of how many levels deep any specific <div> is nested.
Let’s convert the above code to a immediate child selector:
body > div {
  font-family: monospace;
}
This selector will match only those <div> elements that sit on the first level of nesting inside the <body> element. In other words, here’s the HTML structure that shows what <div> elements will be affected using the above immediate child selector:
<body>
  <div>will match
    <div>won't match</div>
    <div>won't match
      <div>won't match</div>
    </div>
  </div>
  <div>will match
    <div>won't match</div>
  </div>
</body>
If you understand the code above, you’re ready to use the immediate child selector.
Let’s now practice some slightly more complex selectors. After that we’ll come back to cover the pseudo-classes and pseudo-selectors.
Practicing slightly more complex selectors
To practice using the above-listed selectors, we’ll look at another example.
Our next example’s HTML is similar to the previous one:
1
2
3
4
5
6
7
8
9
10
11
12
13
14
15
<h1>CSS selectors (CSS targeting) pt2 - complex targeting and CSS specificity</h1>

<div>An HTML element.</div>
<div class="someClass">An HTML element with a class attribute.</div>
<div id="someId">An HTML element with an ID attribute.</div>

<section>
  <div>An HTML element.</div>
  <div class="someClass">An HTML element with a class attribute.</div>
  <div id="someId">
    <div>
      An HTML element with an ID <span>attribute</span>.
    </div>
  </div>
</section>
The biggest changes have been made to the CSS:
1
2
3
4
5
6
7
8
9
10
11
12
13
14
15
16
17
18
19
* { font-family: Arial }
h1 { font-size: 20px }
div { color: red }
div.someClass { color: blue }
div#someId { color: green }

section div { color: tomato }
section div.someClass { font-family: Courier }
section div#someId { font-weight: bold }

section div#someId div span {
  color: purple;
  text-decoration: underline;
  font-size: 24px;
}
section span {
  font-family: "Times New Roman";
  color: gray;
}
As we can see above, we’ve used several of the listed most frequently used selectors in our CSS code:
- on line 7 of the above CSS code, we see a descendant selector targeting two elements
- on line 8 we are targeting a class selector named
someClass, when it is a descendant of the<section>element - one line 9 we have another example of a descendant selector
- on line 11 we have multiple descendant selectors with an id sprinkled in
Before we can wrap this article up, we need to discuss pseudo-classes and pseudo-selectors.
Pseudo-classes in CSS
A pseudo-class describes how a selector should look when in a special state.
The most common special state for any element is its hover state, and thus the pseudo-class of :hover is most commonly used.
Consider this example.
The example is titled CSS selectors (CSS targeting) pt 3 - pseudo-classes.
This example is almost identical to the CSS selectors pt2 - the example from the previous section of this article.
The only difference is that now we’ve added the :hover pseudo-class to the body element selector, like this:
body:hover { background: cornsilk }
This simple pseudo-class is the basic mechanism behind many buttons, image effects, and links effects in almost every web page today.
There are many, many more pseudo-classes in CSS. You can find the comprehensive list over at Mozila Developers Network.
There’s no need to understand or even be aware of at least half of the CSS pseudo-classes from the above list. However, it is important to just understand the sheer number of them, and as you learn more, look out for examples of them popping up in source code either at your work or in open-source projects.
Here are the more important ones to tackle - once you’ve completed this series on the basics of HTML and CSS:
- the
:first-child, - the
:first-of-type, - the
:last-child, - the
:last-of-type, - the
:not(), - the
:nth-child(), - the
:nth-last-child(), - the
:nth-last-of-type(), - the
:nth-of-type()
The ::before and ::after pseudo elements
Did you know that you can build a completely new element right from your CSS?
It’s not really as magical as it sounds, and it’s actually relatively limited.
The following conditions need to be met:
- you can only attach either one or two children elements to an existing element,
- these elements can be the first child (in that case, it’s the
::beforepseudo element), or the last child (the::afterpseudo element) to the already-existing element in the HTML
Let’s look at an example of using pseudo elements.
Here’s our example’s HTML code:
1
2
3
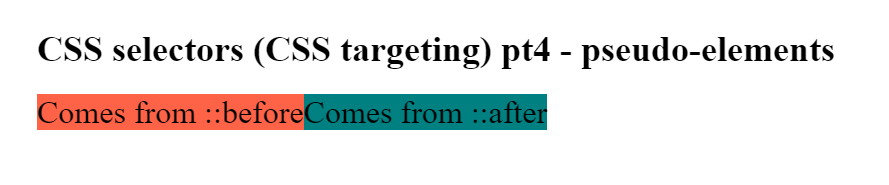
<h1>CSS selectors (CSS targeting) pt4 - pseudo-elements</h1>
<div></div>
The beauty of the ::before and ::after pseudo-elements lies in the fact that we can now “decorate” even this empty <div>, from our css, like this:
div::before {
  content: "Comes from ::before";
  background: tomato;
}

div::after {
  content: "Comes from ::after";
  background: teal;
}
Here’s the result in the browser:
There are many use cases for the ::before and ::after pseudo-elements.
Arguably, one of the most-frequent use cases is the clearfix, which we’ve covered in the previous post in this series. Now you know what the strange-looking code in the clearfix CSS class is: it’s the pseudo-element.
The utility of pseudo-elements doesn’t end there! Just to understand how wild things can get, it might be worth looking at Yusugo Mori’s CSS sans font: A font made with the help of ::before and ::after pseudo-elements.
Use the below links to navigate through other tutorials in this guide.
< Back to part 9: Images and floats in CSS
You are here: Part 10, CSS selectors and CSS targeting revisited

