HTML and CSS Basics, part 3: CSS element selectors VS class selectors
Examples of styling block-level elements; CSS element selectors versus CSS class selectors
By: Ajdin Imsirovic 12 September 2019
This series of posts is titled HTML and CSS Basics. If you’re just starting out with web development, it is crucial to read and understand this series of posts.
This is the third post in this series.
Check out the list of articles in this series.
In this article, we’ll look at a few examples of block-level elements.
Video tutorial comparing CSS element selectors and CSS class selectors
If you prefer your tutorials in video format, I’ve recorded a video of things that I’m explaining in this article.
If the above video was useful to you, please make sure to like 👍 the above video and subscribe 🥰 to the CodingExercises Youtube channel.
In the rest of the article, you can follow the tutorial in text format, so that you can more easily:
- copy-paste code snippets
- click and review Codepen examples
Styling block-level elements
This article’s first codepen example is really simple. We have an <h1> element, followed by a <div>.
As we’ve already learned, both the <h1> and the <div> are examples of block-level elements.
Inside this <div> there is a nested <span> element (an inline element). Once this wrapping div is closed, we have two paragraph elements (two <p> elements), followed by another wrapping <div>, inside of which there is another <p> tag and another <div>.
The reason why I’m showing you exactly this HTML structure in the example is because in the CSS side, we have three element selectors:
- an
h1element selector - a
divelement selector, and - a
pelement selector
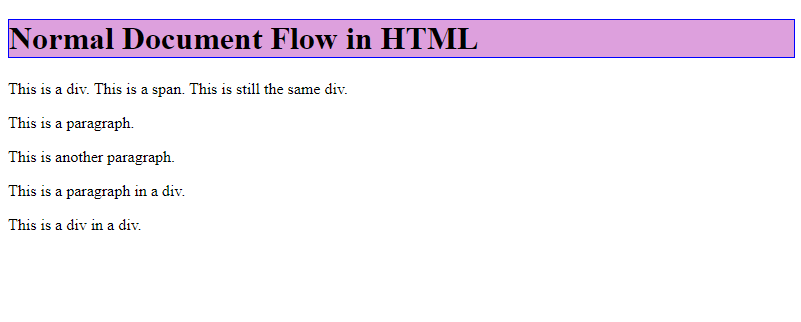
Once you open the example codepen, you’ll see the initial look of the example:
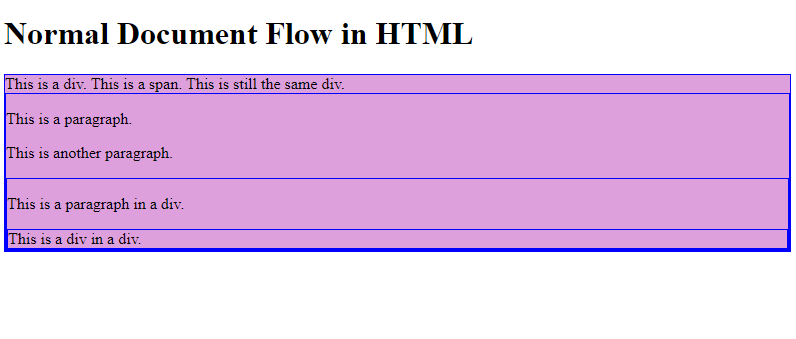
Next, if you uncomment the div selector, i.e if you erase the two // characters from the beginning of the line, and apply the two // inline comment characters to the h1 selector, you’ll get the following look:
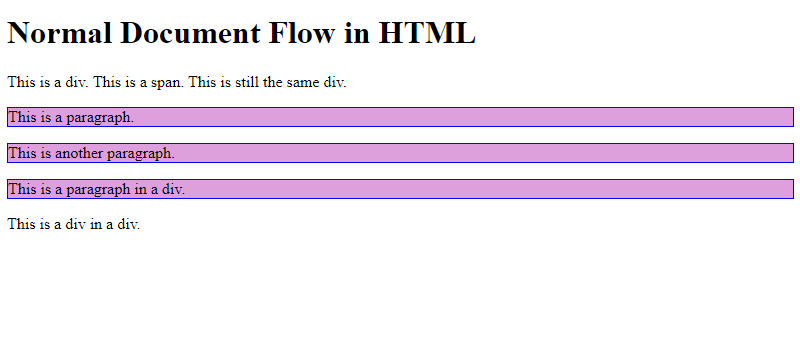
Finally, if you commented out the top two selectors and uncommented the selector for the p element, you’ll get this look:
Next, let’s look at another codepen and see how we can use CSS classes to style our HTML elements.
Styling block-level elements with CSS classes
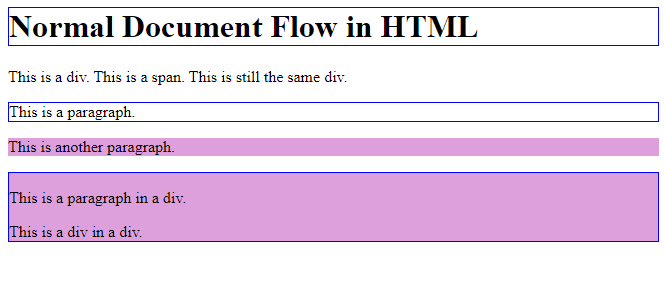
The second codepen example is very similar to the first one. The difference is that now we are using CSS class selectors rather than elements selectors.
Here’s the updated HTML of the second example:
1
2
3
4
5
6
7
8
9
10
11
12
<h1 class="border1">Normal Document Flow in HTML</h1>
<div>This is a div.
  <span> This is a span.</span>
  This is still the same div.
<div>

<p class="border1">This is a paragraph.</p>
<p class="plum">This is another paragraph.</p>
<div class="border1 plum">
  <p>This is a paragraph in a div.</p>
  <div>This is a div in a div.</div>
</div>
And here’s the CSS:
1
2
.plum { background: plum }
.border1 { border: 1px solid blue }
What’s the difference?
The difference between the first and the second Codepen example
Contrary to the CSS element selectors, which target specific HTML elements, a CSS class selector targets a matching value that sits inside a class attribute of any HTML element.
What this means is that now we can simply add a certain value to our HTML’s class attribute. Let’s say the value is a string called: bold.
Now we can simply define a CSS declaration of .bold, like this:
.bold {
  font-weight: bold
}
In our codepen example code, we’ve added two CSS classes: plum, and border1. The . (the dot character) before the class name is a sign that whatever follows in the CSS file is a CSS class.
What’s the benefit of using CSS classes instead of CSS element selectors
There are at least 2 major benefits to using CSS classes over CSS element selectors:
- We can mix and match CSS classes on any element
- We can chain multiple CSS classes on the same element
In general, we can mix and match our CSS classes on whatever HTML element we want.
In our second example codepen, to toggle the border on an element, we just add or remove the value of border1 to the HTML element’s class attribute.
Want to add two CSS classes to the same HTML element? No problem, just chain them like this:
<div class="plum border1">...</div>
Conclusions
HTML conclusions:
- We can add a class attribute to any HTML tag.
- Using class attributes in HTML is just a different way of tagging text on our web page.
- Now any of our elements can have some additional information, provided in a class.
- We can provide as many class names as we want to our class attribute. Just remember to separate class names with a space!
CSS conclusions:
- To tell to CSS that we’re targeting a class attribute in an HTML element, we need to put a dot in front of a class name.
- We follow it up with the actual class name.
- Here’s the formula:
.classname { property: value; property: value; .... } - We can stick to only 1
property: valueper class:.classname { property: value } - Or we can add as many
property: valuepairs as we like:.classname { property: value; property: value; property: value }
That’s it for this article. In the fourth article in this series, we’ll discuss controlling document flow via display property.
Use the below buttons to navigate through other tutorials in this tutorial series.
Use the below links to navigate through other tutorials in this guide.
< Back to part 2: normal document flow
You are here: Part 3, CSS element selectors VS class selectors

