HTML and CSS Basics, part 5: block vs inline elements
Further exploration of the CSS display property, block-level, and inline elements
By: Ajdin Imsirovic 13 September 2019
This series of posts is titled HTML and CSS Basics. If you’re just starting out with web development, it is crucial to read and understand this series of posts.
This is the fifth post in this series of articles.
In this article, we’ll continue exploring the CSS display property and how it affects the document flow. We’ll begin by seeing that we can omit adding our custom CSS classes if the style described in that class is the default style of an element. We’ll also see how to override the default behavior of the <span> element. By default, the <span> element is an inline element, but we’ll change it to display as a block-level element - that is, we’ll make it behave just like a <div> or an <h1> behaves by default. Let’s start!
Video tutorial on CSS display property, and block and inline elements
In this video, we’ll alter the display property on HTML elements.
If you like 👍 the video, please hit that like button. Also, please consider subscribing 🥰 to the CodingExercises Youtube channel. It doesn’t cost you anything and it will further improve the channel and this website.
When it’s reasonable not to add a CSS class?
This is probably obvious, but maybe it’s still worth mentioning: you don’t have to add a CSS class if you want the default browser styles to be displayed. In other words, if you’re happy with how some elements are displayed on your page, then you don’t have to add custom CSS classes that override that default behavior.
Let’s look at an example that demonstrates this.
The first example looks like this:
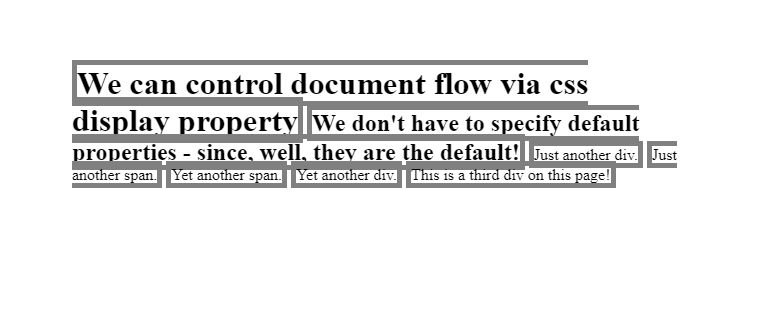
Here’s the HTML from the above example:
<h1 class="border1 display-inline">We can control document flow via css display property</h1>
<h2 class="border1 display-inline">We don't have to specify default properties - since, well, they are the default!</h2>
<div class="border1 display-inline">Just another div.</div>
<span class="border1">Just another span.</span>
<span class="border1">Yet another span.</span>
<div class="border1 display-inline">Yet another div.</div>
<div class="border1 display-inline">This is a third div on this page!</div>
As we can see, the above code is very similar to the example from the previous post:
1
2
3
4
5
6
<h1 class="border1 display-inline">We can control document flow via css display property</h1>
<div class="border1 display-inline">Just another div.</div>
<span class="border1 display-inline">Just another span.</span>
<span class="border1 display-inline">Yet another span.</span>
<div class="border1 display-inline">Yet another div.</div>
<div class="border1 display-inline">This is a third div on this page!</div>
Actually, the resulting web page in both code examples looks exactly the same! So where’s the difference?
Comparing the two code examples, we can see that in the current one, we’re choosing not to apply the display-inline class, since the <span> element comes with the display property set to inline by default.
Note that this updated example has the exact same CSS as the previous one.
In the next example, we’ll keep the default behavior on all the block-level elements, and we’ll only override the <span> elements.
Setting <span> elements to display: block
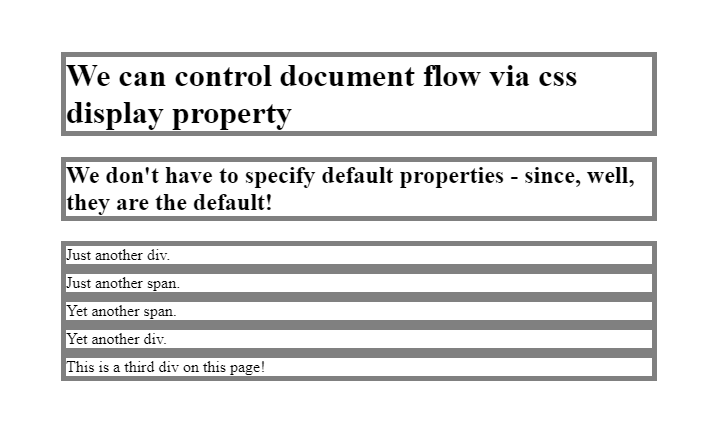
Here’s the HTML for the second example in this article.
1
2
3
4
5
6
7
<h1 class="border1 ">We can control document flow via css display property</h1>
<h2 class="border1 ">We don't have to specify default properties - since, well, they are the default!</h2>
<div class="border1 ">Just another div.</div>
<span class="border1 display-block">Just another span.</span>
<span class="border1 display-block">Yet another span.</span>
<div class="border1 ">Yet another div.</div>
<div class="border1 ">This is a third div on this page!</div>
And here’s the CSS:
1
2
.border1 { border: 5px solid gray }
.display-block { display: block }
In this example all the elements are styled as block elements, even though we have two <span> elements on the page. All it took was to add the property: value pair of display: block to our display-block class attribute name.
Here we can see the result of the above code:
Are elements on our page going to behave like block-level or inline elements?
We have complete control over that.
Consider this codepen’s HTML:
1
2
3
4
5
6
7
<h1 class="border1 display-inline">We can control document flow via css display property</h1>
<h2 class="border1 display-inline">We don't have to specify default properties - since, well, they are the default!</h2>
<div class="border1 display-inline">Just another div.</div>
<span class="border2 display-block">Just another span.</span>
<span class="border2 display-block">Yet another span.</span>
<div class="border1 display-inline">Yet another div.</div>
<div class="border1 display-inline">This is a third div on this page!</div>
This is the CSS for the above HTML:
1
2
3
4
.border1 { border: 5px solid gray }
.border2 { border: 5px solid tomato }
.display-block { display: block }
.display-inline { display: inline }
Are elements on our pages going to behave like block-level or like inline elements? We have complete control over that!
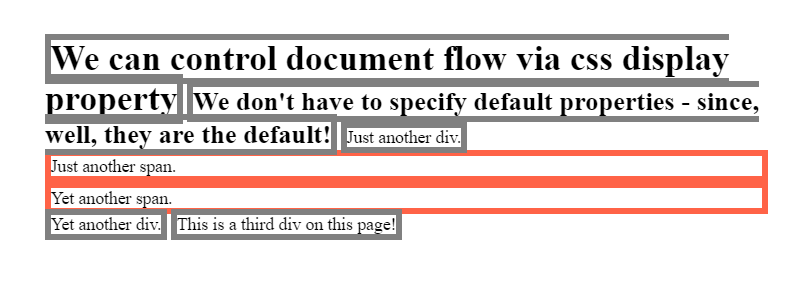
Whatever CSS class we give our elements, that’s how they’ll behave! Here we gave the .border2 class to our <span> elements so that it’s obvious that they’re stretching the full width of the available screen space.
Flipping the behavior of inline and block-level elements
In the next codepen example we’ll show here, we’ll be playing with the inline and block-level display CSS property.
Basically, we’ll switch the behavior of all our elements: those that are inline will become block-level, and those that are block-level, will become inline.
Since the only inline elements we have in our code example are two <span> elements, these two elements are the only elements we’ll force to behave like block elements. All the other elements on the page are, by default, block elements, so we’ll give them all a class of display-inline to make them behave like inline elements.
Here’s our example’s HTML:
1
2
3
4
5
6
7
<h1 class="border1 display-inline">We can control document flow via css display property</h1>
<h2 class="border1 display-inline">We don't have to specify default properties - since, well, they are the default!</h2>
<div class="border1 display-inline">Just another div.</div>
<span class="border2 display-block">Just another span.</span>
<span class="border2 display-block">Yet another span.</span>
<div class="border1 display-inline">Yet another div.</div>
<div class="border1 display-inline">This is a third div on this page!</div>
The CSS just defines the four classes:
1
2
3
4
.border1 { border: 5px solid gray }
.border2 { border: 5px solid tomato }
.display-block { display: block }
.display-inline { display: inline }
The resulting web page looks like this:
Conclusions
- Are elements on our pages going to behave like block-level or like inline elements? We have complete control over that!
- Whatever CSS class we give our elements, that’s how they’ll behave!
- Here we gave the
.border2` class to our span elements so that it’s obvious that they’re stretching the full width of the available screen space.
Use the below links to navigate through other tutorials in this guide.
< Back to part 4: Controlling document flow via display property
You are here: Part 5, Block VS inline elements

