Rebuilding a Bootstrap 4 pricing example layout in Angular 8
Build a full pricing example layout with ngx-bootstrap in Angular 8 on Stackblitz
By: Ajdin Imsirovic 04 September 2019
As we saw in the previous post, adding a Bootstrap 4 layout in Angular 8 is easy and straightforward.
Just like with most of the examples here on codingexercises, we’ll begin with the completed layout on Stackblitz so that you have an idea of what we’ll be building.
Get started building a pricing table
 Photo by Марьян Блан, @marjan_blan on Unsplash
The plain Bootstrap 4 example layout we’ll be adding to Angular 8 can be found at this link on the official Bootstrap 4 docs.
As before, we start by diving the layout into separate, logical building blocks:
- header (navigation)
- pricing header
- pricing cards
- footer
Furthermore, if we inspect the HTML structure of the example pricing layout, we’ll see that the cards and the footer are grouped inside a wrapping container div.
As we’ve seen in the previous post, we can be quicker in our development if we follow a recipe. In this case, I’m specifically referring to the component-building recipe.
One step that is omitted from the recipe is that we already have ngx-bootstrap and Boostrap 4 styles added to our app.
Thus, the initial commit for the barebones app can be found in the initial commit, and the commit that adds the ngx-bootstrap dependency and imports the Bootstrap 4 styles from a CDN can be found here.
Now that we have an idea of the requirements and that we’ve added all the pre-requisites, let’s start ticking off steps from the recipe!
1. Adding the components’ files and folders
The first step listed in the recipe directions was to add the component files and folders, so let’s do that now.
We’ll separate each building block of the pricing table example layout into its own component:
app/
├── navigation/
│   ├── navigation.component.html
│   └── navigation.component.ts
├── pricing-header/
│   ├── pricing-header.component.html
│   └── pricing-header.component.ts
├── pricing-cards/
│   ├── pricing-cards.component.html
│   └── pricing-cards.component.ts
├── footer/
│   ├── footer.component.html
│   └── footer.component.ts
├── ...
Next, we’ll add the same code to all Typescript files, except for the referenced selector entries, template urls, and the exported class names:
1
2
3
4
5
6
7
import { Component } from '@angular/core';

@Component({
    selector: 'the-navigation',
    template: './navigation.component.html'
})
export class NavigationComponent { }
Now we can add the HTML to the template files. At this stage, we only want to make sure that everything is hooked up properly, so we’ll be adding a one line of HTML to each of the template files:
<div>it works!</div>
Note that we’ll be replacing the word “it” with the appropriate component folder name, such as: navigation, pricing-header, etc.
We also need to find a home for all these new components. In other words, a module that will list them in its declarations array. Since we only have one module, they’ll all be listed there, in app.module.ts:
// ...code skipped for brevity...
import { NavigationComponent } from './navigation/navigation.component';
import { PricingHeaderComponent } from './pricing-header/pricing-header.component';
import { PricingCardsComponent } from './pricing-cards/pricing-cards.component';
import { FooterComponent } from './footer/footer.component';
// ...code skipped for brevity...
declarations: [
  AppComponent,
  HelloComponent,
  NavigationComponent,
  PricingHeaderComponent,
  PricingCardsComponent,
  FooterComponent
],
Now that we’ve found a home module for our new components, we can use them anywhere inside the module. Specifically, that means app.component.html, and we’ll add them as custom HTML tags, as follows:
1
2
3
4
<the-navigation></the-navigation>
<pricing-header></pricing-header>
<pricing-cards></pricing-cards>
<the-footer></the-footer>
Once we’ve saved all these changes, our app is now beginning to take shape, and we can focus on adding the correct HTML code to each template file.
Here’s a screenshot of the app at this point:
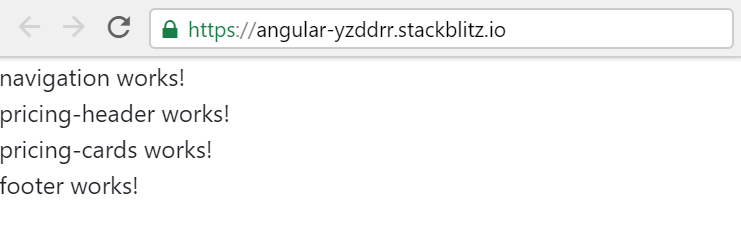
If you’d like to compare your code with the source code at this point, have a look at this commit.
2. Adding the navigation template code
Now it’s just a matter of copy-pasting the appropriate sections of the example layout. We’ll start with the navigation:
1
2
3
4
5
6
7
8
9
10
<div class="d-flex flex-column flex-md-row align-items-center p-3 px-md-4 mb-3 bg-white border-bottom shadow-sm">
  <h5 class="my-0 mr-md-auto font-weight-normal">Company name</h5>
  <nav class="my-2 my-md-0 mr-md-3">
    <a class="p-2 text-dark" href="#">Features</a>
    <a class="p-2 text-dark" href="#">Enterprise</a>
    <a class="p-2 text-dark" href="#">Support</a>
    <a class="p-2 text-dark" href="#">Pricing</a>
  </nav>
  <a class="btn btn-outline-primary" href="#">Sign up</a>
</div>
One of the benefits of working with Bootstrap is the fact that we sometimes don’t even have to touch any CSS to make a nice-looking, fully responsive layout. One such example is here. After adding the above code, our layout now looks like this:
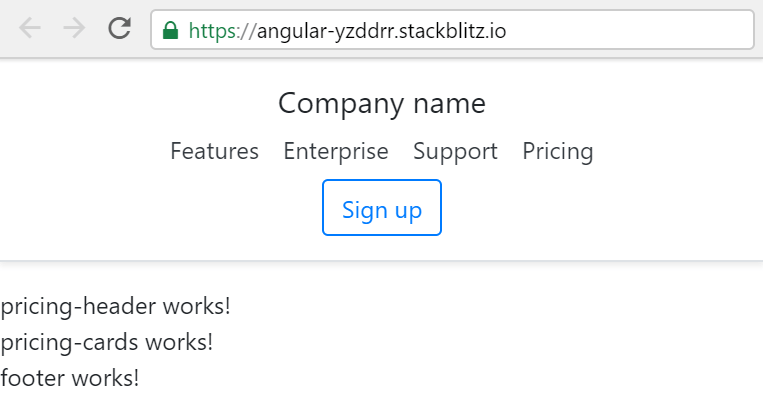
The commit for the navigation update is here.
Adding the pricing header, pricing cards, and the footer area
Next, we’ll add the pricing header:
1
2
3
4
<div class="pricing-header px-3 py-3 pt-md-5 pb-md-4 mx-auto text-center">
  <h1 class="display-4">Pricing</h1>
  <p class="lead">Quickly build an effective pricing table for your potential customers with this Bootstrap example. It’s built with default Bootstrap components and utilities with little customization.</p>
</div>
We’ll follow it up with copy-pasting the code for the pricing cards:
1
2
3
4
5
6
7
8
9
10
11
12
13
14
15
16
17
18
19
20
21
22
23
24
25
26
27
28
29
30
31
32
33
34
35
36
37
38
39
40
41
42
43
44
45
46
47
<div class="card-deck mb-3 text-center">
    <div class="card mb-4 shadow-sm">
      <div class="card-header">
        <h4 class="my-0 font-weight-normal">Free</h4>
      </div>
      <div class="card-body">
        <h1 class="card-title pricing-card-title">$0 <small class="text-muted">/ mo</small></h1>
        <ul class="list-unstyled mt-3 mb-4">
          <li>10 users included</li>
          <li>2 GB of storage</li>
          <li>Email support</li>
          <li>Help center access</li>
        </ul>
        <button type="button" class="btn btn-lg btn-block btn-outline-primary">Sign up for free</button>
      </div>
    </div>
    <div class="card mb-4 shadow-sm">
      <div class="card-header">
        <h4 class="my-0 font-weight-normal">Pro</h4>
      </div>
      <div class="card-body">
        <h1 class="card-title pricing-card-title">$15 <small class="text-muted">/ mo</small></h1>
        <ul class="list-unstyled mt-3 mb-4">
          <li>20 users included</li>
          <li>10 GB of storage</li>
          <li>Priority email support</li>
          <li>Help center access</li>
        </ul>
        <button type="button" class="btn btn-lg btn-block btn-primary">Get started</button>
      </div>
    </div>
    <div class="card mb-4 shadow-sm">
      <div class="card-header">
        <h4 class="my-0 font-weight-normal">Enterprise</h4>
      </div>
      <div class="card-body">
        <h1 class="card-title pricing-card-title">$29 <small class="text-muted">/ mo</small></h1>
        <ul class="list-unstyled mt-3 mb-4">
          <li>30 users included</li>
          <li>15 GB of storage</li>
          <li>Phone and email support</li>
          <li>Help center access</li>
        </ul>
        <button type="button" class="btn btn-lg btn-block btn-primary">Contact us</button>
      </div>
    </div>
  </div>
Finally, we’ll add in our footer:
1
2
3
4
5
6
7
8
9
10
11
12
13
14
15
16
17
18
19
20
21
22
23
24
25
26
27
28
29
30
31
32
33
34
35
36
37
<footer class="pt-4 my-md-5 pt-md-5 border-top">
    <div class="row">
      <div class="col-12 col-md">
        <img class="mb-2" src="/docs/4.3/assets/brand/bootstrap-solid.svg" alt="" width="24" height="24">
        <small class="d-block mb-3 text-muted">© 2017-2019</small>
      </div>
      <div class="col-6 col-md">
        <h5>Features</h5>
        <ul class="list-unstyled text-small">
          <li><a class="text-muted" href="#">Cool stuff</a></li>
          <li><a class="text-muted" href="#">Random feature</a></li>
          <li><a class="text-muted" href="#">Team feature</a></li>
          <li><a class="text-muted" href="#">Stuff for developers</a></li>
          <li><a class="text-muted" href="#">Another one</a></li>
          <li><a class="text-muted" href="#">Last time</a></li>
        </ul>
      </div>
      <div class="col-6 col-md">
        <h5>Resources</h5>
        <ul class="list-unstyled text-small">
          <li><a class="text-muted" href="#">Resource</a></li>
          <li><a class="text-muted" href="#">Resource name</a></li>
          <li><a class="text-muted" href="#">Another resource</a></li>
          <li><a class="text-muted" href="#">Final resource</a></li>
        </ul>
      </div>
      <div class="col-6 col-md">
        <h5>About</h5>
        <ul class="list-unstyled text-small">
          <li><a class="text-muted" href="#">Team</a></li>
          <li><a class="text-muted" href="#">Locations</a></li>
          <li><a class="text-muted" href="#">Privacy</a></li>
          <li><a class="text-muted" href="#">Terms</a></li>
        </ul>
      </div>
    </div>
  </footer>
With these changes, we’re almost done porting the pricing list example layout from Bootstrap docs to an Angular 8 app.
There’s just one additional little thing to do: add a wrapping container div around the pricing cards and the footer. We’ll add this div inside app.component.html file, which should look like this after the update:
1
2
3
4
5
6
<the-navigation></the-navigation>
<pricing-header></pricing-header>
<div class="container">
  <pricing-cards></pricing-cards>
  <the-footer></the-footer>
</div>
That’s it! We’ve succesfully added the pricing example layout to an Angular 8 app on Stackblitz.
The full view of the completed layout can be found here, and the commit at this point of our layout development can be found here.

