Serving React from a CDN and running it without a build step
Let's use React without any local setup - we'll just include it via a CDN and immediately start using it
By: Ajdin Imsirovic 20 January 2022
In the previous article, we’ve learned how to build the simplest possible React app on our local machine. In this lesson, we’ll learn about making things even simpler, by serving React from a CDN.
Table of contents
- The quickest possible way to use React
- Challenge: Render three more headings
- What happened to the DOM?
- Some Conclusions
- Optimizing our simplest example’s code, the React way
- Introducing JSX
- Exercise: Find at least one interesting React Codepen
- Making our simplest app a bit more dynamic
- JSX combines HTML and JS, but also keeps them neatly separated
- Exercise: add your own dynamic JavaScript in JSX
The quickest possible way to use React
Here’s the quickest possible way to use React:
1
2
3
4
5
6
7
8
9
10
11
12
13
14
15
16
17
18
19
20
21
22
23
24
25
26
27
28
29
30
31
<!DOCTYPE html>
<html>
  <head>
    <meta charset="utf-8" />
    <title>React from CDN</title>
  </head>
  <body>
    <!-- Target container -->
    <div id="app"></div>

    <!-- React -->
    <script
        src="https://unpkg.com/react@17/umd/react.development.js"
    ></script>

    <!-- ReactDOM -->
    <script
        src="https://unpkg.com/react-dom@17/umd/react-dom.development.js"
    >
    </script>

    <!-- Our own custom React code -->
    <script>
        ReactDOM.render(
          React.createElement('h1', null, 'Hello world!'),
          document.getElementById('app')
        );
    </script>

  </body>
</html>
In the file above, we’ve just reimplemented the stripped-down starter app we ended up with in the previous chapter.
Here’s a codepen of the above code, titled The simplest React example.
In the above code, we’re using the ReactDOM and React objects, running methods on them to build the structure to be rendered on the screen.
Here’s a simplified “formula” (in pseudo-code):
1
ReactDOM.render(El, Target);
The El above is the element to render (in this case, an h1, built using React.createElement), and the Target is the DOM node into which we’re mounting the element.
Now we can build another node and load it into another div, as follows:
1
2
3
4
5
6
7
8
9
10
11
12
13
14
15
16
17
18
19
20
21
22
23
24
25
26
27
28
<head>
  <meta charset="utf-8" />
  <title>React from CDN</title>
</head>

<body>
  <!-- Target container -->
  <div id="app"></div>
  <div id="app2"></div>

  <!-- React -->
  <script src="https://unpkg.com/react@17/umd/react.development.js"></script>

  <!-- ReactDOM -->
  <script src="https://unpkg.com/react-dom@17/umd/react-dom.development.js">
  </script>

  <!-- Our own custom React code -->
  <script>
    ReactDOM.render(
      React.createElement('h1', null, 'Hello world!'),
      document.getElementById('app')
    );
    ReactDOM.render(
      React.createElement('h2', null, 'Hello again!'),
      document.getElementById('app2')
    )
  </script>
This second example can be found in codepen titled The simplest React example, revisited.
Challenge: Render three more headings
Now’s the time to practice! Let’s add three more headings. Feel free to give them any title you want.
Also, you don’t have to mount them in different “real” elements on the page. You can use that single div with the id of app that we started with in the first example.
Note: this might look a bit trickier than expected. Here’s why: If we ran React.createElement(...) to add, say, and h1, then ran React.createElement(...) to add, say, an h2, we’d end up with only an h2 because the second React.createElement() would override the first one.
This would result in only the h2 being rendered on the screen.
So what’s the solution?
One solution is to wrap all the subsequent React.createElement() calls into an outer React.createElement().
If you’re impatient to see a working solution, navigate to the codepen titled The simplest React example, practice.
Here’s the relevant part of the above codepen:
1
2
3
4
5
6
7
8
9
10
11
12
13
14
  <!-- Our own custom React code -->
  <script>
    ReactDOM.render(
      React.createElement(
        'div', null,
        React.createElement("h1", null, "Hello World!"),
        React.createElement("h2", null, "Hello again"),
        React.createElement("h3", null, "Hello yet again"),
        React.createElement("h4", null, "whatever"),
        React.createElement("h5", null, "I can do this all day"),
      ),
      document.getElementById('app')
    );
  </script>
The above code is formatted so that it’s made more obvious that the 'div', null are “separate” from all the nested React.createElement() calls.
Using this approach, we might render an entire DOM tree, but it would be a bit hard to read.
Still, let’s stick around just a bit longer at our current place, so that we can additionally render some CSS classes - just to get a feel for how it works in this approach.
We’ll add some styles to the head of our new example:
1
2
3
4
5
6
7
8
9
10
11
12
13
14
  <style>
    .purple {
      color: purple;
    }
    .eighty {
      font-size: 80px;
    }
    .seventy {
      font-size: 70px;
    }
    .fifty {
      font-size: 50px;
    }
  </style>
And now we can replace the null parameters with some CSS classes:
1
2
3
4
5
6
7
8
9
10
11
12
13
14
<!-- Our own custom React code -->
<script>
ReactDOM.render(
    React.createElement(
      'div', {className: "purple"},
      React.createElement("h1", {className: "eighty"}, "Hello World!"),
      React.createElement("h2", {className: "seventy"}, "Hello again"),
      React.createElement("h3", {className: "fifty"}, "Hello yet again"),
      React.createElement("h4", {className: "fifty"}, "whatever"),
      React.createElement("h5", {className: "fifty"}, "I can do this all day"),
    ),
    document.getElementById('app')
);
</script>
The above updates are available in a codepen titled The simplest React example, practice pt 2.
What happened to the DOM?
This is a good opportunity for us to discuss the curious case of “the DOM disappearance”.
Without going into too many details at this point, one of the effects of using the React library is that we’re no longer concerned with what’s happening with the DOM. For all intents and purposes, the DOM has dissapeared for us - precisely because we’re using React.
This shift in focus results in us not having to think about all the various ways of directly touching the DOM with vanilla JavaScript methods like insertBefore(), createElement(), appendChild(), etcetera.
Instead, we are free to think about React and its components, the data that comes in and how to render it. React uses virtual DOM to obey our more declareative instructions, and updates the actual DOM much more efficiently than what is likely to would be happening if we were doing it ourselves.
In other words, we just tell React what we want to happen on the screen, and we let React worry about how it’ll update the real DOM.
However, the DOM is not completely gone. If we really want to work with it, React does allow it - but it’s probably better to simply let it go.
Some Conclusions
So, what are the takeaways from this chapter?
- React works with the virtual DOM, and it auto-updates the real DOM (preferrably, we should never update the real DOM ourselves)
- React “injects” it’s code into an element in the real DOM (in our app, it was the
divwith theidofappandapp2) - and we have the ability to choose the element into which will inject this React-rendered code - Here’s a corollary to the previous point: we can inject multiple React instances into multiple “slots” (in multiple elements) in the DOM
- However, there’s always one top-level element, which then wraps other, nested elements. Think back to the example in which we rendered multiple headings and wrapped all of them into a single
div, then “injected” thatdivinto the<div id="app"></div>element. - The second parameter of the
React.createElementis reserved for HTML attributes. We can leave it asnullif there aren’t any, or specify it using the following example syntax:{className: "fifty"}. Note that we’re using theclassNamekeyword instead ofclass, since theclassis already a reserved keyword in JavaScript.
Optimizing our simplest example’s code, the React way
Let’s revisit the most recent example we had:
1
2
3
4
5
6
7
8
9
10
11
12
13
14
15
16
17
18
19
20
21
22
23
24
25
26
27
28
29
30
31
32
33
34
<head>
  <meta charset="utf-8" />
  <title>React from CDN</title>
  <style>
    .purple { color: purple; }
    .eighty { font-size: 80px; }
    .seventy { font-size: 70px; }
    .fifty { font-size: 50px; }
  </style>
</head>

<body>
  <!-- Target container -->
  <div id="app"></div>

  <!-- React --><!-- ReactDOM -->
  <script src="https://unpkg.com/react@17/umd/react.development.js"></script>
  <script src="https://unpkg.com/react-dom@17/umd/react-dom.development.js">
  </script>

  <!-- Our own custom React code -->
  <script>
    ReactDOM.render(
      React.createElement(
        'div', {className: "purple"},
          React.createElement("h1", {className: "eighty"}, "Hello World!"),
          React.createElement("h2", {className: "seventy"}, "Hello again"),
          React.createElement("h3", {className: "fifty"}, "Hello yet again"),
          React.createElement("h4", {className: "fifty"}, "whatever"),
          React.createElement("h5", {className: "fifty"}, "I can do this all day"),
      ),
      document.getElementById('app')
    );
  </script>
Let’s now use a React “invention” to make the above code easier to work with.
Introducing JSX
In the script above, we’ve replaced the rather “clumsy” way of adding components:
1
2
3
4
5
6
7
React.createElement(
'div', {className: "purple"},
React.createElement("h1", {className: "eighty"}, "Hello World!"),
React.createElement("h2", {className: "seventy"}, "Hello again"),
React.createElement("h3", {className: "fifty"}, "Hello yet again"),
React.createElement("h4", {className: "fifty"}, "whatever"),
React.createElement("h5", {className: "fifty"}, "I can do this all day"), )
… with a lot more approachable one:
1
2
3
4
5
6
7
8
9
10
11
12
13
14
<!-- Our own custom React code -->
<script>
  ReactDOM.render(
    <div class="purple">
      <h1 class="eighty">Hello World!</h1>
      <h2 class="seventy">Hello again</h2>
      <h3 class="fifty">Hello yet again</h3>
      <h4 class="fifty">Whatever</h4>
      <h5 class="fifty">I can do this all day</h5>
    </div>
    ,
    document.getElementById('app')
  );
</script>
Unfortunately, the above code doesn’t work.
That’s why the codepen for the above example is called The simplest React example, introducing JSX - broken without a transpile step.
JSX is indeed broken without a transpile step:
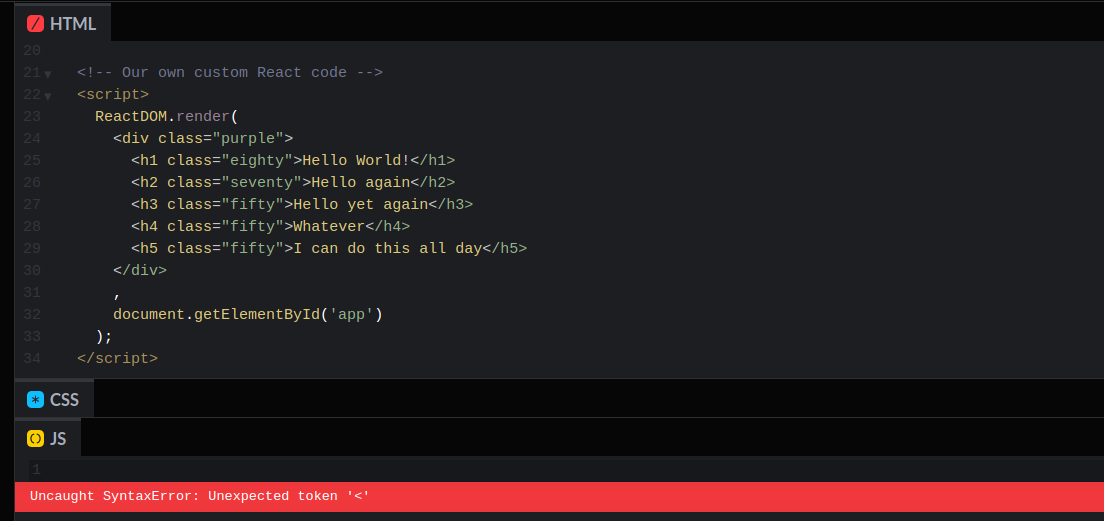
The reason for the error should be obvious: When the JS engine tries to parse this code:
1
2
3
4
5
ReactDOM.render(

  <div class="purple">
  ...
)
…as soon as it hits the opening angle bracket < character - it throws an error.
This brings us to the core of what JSX is: it is “HTML in JS” syntax - which is not regular syntax for any JS engine. For a JS engine, JSX is incomprehensible gibberish.
However, we can make it understandable by having a transpile step in our development process.
We’ll transpile our code using Babel.
Luckily, the Codepen platform comes with a built-in feature of JS preprocessor activation.
To activate Babel on Codepen, all we have to do is click the gear icon in the top-left of the JS panel, and then set up the transpilation step as can be seen on the following screen-shot.

So let’s try our JSX example again, with the codepen titled The simplest React example, introducing JSX - working with a transpile step.
Why is this important?
It’s important because we’ve achieved two things:
- We’ve successfully set up our simplest app to work with JSX
- We now understand how a vast majority of React examples on Codepen are set up
The second point is especially important, because it allows us to explore on our own. Such exploration is crucial, because it brings back the excitement of the unknown back into our learning.
Important note: In plain HTML, there are self-closing tags, such as <input>. However, in JSX, all the tags need to be closed. Thus an input tag in JSX must look like this: <input />.
Exercise: Find at least one interesting React Codepen
It’s time for another exercise.
Go to Codepen website, and type in “React” into the search box.
Browse through the examples, and try to find at least one example that you will be able to comprehend with your very limited understanding of React (currently!)
If you are pressed for time, here is one React codepen I’ve found appropriate:
Here’s the code of the above codepen.
The HTML:
1
<div id="app"></div>
The JS (Babel):
1
2
3
4
5
6
7
8
9
10
11
12
13
14
15
16
17
18
function Person (props) {
return (
<div className="person">
<h1>{props.name}</h1>
<p>Age: {props.age}</p>
</div>
);
}

let app = (

  <div>
    <Person name="Simeon" age="30" />
    <Person name="Liliya" age="31" />
  </div>
);

ReactDOM.render(app, document.querySelector('#app'));
The CSS:
1
2
3
4
5
6
7
8
.person {
display: inline-block;
margin: 10px;
border: 1px solid #eee;
box-shadow: 0 2px 2px #ccc;
width: 200px;
padding: 20px;
}
Obviously, the CSS is listed last because it’s almost irrelevant for our discussion.
Additionally, even this very simple example might seem a bit too advanced for us at this moment.
But let’s take a step back and analyze the code logically:
- There’s a
Personcomponent, and we’re passing it apropsparameter. You might not know this, but thepropsparameter is actually an object that holds all the properties that the component receives from its parent component. Feel free to runconsole.log(props)inside thePersoncomponent to inspect the receivedpropsobject. - The
Personcomponent returns some JSX syntax, with some funny JS-object-like code instead of plain text in theh1andptags. - The
appvariable uses some custom HTML elements in its JSX syntax, namely<Person>. - Finally, the call to
ReactDOM.render()method receives theappvariable and the call todocument.querySelector('#app').
Logically looking at the code above, even without understanding all the parts of the above app, we can see that props are simply the “HTML attributes” of name and age, passed to the custom Person constructor call.
Let’s now revisit our own example and try to re-purpose it to make our own implementation a bit more dynamic.
Making our simplest app a bit more dynamic
Before we make our simplest app more dynamic, let’s revisit the code as it was:
1
2
3
4
5
6
7
8
9
10
11
12
ReactDOM.render(

  <div class="purple">
    <h1 class="eighty">Hello World!</h1>
    <h2 class="seventy">Hello again</h2>
    <h3 class="fifty">Hello yet again</h3>
    <h4 class="fifty">Whatever</h4>
    <h5 class="fifty">I can do this all day</h5>
  </div>
  ,
  document.getElementById('app')
);
The way to make our code more dynamic is to “extract” all the text from each of the headings and save them as variables, like this:
1
2
3
4
5
6
7
8
9
10
11
12
13
14
15
16
17
const h1Hello = "Hello World!";
const h2Hello = "Hello again";
const h3Hello = "Hello yet again";
const h4Hello = "Whatever";
const h5Hello = "I can do this all day";

ReactDOM.render(

  <div className="purple">
    <h1 className="eighty">{h1Hello}</h1>
    <h2 className="seventy">{h2Hello}</h2>
    <h3 className="fifty">{h3Hello}</h3>
    <h4 className="fifty">{h4Hello}</h4>
    <h5 className="fifty">{h5Hello}</h5>
  </div>,
  document.getElementById("app")
);
You might be complaining that we’ve just replaced one thing for another, but actually, this is now a lot more dynamic.
The reason why the above code is a lot more dynamic might not be obvious, but what we did above is: we’ve separated the logic from the structure in our code.
More specifically, we’ve separated the JS logic (the const variable assignments) from the HTML structure (the actual code that will be rendered using ReactDOM.render()). We’ll see why this is important when we build a data-powered layout in an upcoming chapter. For now, let’s just remember that in React, we separate logic from the structure.
Here’s one huge takeaway from the above code: JSX is a combination of “regular” HTML and JavaScript code. The JavaScript code is separated from everything else using the opening and closing curly brackets: {}.
JSX combines HTML and JS, but also keeps them neatly separated
Let’s take a single line out of the code we’ve worked with in the previous section:
<h1 className="eighty">{h1Hello}</h1>
The above line starts with some static HTML: <h1 className="eighty">. Then it goes into the JavaScript part: {h1Hello}, and it ends up with another piece of static HTML: </h1>. This “dance” of HTML and JS is one of the reasons why JSX is so easy to work with. Whenever we need to run some JS we simply surround our code with the opening and closing curly brackets: { and }. That’s all there is to it!
When first met with this concept, it might be a bit hard to appreciate just how much we can do with it. For example, we could have written something like this:
<h1 className="eighty">{1 + 1}</h1>
… and the output in the real DOM would be: <h1>2</h1>.
We can even use some more advanced JavaScript, such as:
<h1 className="eighty">{new Date().getFullYear()}</h1>
This time, the output in the real DOM would be <h1>2022</h1>.
Even better, we can combine multiple pieces of JavaScript code, for example:
<h1 className="eighty">
  Today is: {new Date().toLocaleDateString("de")} and the temperature is{" "}
  {Math.floor(Math.random() * 30)} degrees Celsius
</h1>
This now brings us to another a-ha moment: while the above way to write JSX syntax is correct - it won’t throw errors - it’s not the best way to do it. The whole point of the separation of JS and HTML in JSX is that it allows us to write code so that it’s easy to read.
Thus, instead of writing our code as above, we could do it like this:
const date = new Date().toLocaleDateString("de");
const randomTemp = Math.floor(Math.random() * 30);
const h1Hello = `Today is: ${date} and the temperature is ${randomTemp} degrees`;
const h2Hello = "Hello again";
const h3Hello = "Hello yet again";
const h4Hello = "Whatever";
const h5Hello = "I can do this all day";

ReactDOM.render(
  <div className="purple">
    <h1 className="eighty">{h1Hello}</h1>
    <h2 className="seventy">{h2Hello}</h2>
    <h3 className="fifty">{h3Hello}</h3>
    <h4 className="fifty">{h4Hello}</h4>
    <h5 className="fifty">{h5Hello}</h5>
  </div>,
  document.getElementById("app")
);
We can take this even further, and add as complex code as we might need.
For example, here’s a short snippet from my book A Better Way to Learn JavaScript: Useful Snippets:
const randomBool = Math.random() > 0.5 ? "It is true" : "It is false";
Now we can repurpose it so that it looks like this:
const randColor = Math.random() > 0.5 ? "blue" : "red";
And now we can use it in our example app:
const randColor = Math.random() > 0.5 ? "blue" : "red";
const h1Hello = `Hello, my favorite color is ${randColor}.`;
const h2Hello = "Hello again";
const h3Hello = "Hello yet again";
const h4Hello = "Whatever";
const h5Hello = "I can do this all day";

ReactDOM.render(
  <div className="purple">
    <h1 className="eighty">{h1Hello}</h1>
    <h2 className="seventy">{h2Hello}</h2>
    <h3 className="fifty">{h3Hello}</h3>
    <h4 className="fifty">{h4Hello}</h4>
    <h5 className="fifty">{h5Hello}</h5>
  </div>,
  document.getElementById("app")
);
Dynamically changing the background color of a div in React based on user input
We don’t have to stick to only text nodes in our DOM. Consider the following example:
const userColor = prompt("Type an HTML color");
const h1Hello = "Hello World!";
const h2Hello = "Hello again";
const h3Hello = "Hello yet again";
const h4Hello = "Whatever";
const h5Hello = "I can do this all day";

ReactDOM.render(
  <div className="purple" style={{"background-color": userColor}}>
    <h1 className="eighty">{h1Hello}</h1>
    <h2 className="seventy">{h2Hello}</h2>
    <h3 className="fifty">{h3Hello}</h3>
    <h4 className="fifty">{h4Hello}</h4>
    <h5 className="fifty">{h5Hello}</h5>
  </div>,
  document.getElementById("app")
);
If a user typed a named HTML color such as tomato or orange, the background of the rendered div would update accordingly.
This example is available as a Codepen titled: Dynamically changing the background color of a div in React based on user input.
Exercise: add your own dynamic JavaScript in JSX
Feel free to play around with the dynamic example starter Codepen: The simplest React example, introducing JSX (it’s dynamic). Try adding some dynamic JavaScript code and saving it in a variable, then using it inside the ReactDOM.render() method call, similar to what we’ve done in this chapter.
That’s it for this chapter.
In the next chapter, we’ll learn how to rebuild a starter app using the create-react-app module in our local environment.

