Building Bootstrap 4 layouts, part 9: Build another Bootstrap layout in Angular
In this article we'll cherry-pick Bootstrap components to quickly build a Bootstrap 4 layout with Angular 8
By: Ajdin Imsirovic 06 October 2019
This is the nineth of 20 articles in the Building Bootstrap 4 Layouts article series.
 Photo by
Mae My on Unsplash.com
Photo by
Mae My on Unsplash.com
Up to this point in the Building Bootstrap Layouts article series, we’ve built seven layouts:
- A basic demo of containers
- A shoe-themed demo of rows
- Another shoe-themed site, using components. We saw how to make it responsive with the help of meta tags. This layout is the first one that actually started looking like a real layout.
- Based on the official Album layout, we’ve built a custom Album layout.
- A pricing table layout, based on a premium theme’s pricing layout
- A tweaked Checkout form layout, based on the official one
- A typography-focused layout
The goal is to build 20 layouts in this series, but we’re actually going to see the final missing peace of the puzzle, which will enable us to build many more layouts than 20. Before we do that, let’s go back to see what we’ve covered so far.
We started easy, with containers and contextual colors. We learned about rows and responsive columns.
We then introduced Bootstrap 4 components.
We learned how to use the layouts found on the official Bootstrap examples page to build our first customized Bootstrap 4 layout.
We next saw how to copy features from premium themes and then tweak them to truly make them our own.
We got to know the Koala app for easy SCSS to CSS compilation - and we saw how to quickly update layout examples on the official docs by changing the values of SCSS variables in Bootstrap 4.
We started using the Brackets code editor and combined the techniques learned up to that point to build a completely custom layout, Movies & Typography. We learned how to import Google fonts, revisited containers, talked about mockups, worked with Bootstrap’s utility and spacing classes, discussed columns, responsive images, and source ordering.
Finally, in the previous article, we introduced Angular as a way to improve our process. We saw how to avoid repeating ourselves with Angular. We introduced modularity. We further simplified working with SCSS, using Angular.
In this article we won’t build a whole new layout. We’ll just take a few components from the official documentation, and whip up a layout.
Here are the steps we’ll take:
- Start building a new Angular app on Stackblitz
- Split each section of the layout into its’ own component, then import them via the app module and app component’s html file
Let’s get started!
1. Start building a new Angular app on Stackblitz
In the previous article, we covered how to use Stackblitz in detail. We also covered how to split and how to import sections of a website in Angular.
Thus, in this article, let’s just speed trhough the Angular app setup.
Setup a new Angular 8 app on Stackblitz
Let’s open a brand new Angular 8 app on Stackblitz.
To track the changes to our code more efficiently, we’ll use Github.
Since this is a beginner’s series of articles, I’m assuming you haven’t heard of Github, so I’ll keep it really simple. Github is just a way to take snapshots of an app at certain points in app development.
Which points exactly? It’s completely up to us! Whenever we feel like it, we can take a snapshot of our app, called a commit. Github is using the Git system, built by Linus Torvalds of Linux.
So, once we take this snapshot of a page (i.e a commit), we can then save that change on Github. The place where all these commits live is called a repository. Thus, a repository on Github will have any number of commits for a given project, ordered chronologically.
This makes perfect sense, because a repository is like a time-machine for certain points in the development of your project.
Using Github on Stackblitz
It’s really easy to get started with Github on Stackblitz, because it’s integrated right on the Stackblitz interface. In this article however, I’m not suggesting that you even sign up. You can just inspect the commits I’ve made while building this layout.
Thus, the first commit of this project is the default Angular 8 app on Stackblitz. This link will open in my own repository for this Stackblitz app.
This first commit might look a bit overwhelming, because it simply lists all the files added to the app when it was started. As we’ve learned in the previous article, there’s quite a lot of files in a default starter Angular app.
However, every new commit is going to be much smaller, and you’ll be able to easily see what happened at each commited update to our app.
We’ll see that next, when we remove redundant files from our default starter Angular 8 app.
Removing redundant files
We’ll begin by removing the Hello component:
- delete
hello.component.html - remove it from the
declarationsarray inapp.module.ts - remove its import from
app.module.tstoo - delete the
<hello>custom tag fromapp.component.html
Rather than explainin every single line of code where we deleted traces of the Hello component, let’s just see the commit for it.
Here’s a screenshot of the above-linked commit:
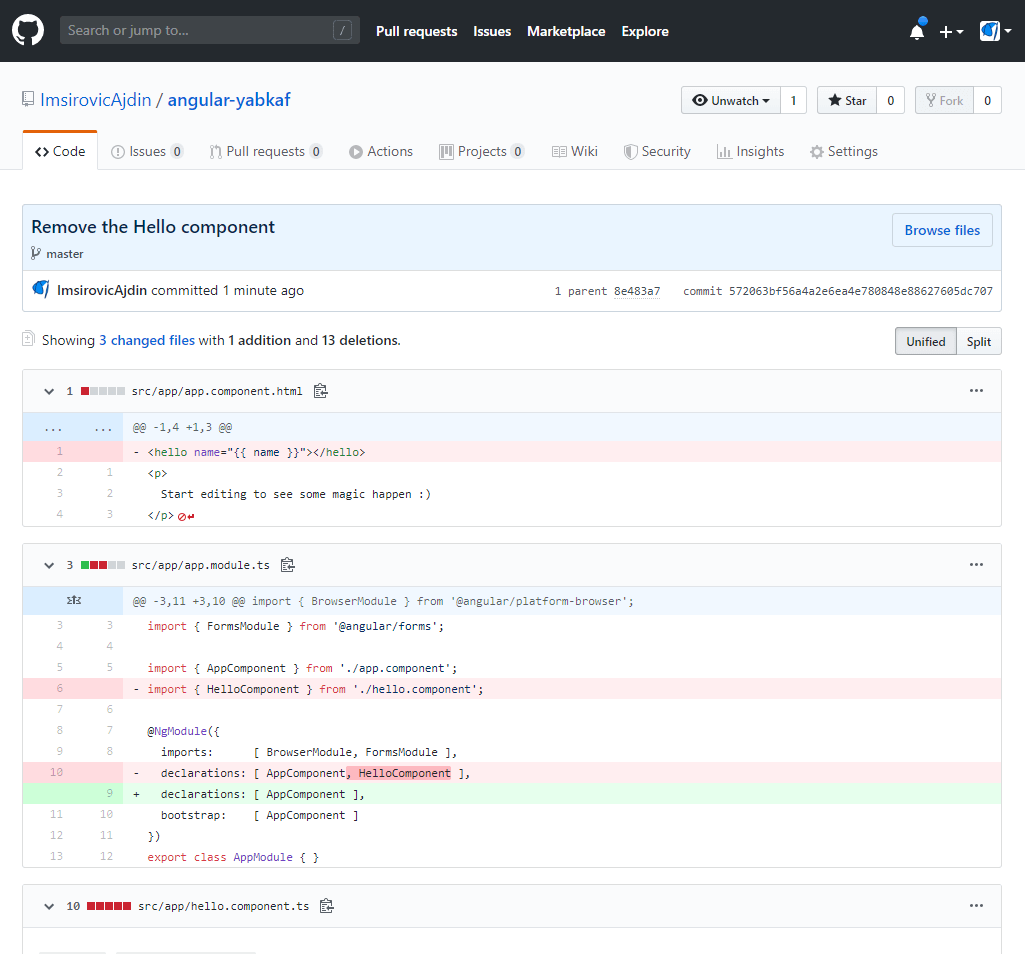
Now it’s much easier to understand what’s happening in our app at this moment in time.
Looking at the above screenshot, it says that there were 3 changed files. The lines and bits of code that were removed are highlighted in red. The additions are highlighted in green.
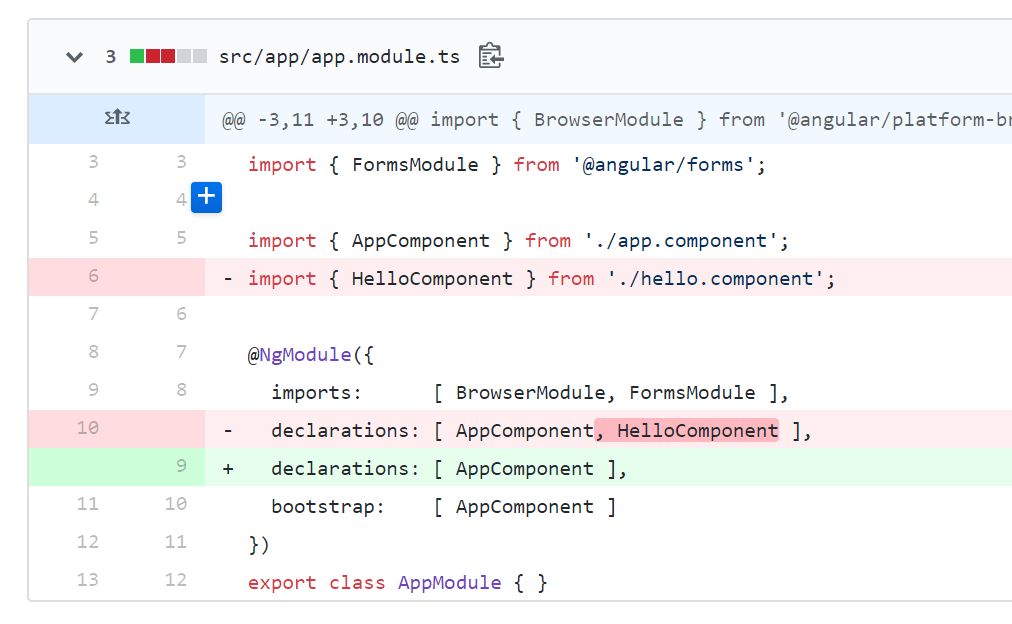
Looking at the declarations array inside app.module.ts, you will see both a removal and an addition:
You might think: “This is wrong, we didn’t add anything, we just removed code!”, and you’d be right. That’s exactly what happened.
But Git doesn’t look at it that way.
If you have removed only a part of a line of code rather than the entire line, Git will see it as both an addition and a removal:
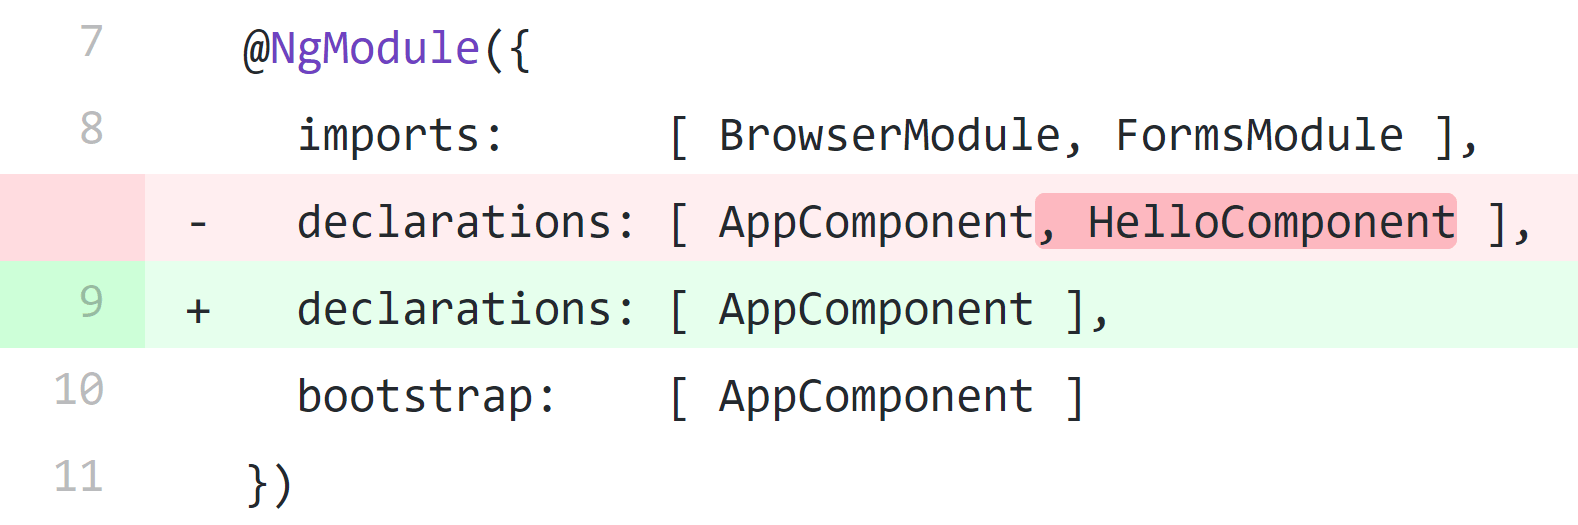
If you look at the above screenshot, it helps to note the line numbers. Or, rather, the line number. Line number 9, to be precise.
The line number 9 is split on two lines:
- the first, red line, shows the code before the removal (with the removed item highlighted with a darker red background)
- the second, green line, shows the code after the removal
If you think about it, Git’s way of looking at deletions might actually make more sense.
The takeaway here is that if you see a red line and then a green line, and there’s only one line number for both lines, that means that a bit of this line was removed in the code. Another way to look at it: the green line will always be shorter - by the number of characters that got removed in the commit.
Let’s look at the entire commit screenshot again:
Looking at it again, we see there were 3 changed files:
- the
app.component.htmlfile, where we removed the line that starts with<hello>... - the
app.module.tsfile, where we removed the import and theHelloComponententry in thedeclarationsarray - the entire
hello.component.tsfile
As for the third file, the hello.component.ts file, you can see it’s deleted - it says so right under the “Load diff” link in the file’s panel (at the bottom of the commit):
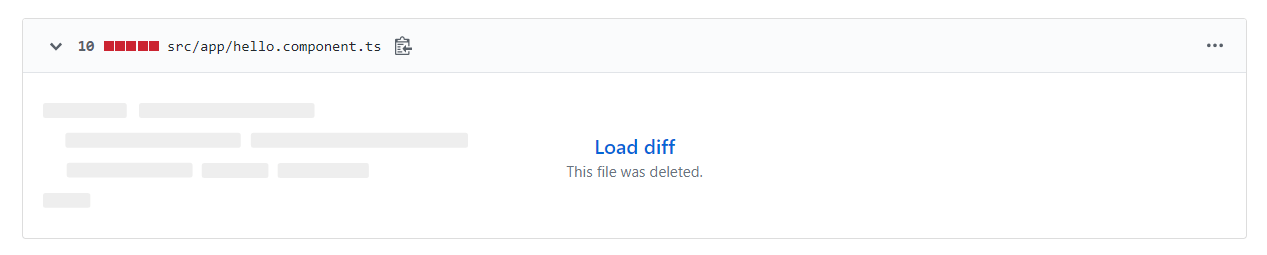
If you click on the “Load diff” link, you’ll see the entire deleted file’s code. That’s sometimes useful, just to inspect the code that was removed, if you’re trying to better understand what happened at a certain stage of an app’s development.
Great, so we’ve just seen how Github and Git commits work and can be viewed.
We still have another file to remove: the app.component.css file. Here’s a commit with this file removed. The commit is titled Delete app.component.css.
If you inspect the changes in this commit, you’d see the following:
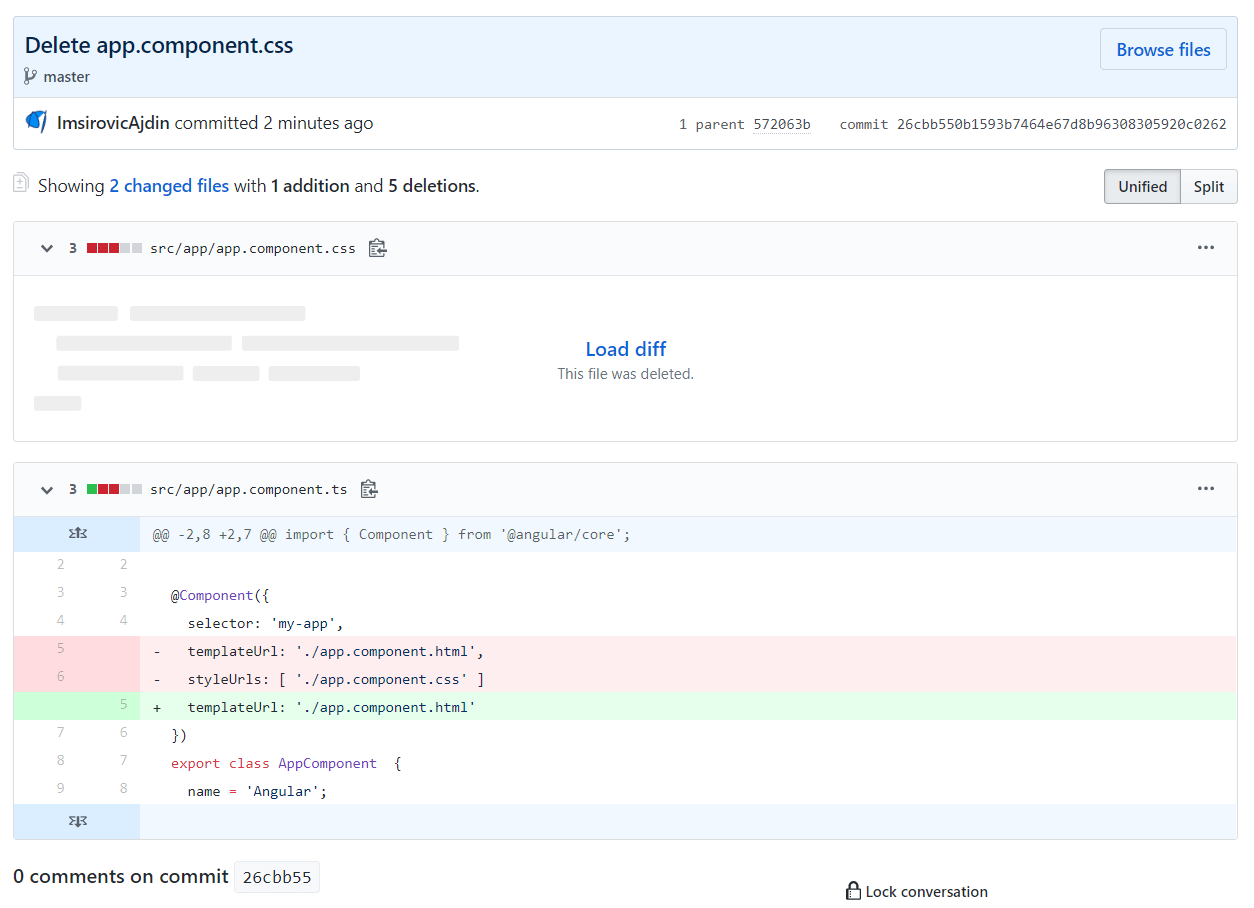
When I said we’re just going to delete the app.component.css file above, you might have thought that that’s literally what was going to happen. Well, that is what happened, but we also had to delete the styleUrls: [./app.component.css'] line from the @Component decorator of the app.component.ts file.
This shows us the utility of commits in Git: A nicely-worded commit, with only a few changes to our codebase, can greatly improve the understanding we get from what was happening with our app at any given time.
This goes back to what we discussed in the previous article: speed.
Properly worded commits, that don’t involve too many changes, are great to speed up our analysis of what was going on at any given time during the coding of our app.
It’s also great for learning - such as in this article - to quickly see what changes needed to be made to achieve a certain web layout feature.
That’s why we can now speed things up, using commits and commit messages as our guides.
Moving app.component.html and app.component.ts to a new folder
Just like in the previous article, we’ll take our app component and move it into a separate folder, so that only the app.module.ts stays in the root of the app folder.
The new folder that we’ll move our app component to is called app-component.
Adding Bootstrap from a CDN
In this section, we’re adding Bootstrap from a CDN.
Adding the navbar component
Now we’ll add the navbar component.
Adding the jumbotron component
Let’s copy paste the first example from the official Bootstrap docs’ jumbotron documentation.
We’ll make a new component and use the copied HTML in its template file. The new component’s commit title is: Add jumbotron component.
Adding the cards component
We’re also adding a couple of cards components from the section titled Using grid markup, on the official docs. The commit title is Add the cards component.
Adding the footer component
In the previous article, we’ve seen how to add the footer component. I enourage you to fork our current Angular app, and try adding the footer yourself.
Once again, feel free to have a look at our Angular app’s repo.
In this article, we’ve introduced Git and Github. We’ve also practiced quickly prototyping a Bootstrap layout by copy-pasting components from the official docs.
In the next article, we’ll go back to a more old-school way of building Bootstrap layouts. We’ll build one locally, and this time we’ll use Git on the desktop.

